step by step install Oracle 21c RAC database
零 前置条件
1 硬件设备条件
1.1 物理机环境
2台服务器:每台机器内存至少8GB以上;
共享存储:每台机器都可以正常访问该存储设备;
网络设备:每台服务器至少双网卡;连接私网的网络设备最好(必须)经由交换机连接,不要直连;
建议有足够多的内存,存储够大、硬件够power的机器。
成本高,不太容易实现,尤其是需要一套共享存储设备,可以给多台机器同时访问。
1.2 虚拟机环境
成本较低,相对好实现,通过虚拟机技术可以完成。
主机内存至少16GB以上,磁盘100GB可用空间;
2 软件技能条件
对Oracle数据库有基本的了解和使用经验,如了解体系架构和运行原理最好。掌握常用的Unix、Linux操作系统基础知识和管理维护经验,比如管理存储设备,网络配置,DNS配置,安装配置软件等。
一背景说明
本文档用于记录,如何利用Oracle虚拟机软件virtualBox技术,来一步一步安装配置双节点Oracle 21C RAC数据库环境。
二环境介绍
1 软件清单
CentOS 7.9+VirtualBox+Oracle Enterprise Linux 7.6+Oracle 21C
2 物理主机host
24核CPU,64GB内存服务器,运行CentOS 7.9系统。在这个机器上安装Oracle的virtual box虚拟机软件。
[root@centos-master ~]# uname -rm
3.10.0-1160.76.1.el7.x86_64 x86_64
[root@centos-master ~]# cat /etc/redhat-release
CentOS Linux release 7.9.2009 (Core)
[root@centos-master ~]# free -m
              total        used        free      shared  buff/cache   available
Mem:          64380       31018         548        3347       32814       29534
Swap:             0           0           0
[root@centos-master ~]#
3 虚拟机软件VirtualBox
5.0版本
[root@centos-master ~]# virtualbox --help Oracle VM VirtualBox Manager 5.0.40 (C) 2005-2017 Oracle Corporation All rights reserved. Usage: --startvm <vmname|UUID> start a VM by specifying its UUID or name --separate start a separate VM process --normal keep normal (windowed) mode during startup --fullscreen switch to fullscreen mode during startup ...

3 虚拟机操作系统guestOS
Oracle Enterprise Linux 7.6
[root@21cnode1 ~]# uname -rm
4.14.35-1818.3.3.el7uek.x86_64 x86_64
[root@21cnode1 ~]# cat /etc/oracle-release
Oracle Linux Server release 7.6
[root@21cnode1 ~]# cat /etc/redhat-release
Red Hat Enterprise Linux Server release 7.6 (Maipo)
[root@21cnode1 ~]#
4 Oracle software
grid clusterware: LINUX.X64_213000_grid_home.zip
Oracle database: LINUX.X64_213000_db_home.zip
下载地址:https://www.oracle.com/database/technologies/oracle-database-software-downloads.html#19c
5 ip规划
规划
| node | public ip | private ip | virtual ip |
|---|---|---|---|
| 21cnode1.localdomain | 172.16.11.211 | 10.10.10.211 | 172.16.11.213 |
| 21cnode2.localdomain | 172.16.11.212 | 10.10.10.212 | 172.16.11.214 |
scan IP: 172.16.11.241,172.16.11.242,172.16.11.243,172.16.11.244
三 总体思路
1 在CentOS 7.9物理机上安装Oracle VirtualBox虚拟机软件
2 通过virtual box创建1台模板虚拟机template
3 配置template虚拟机
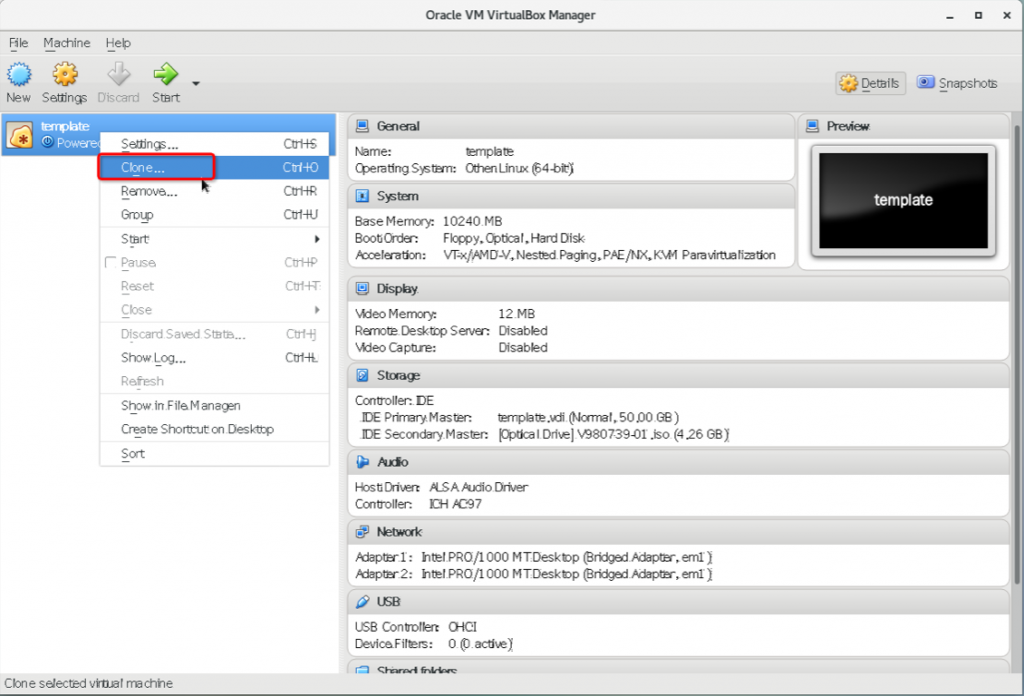
4 通过template虚拟机clone 2台虚拟机:21cnode1、21cnode2
5 配置共享存储
6 配置2台虚拟机
7 创建ASM磁盘
8 配置DNS服务器,解析SCAN IP
9 安装grid集群软件
10 安装Oracle软件
11 DBCA创建并测试RAC数据库
四 动手实战
1 安装Oracle VirtualBox虚拟机软件
具体操作略。
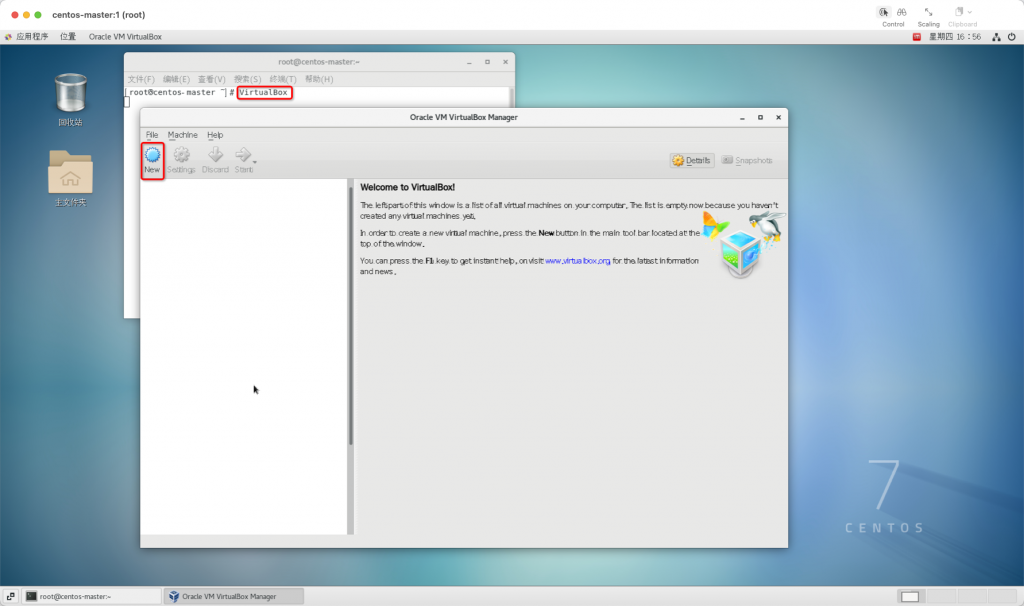
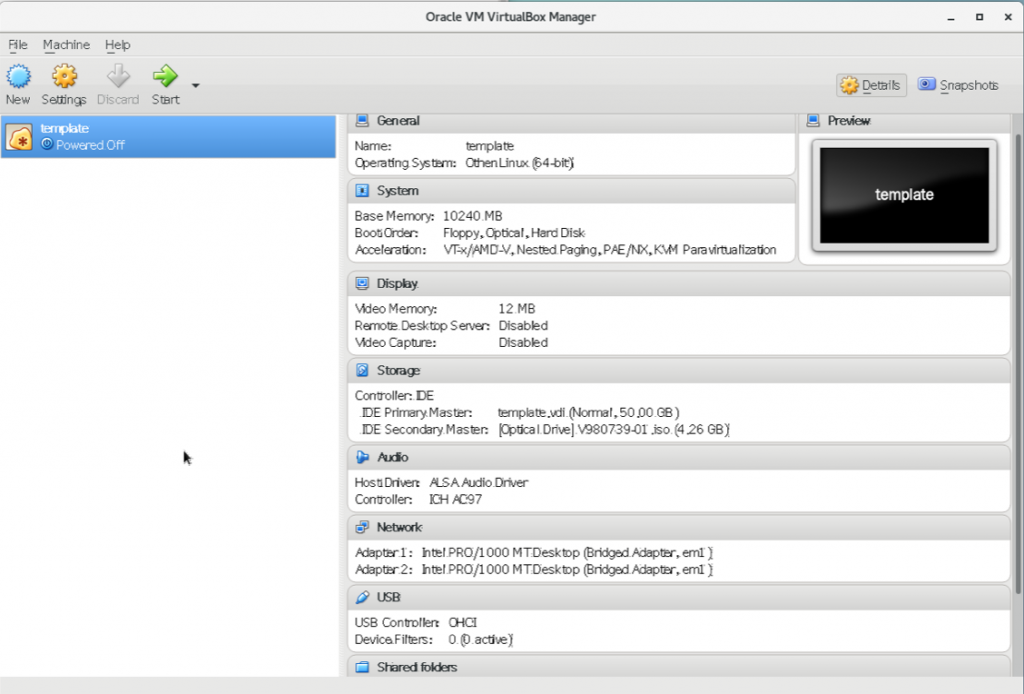
2 通过virtual box创建1台模板虚拟机template
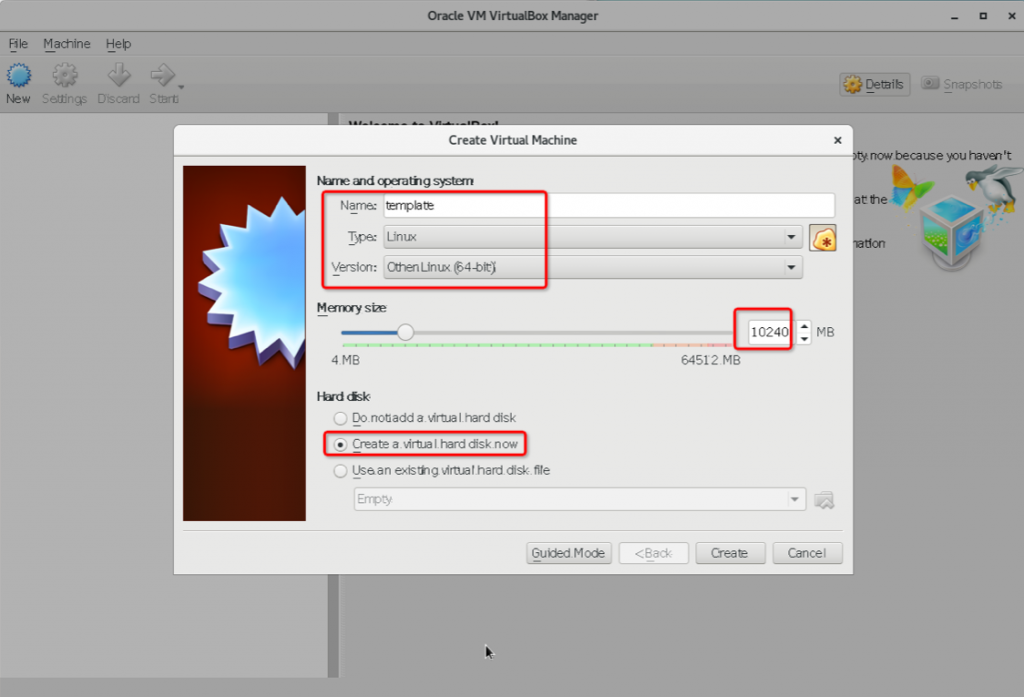
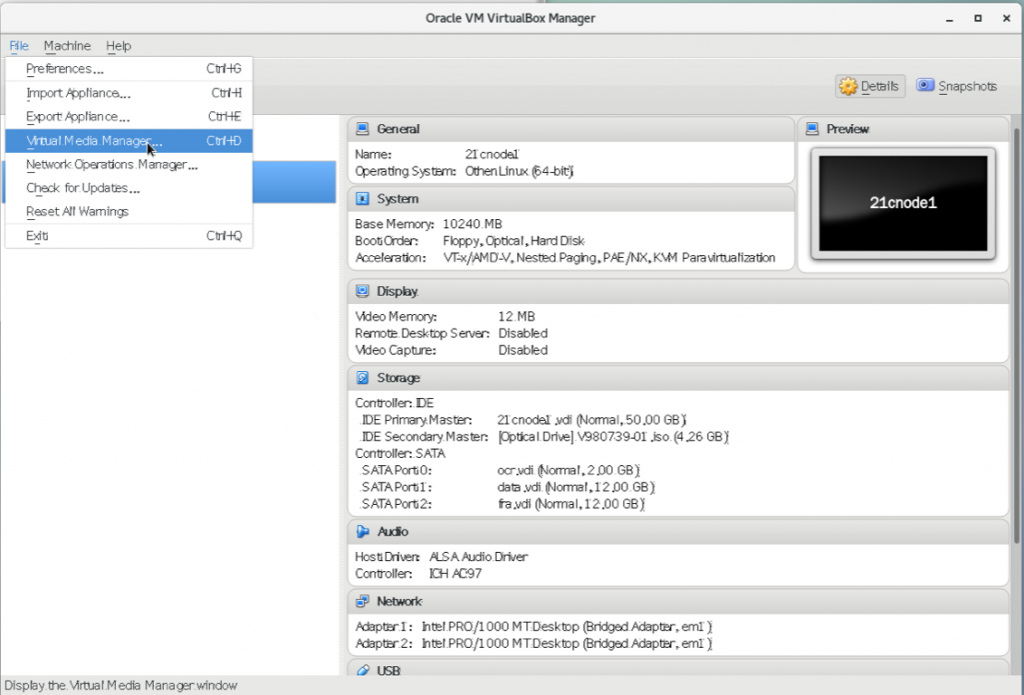
单击NEW创建虚拟机:
输入虚拟机的名字template,类型选择Linux,版本选Oracle Linux64位,内存务必指定10240MB大小:
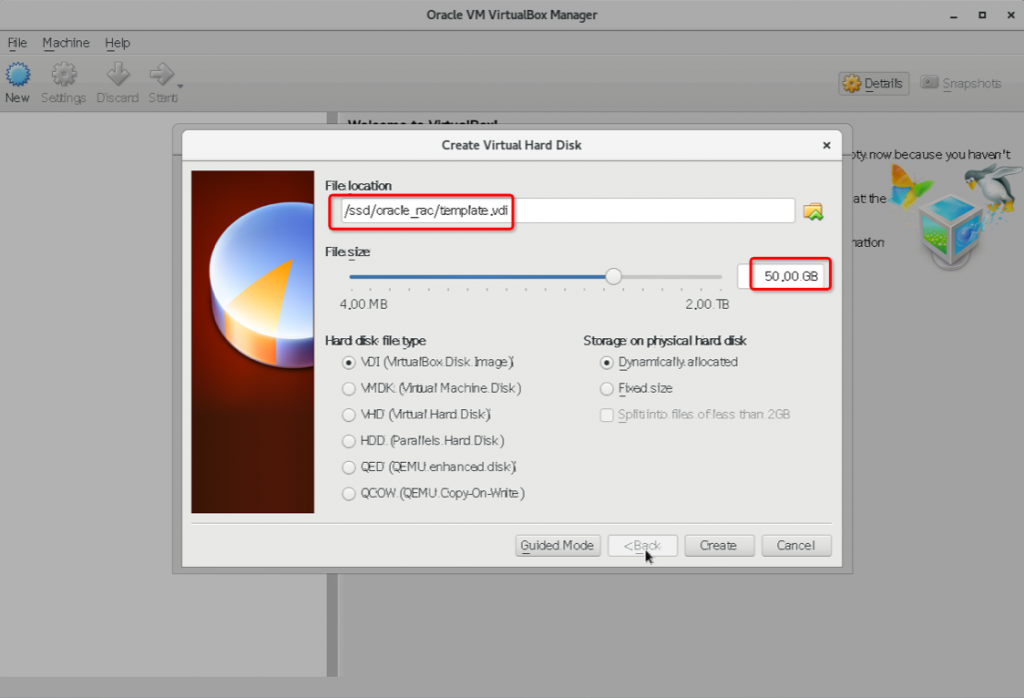
指定磁盘大小为50GB:
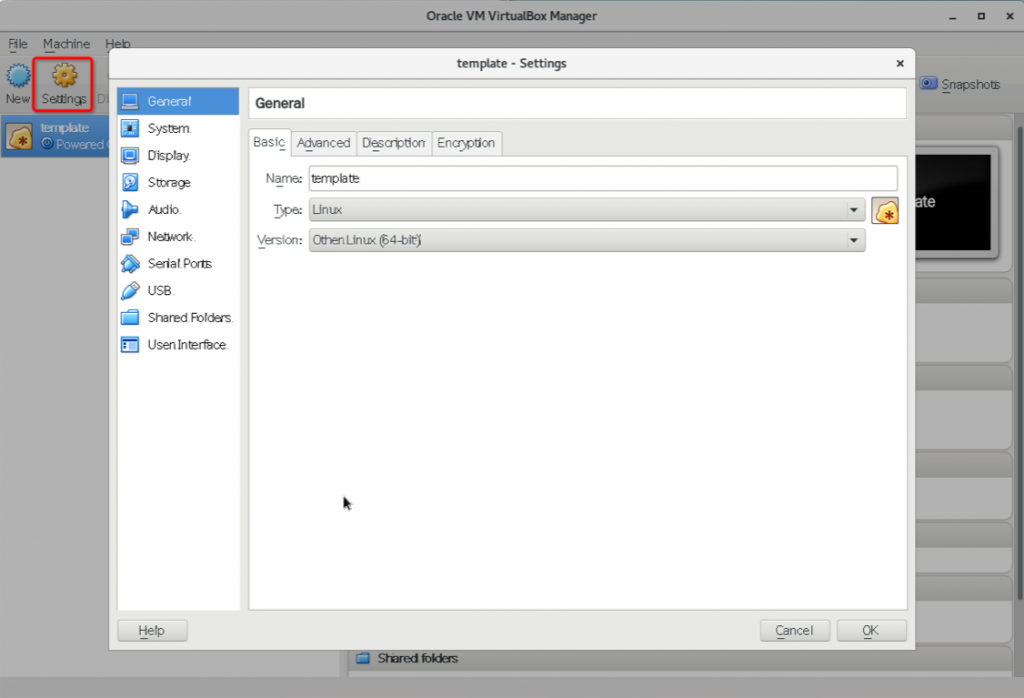
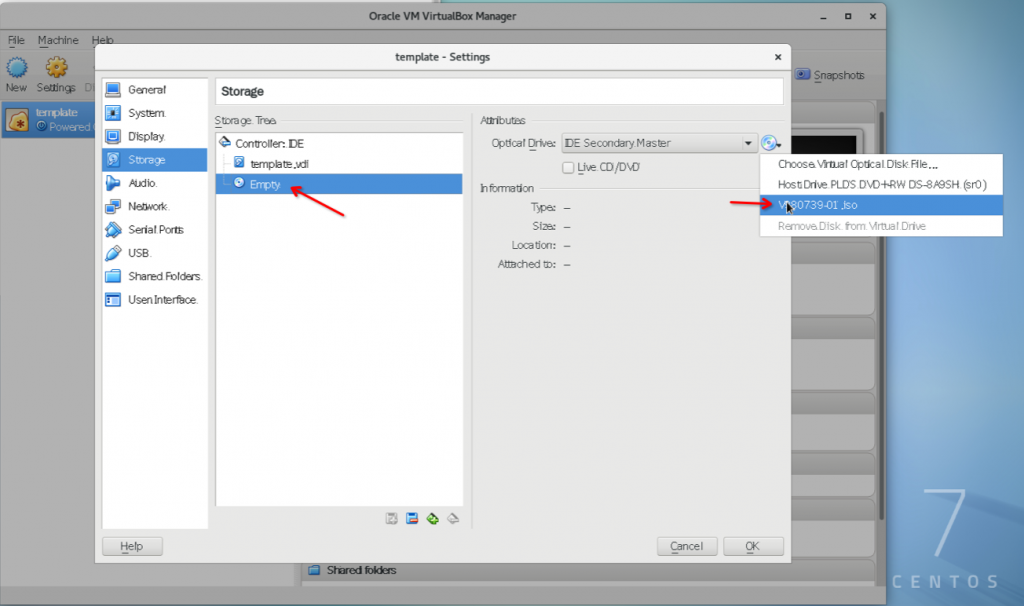
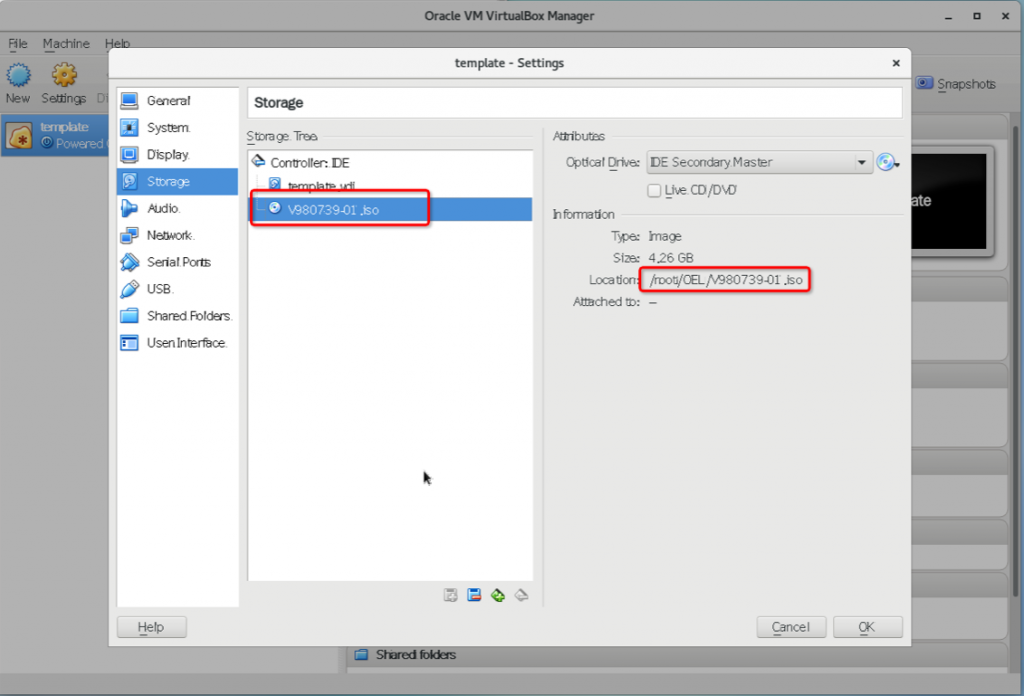
点击settings,对虚拟机进行设置:
指定虚拟机启动的虚拟光驱ISO文件:
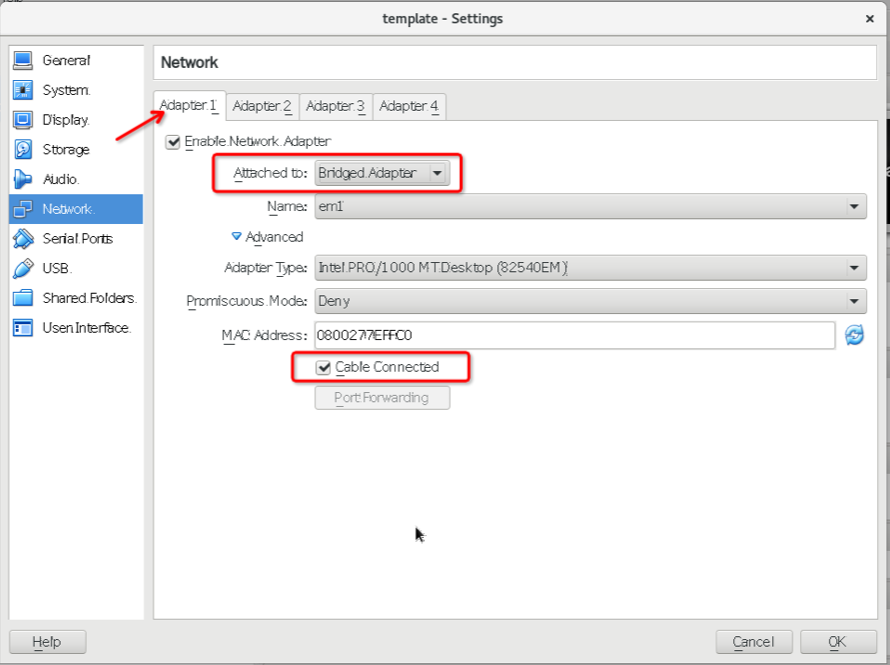
设置虚拟机第一块网卡:
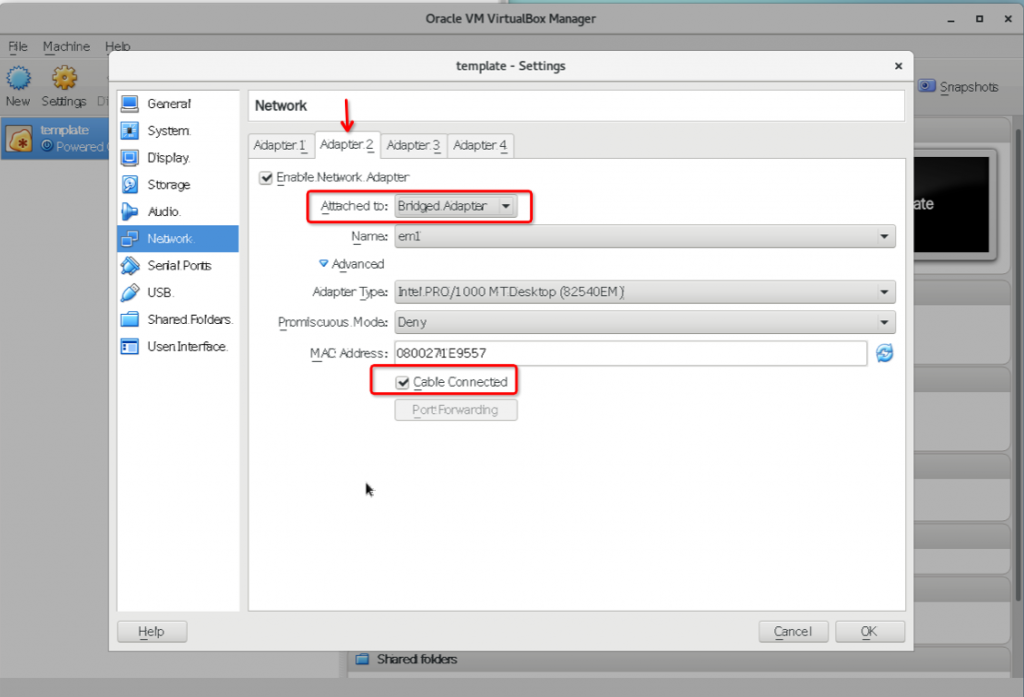
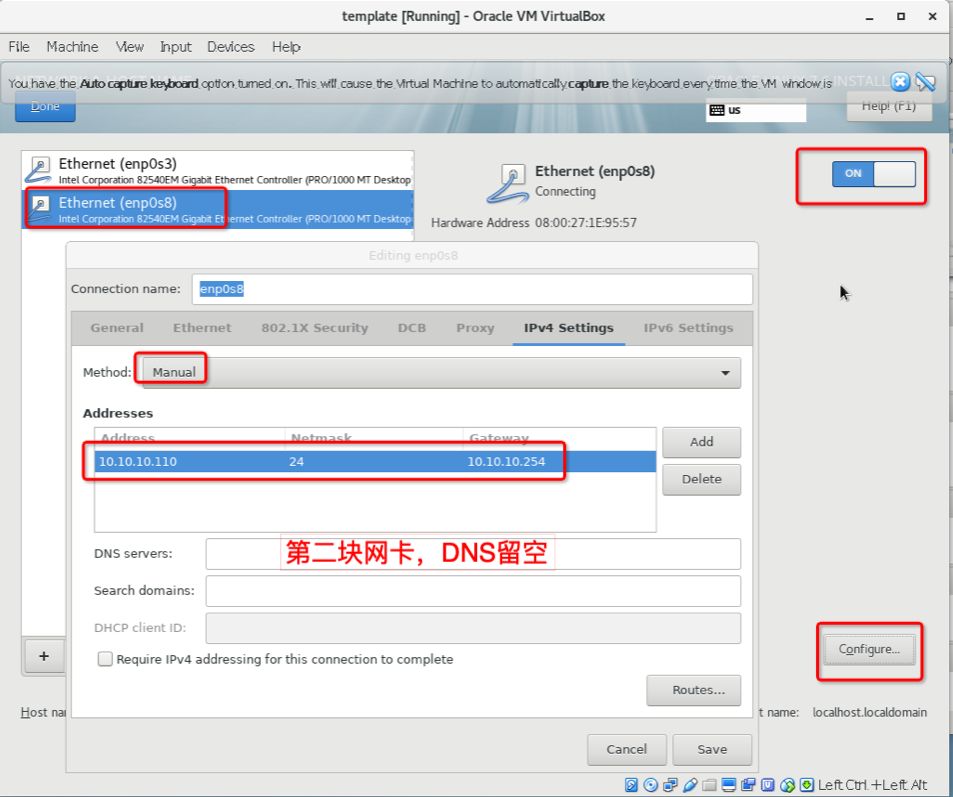
设置虚拟机第二块网卡:
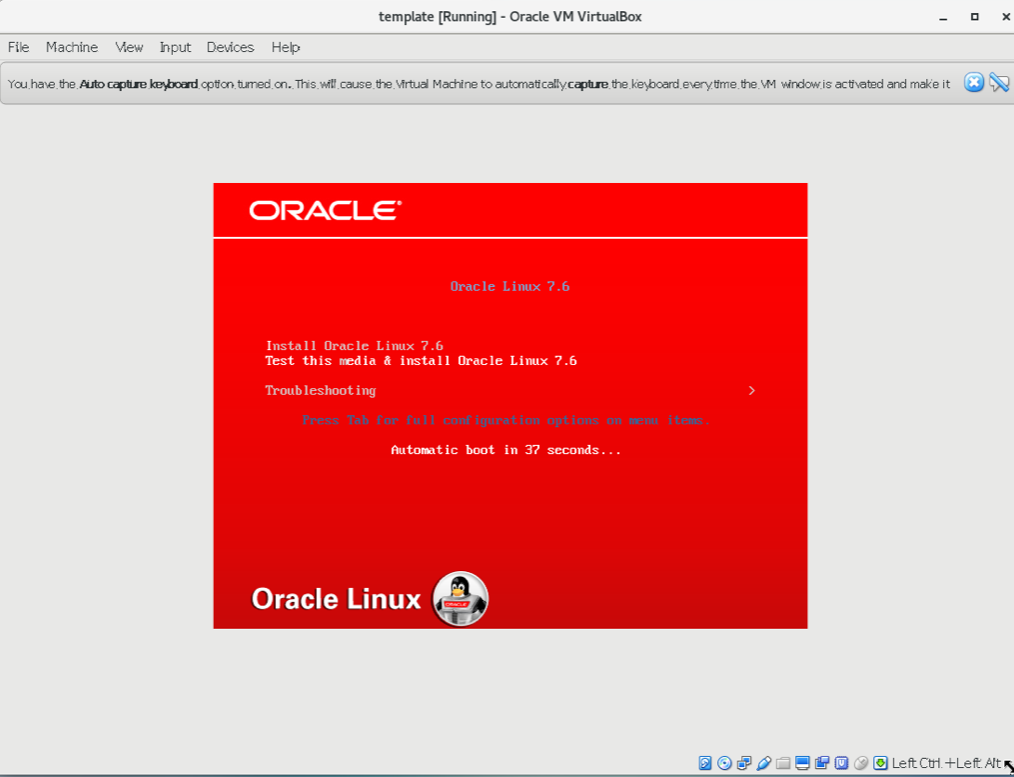
设置之后的虚拟机配置,点击绿色按钮的start,启动虚拟机:
进入虚拟机操作系统的安装阶段:
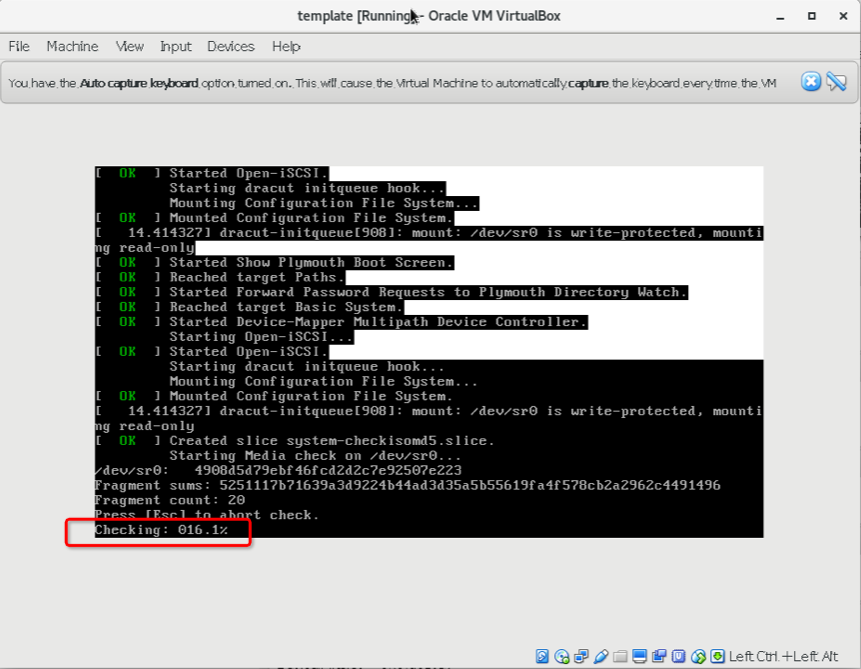
执行虚拟光驱中的文件校验,可以按ESC跳过检查:
选择虚拟机的语言:
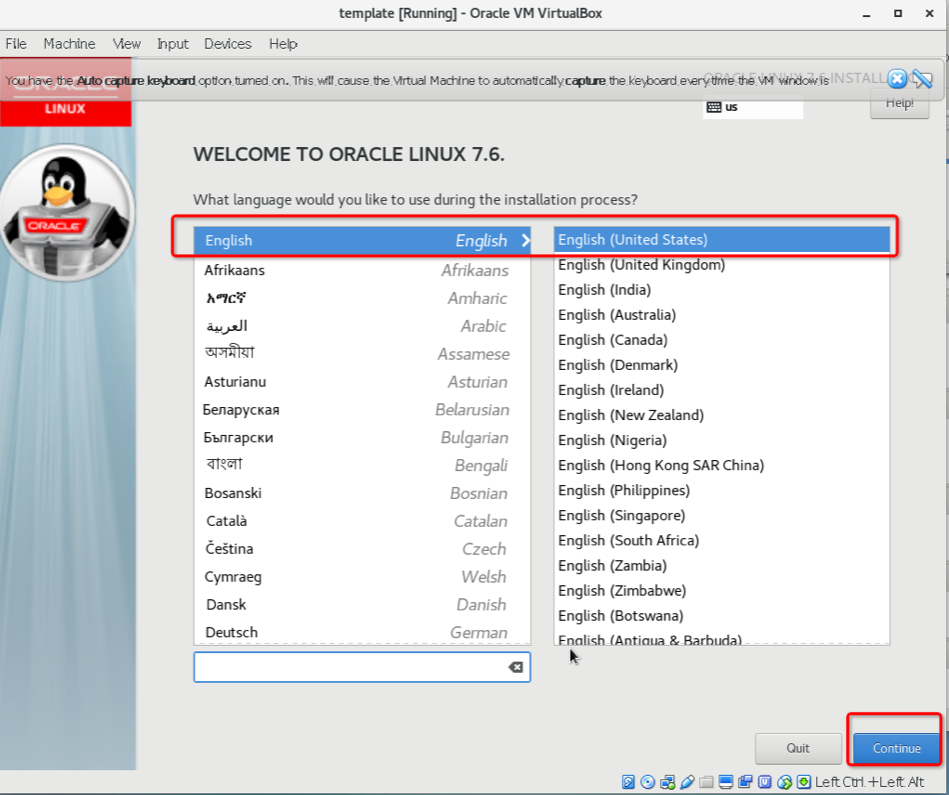
点击continue,选择软件安装:
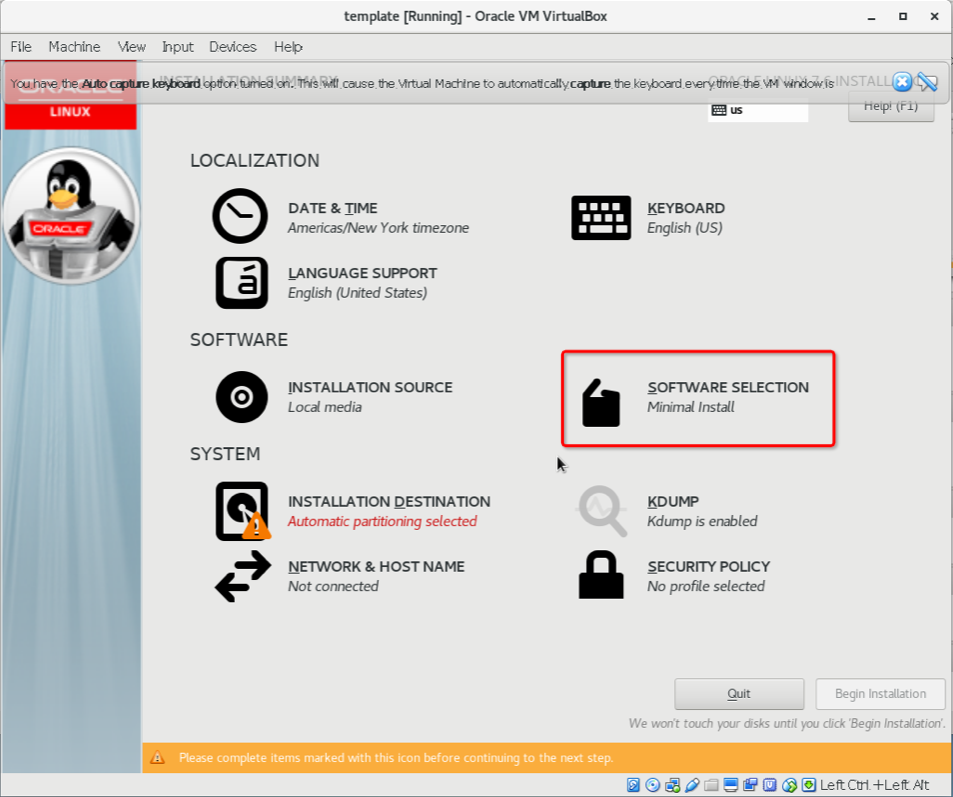
选择要安装的基础环境和软件包,这里选择带有图形界面GUI的Server,并选择性能工具包、兼容library库文件包、开发工具包、系统管理工具包。这将为后续安装配置Oracle RAC数据库时,提供了很多必要的软件包。
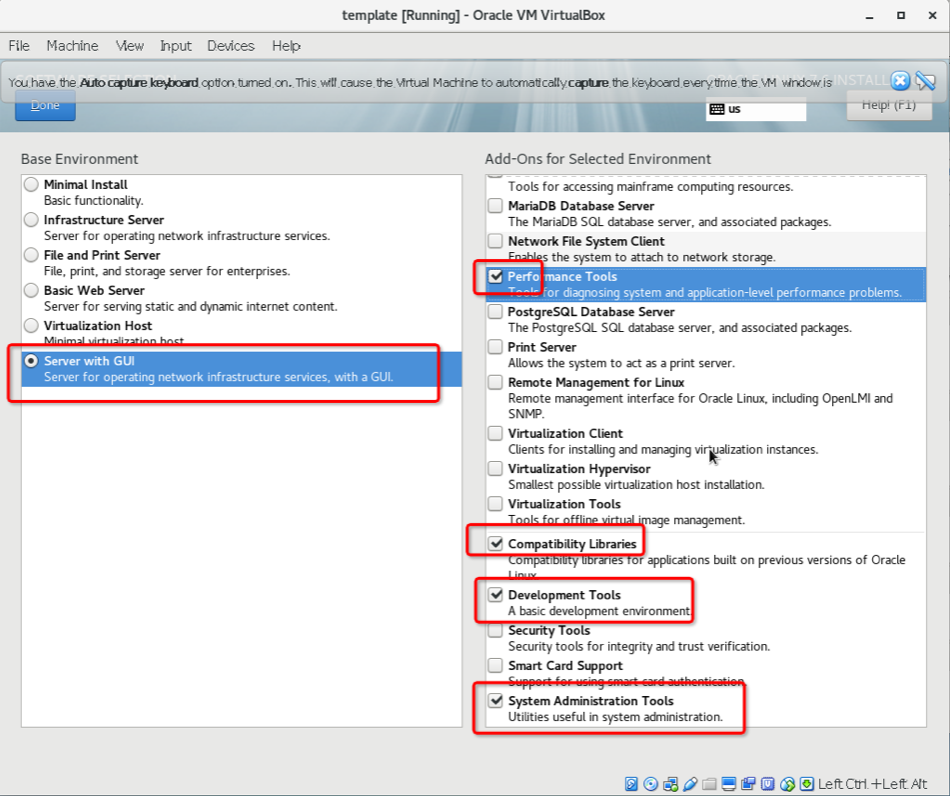
选择软件安装路径:
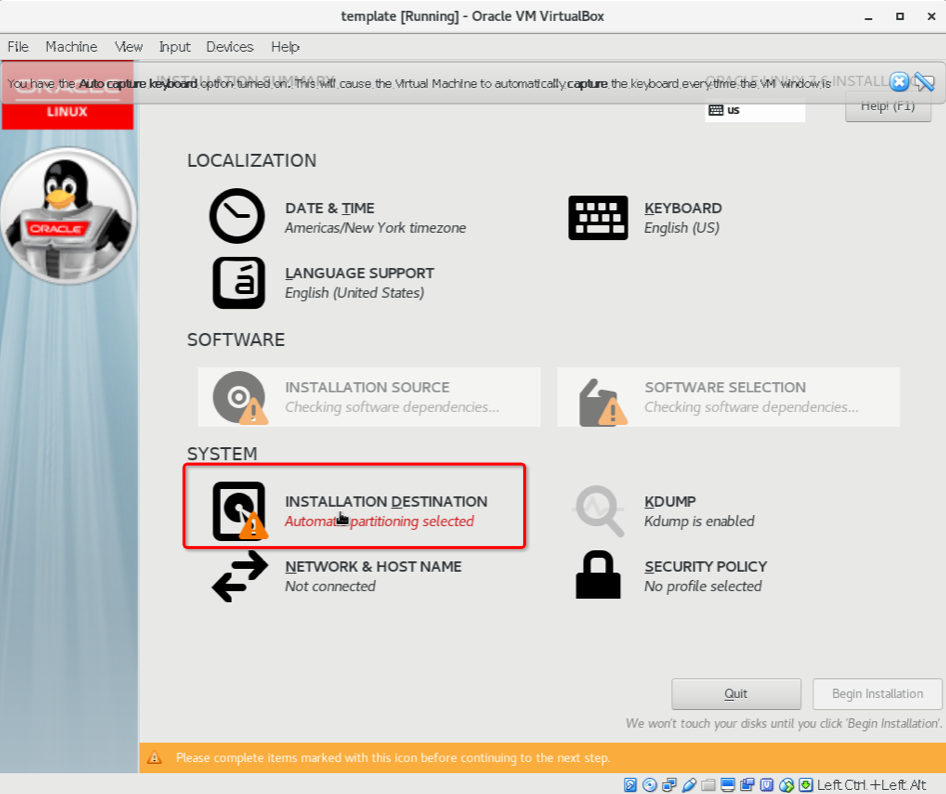
这里选择自己配置操作系统的磁盘分区:
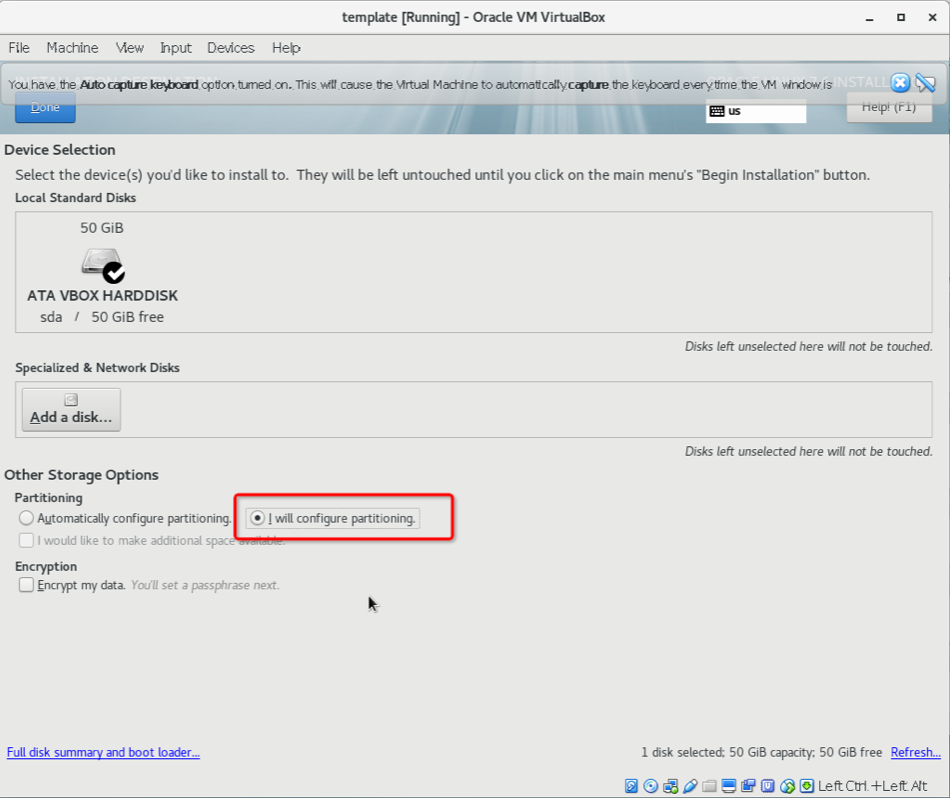
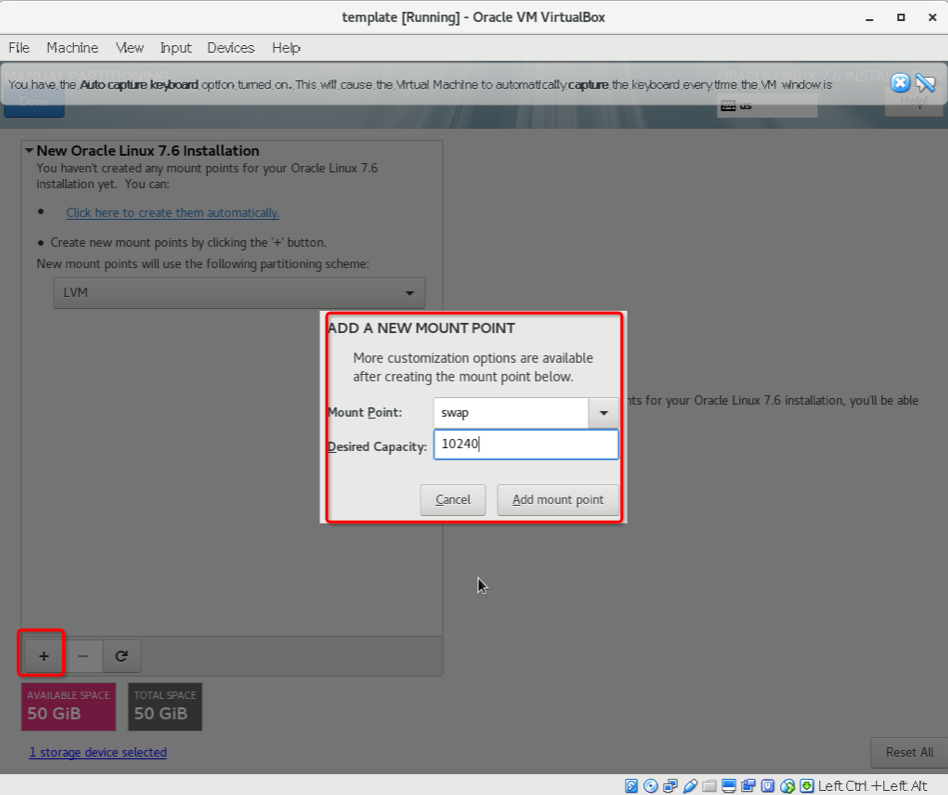
先创建一个大小为10GB的SWAP交换分区:
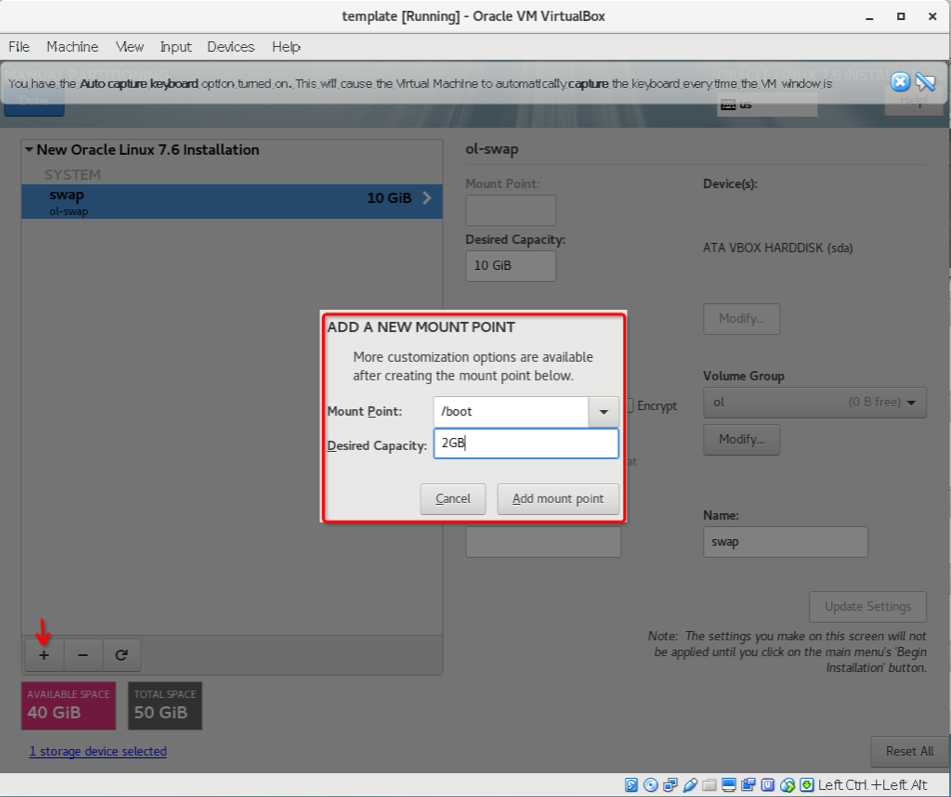
再创建/boot分区,大小为2GB:
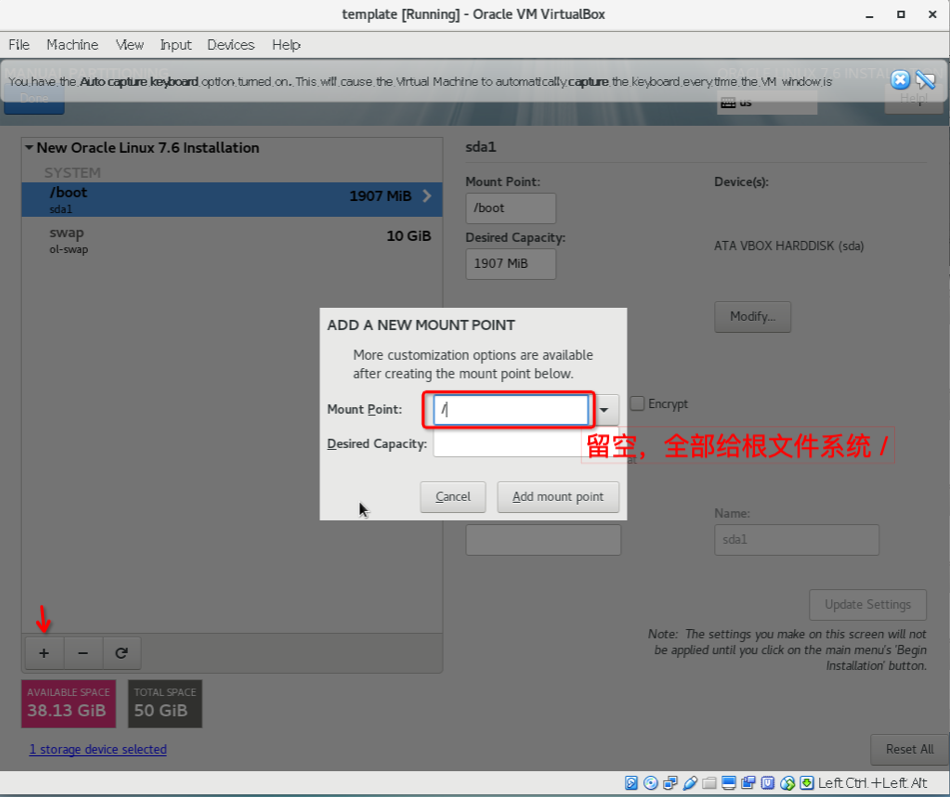
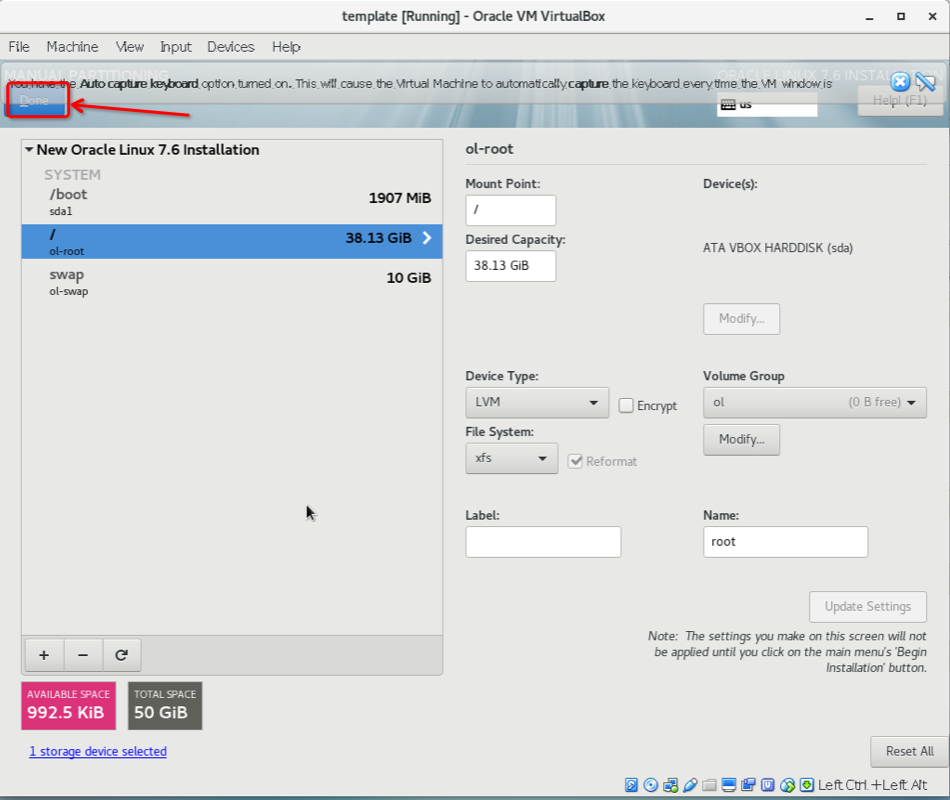
最后创建根分区/,剩余磁盘空间全部给根分区:
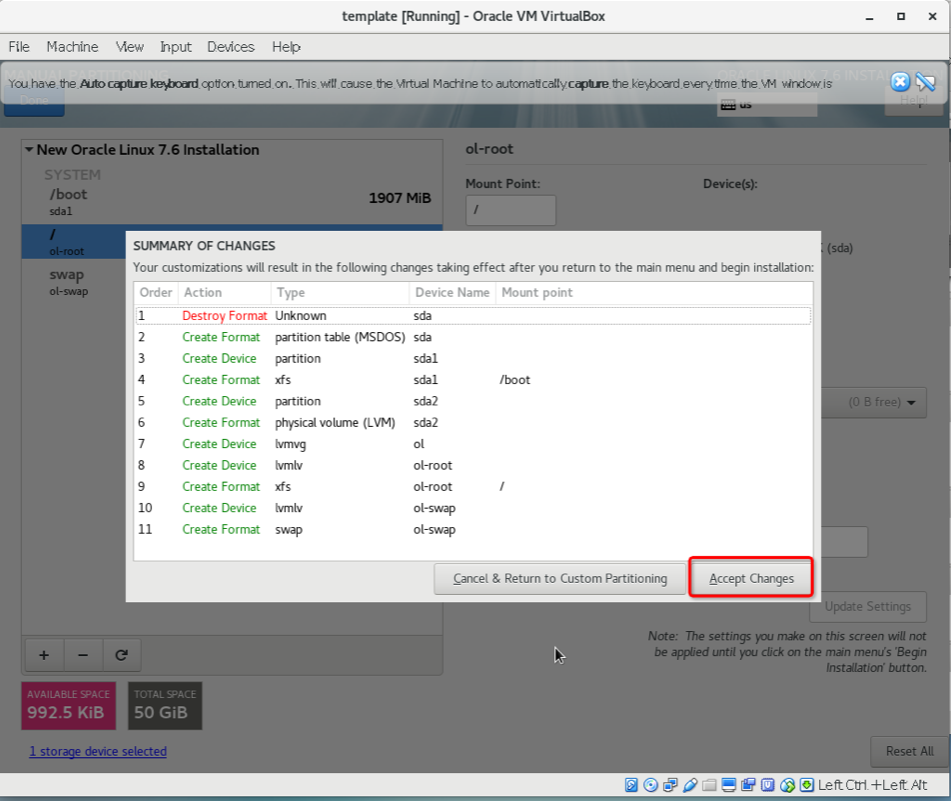
点击done:
选择接受磁盘分区变更:
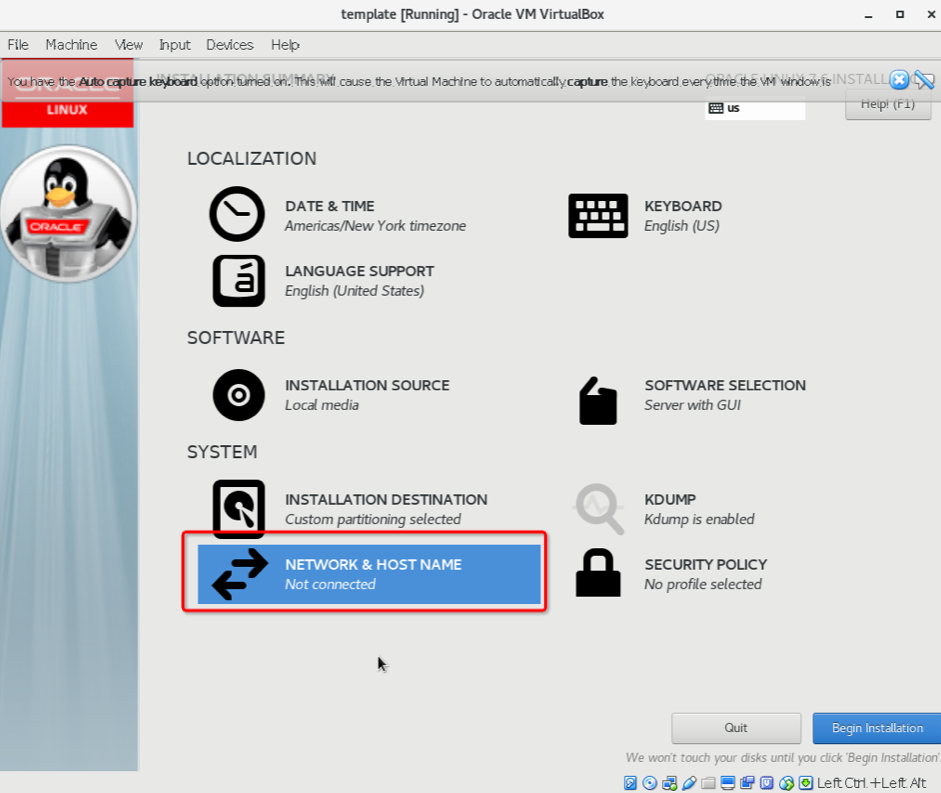
接下来配置网卡和主机名:
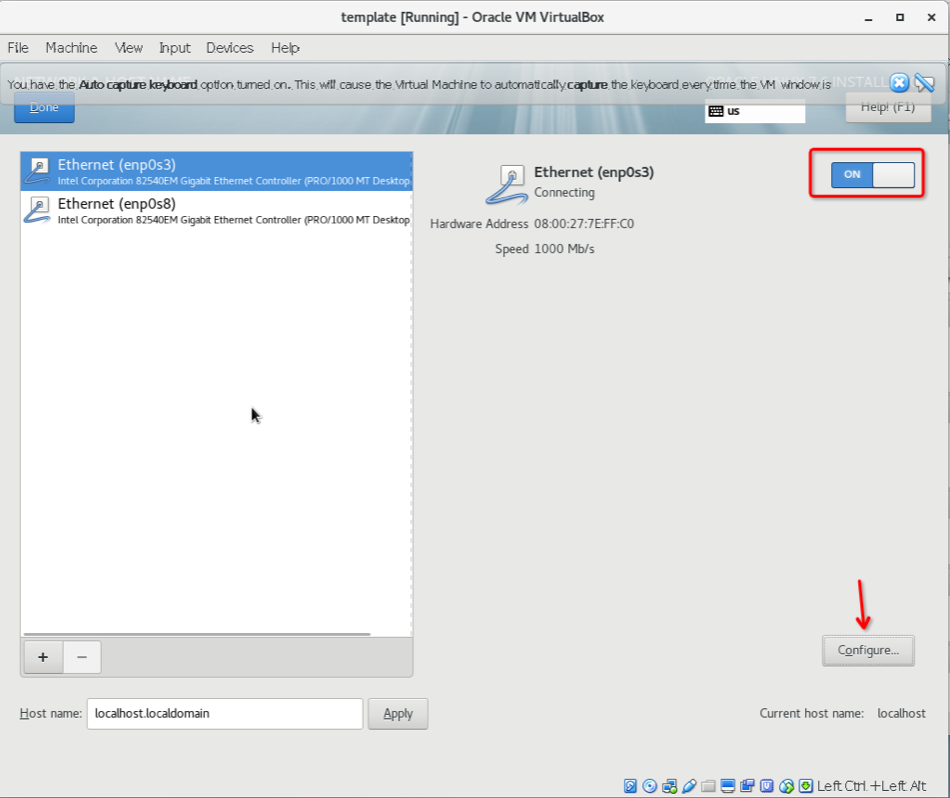
配置第一块网卡,置为启用状态ON:
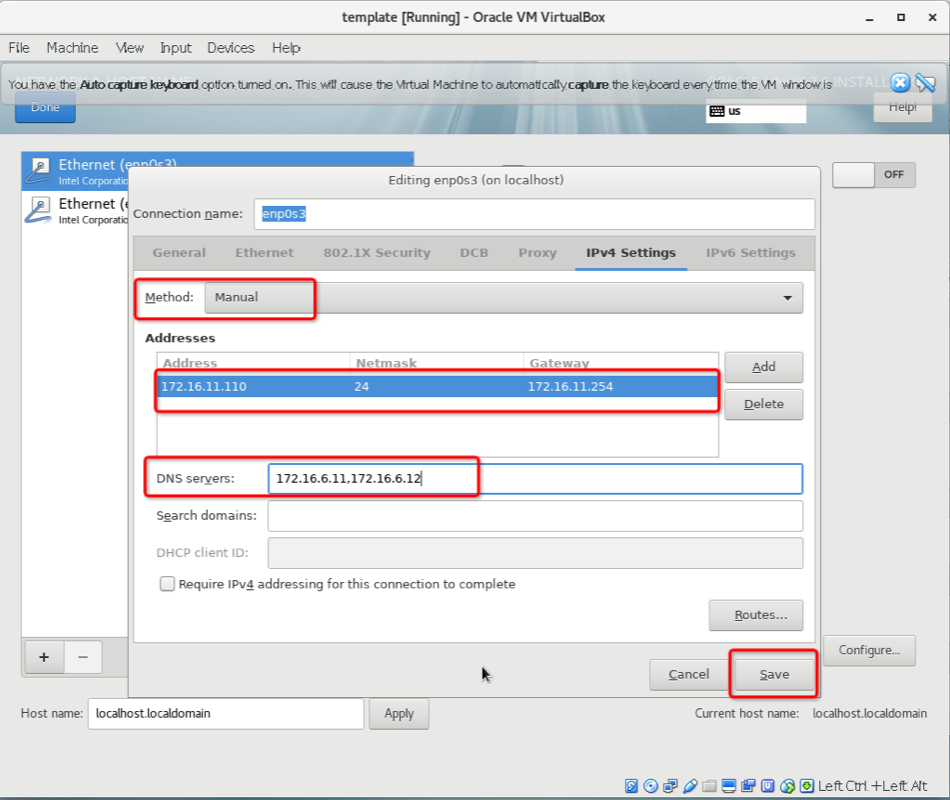
设置第一块网卡,手工指定IP地址,地址:172.16.11.110,掩码:255.255.255.0 gateway:172.16.11.254,dns:172.16.6.11,172.16.6.12,将来我这个虚拟机需要通过该IP地址访问互联网,所以这里需要配置DNS服务器:
设置第二块网卡地址:10.10.10.10,掩码255.255.255.0,网关10.10.10.254:
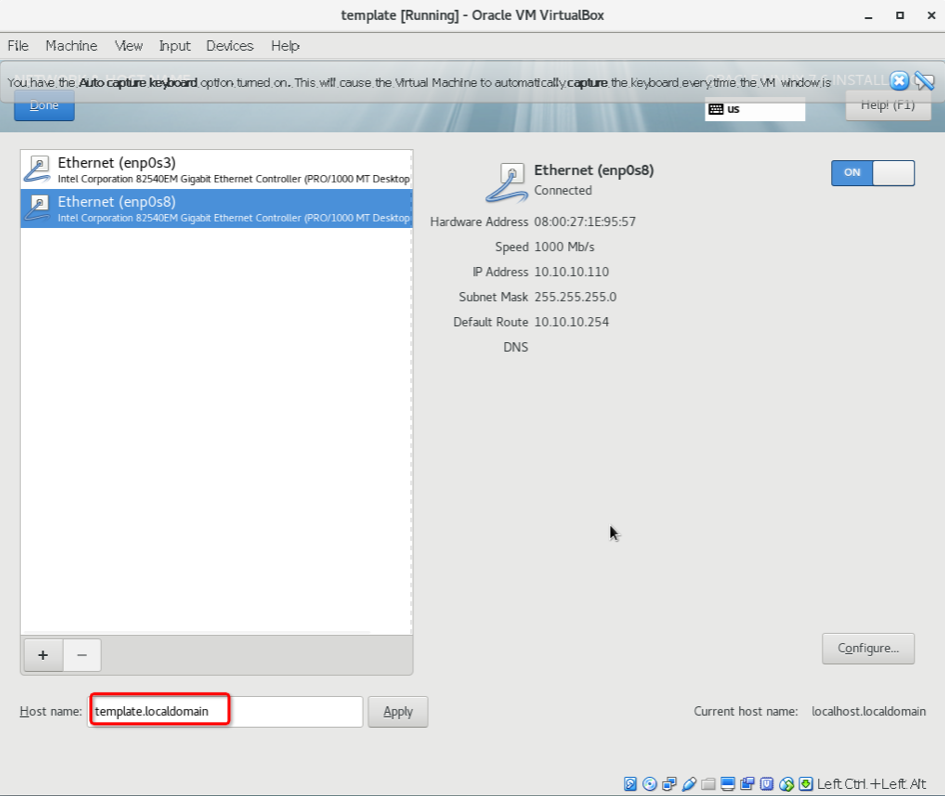
设置主机名:template.localdomain
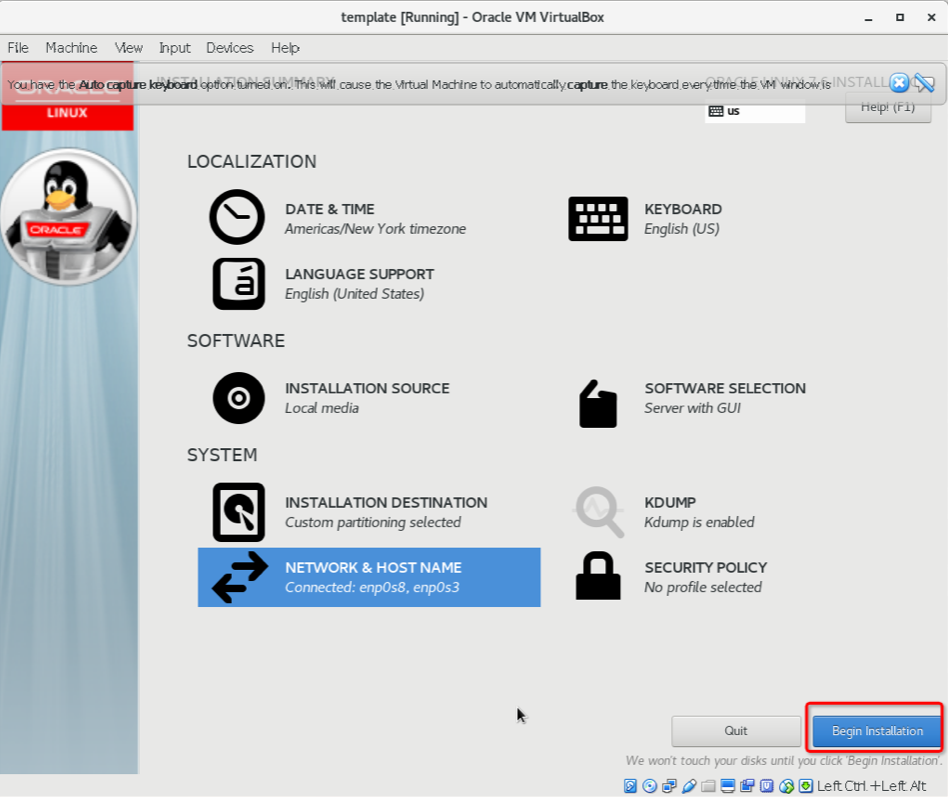
点击开始安装:
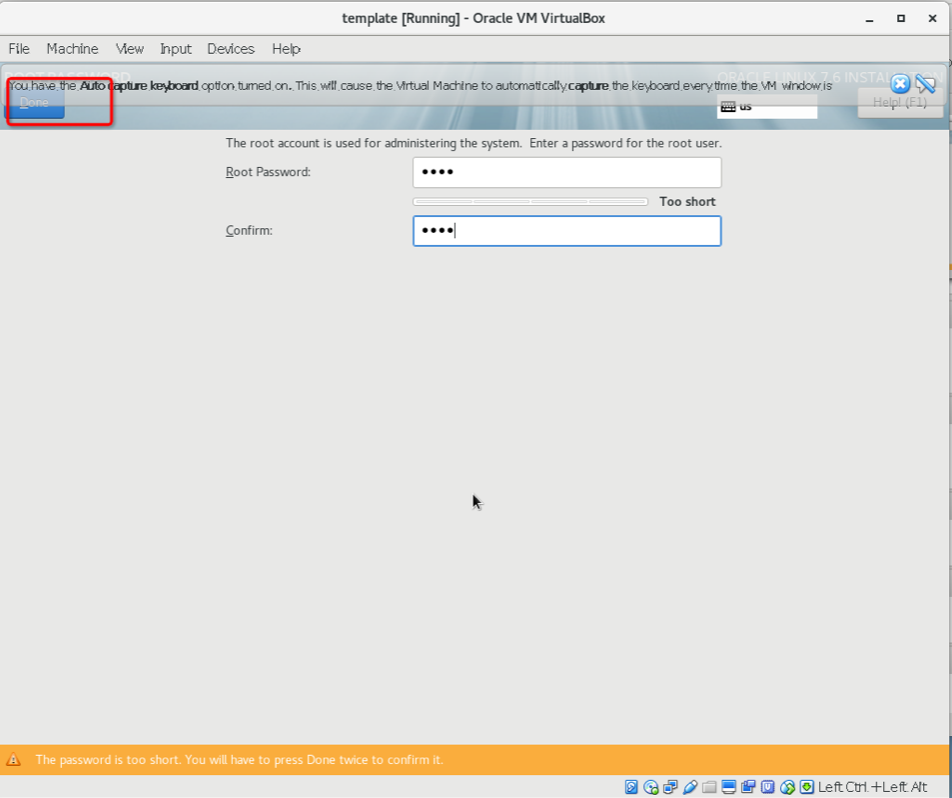
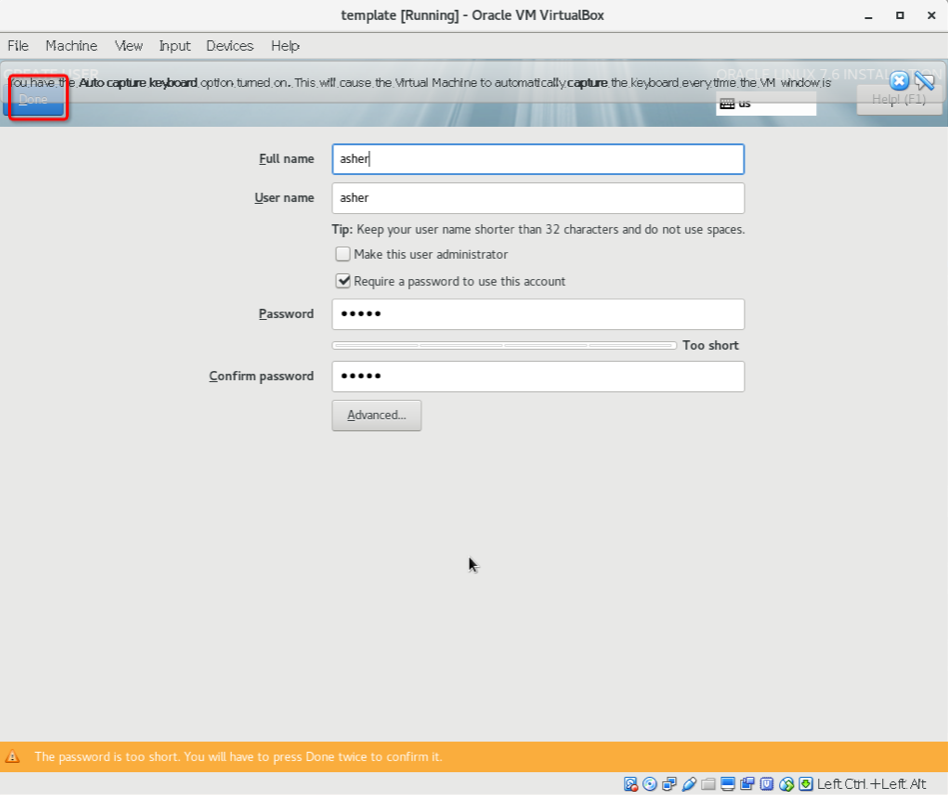
接下来设置root用户的口令,

修改root用户:
添加普通用户:
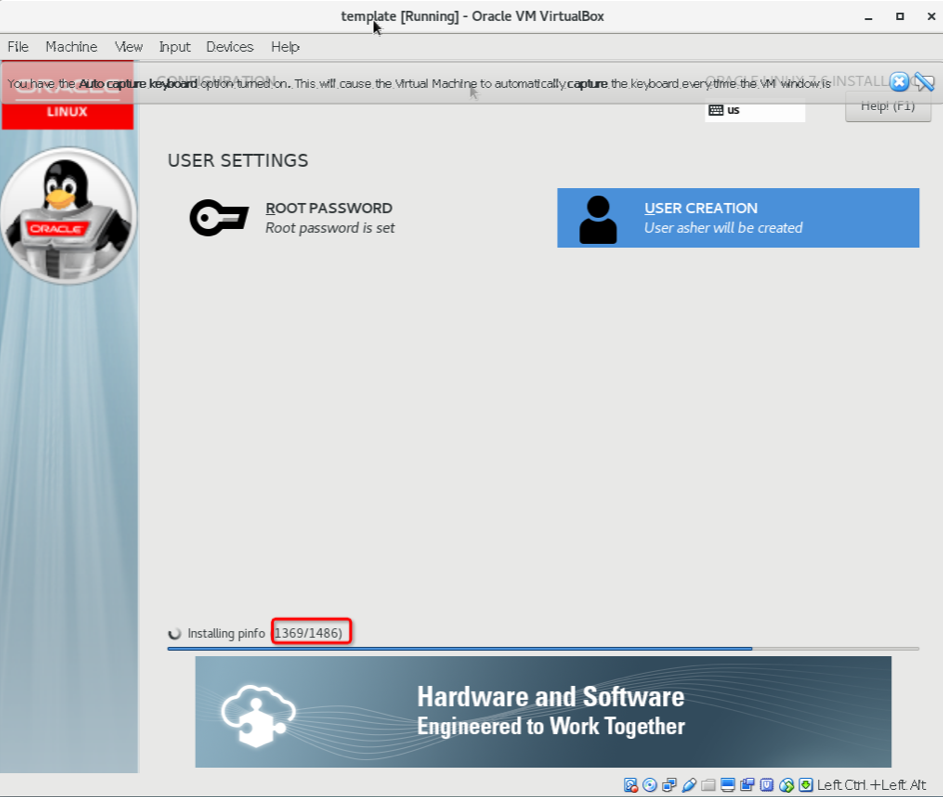
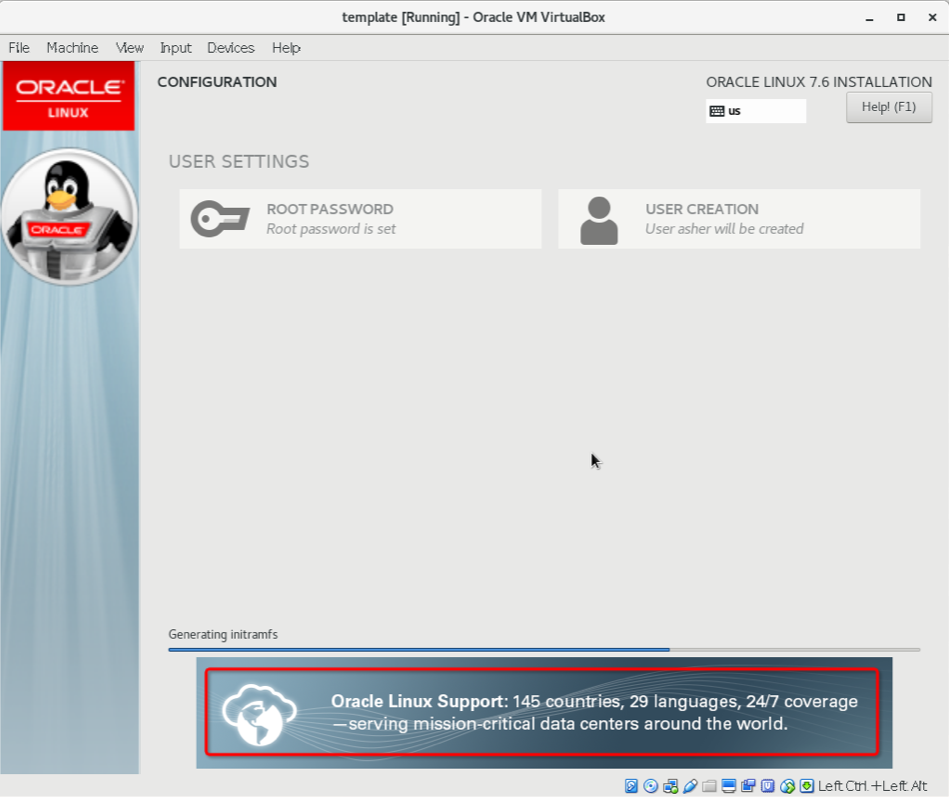
开始执行磁盘分区、配置网络、安装操作系统的过程:
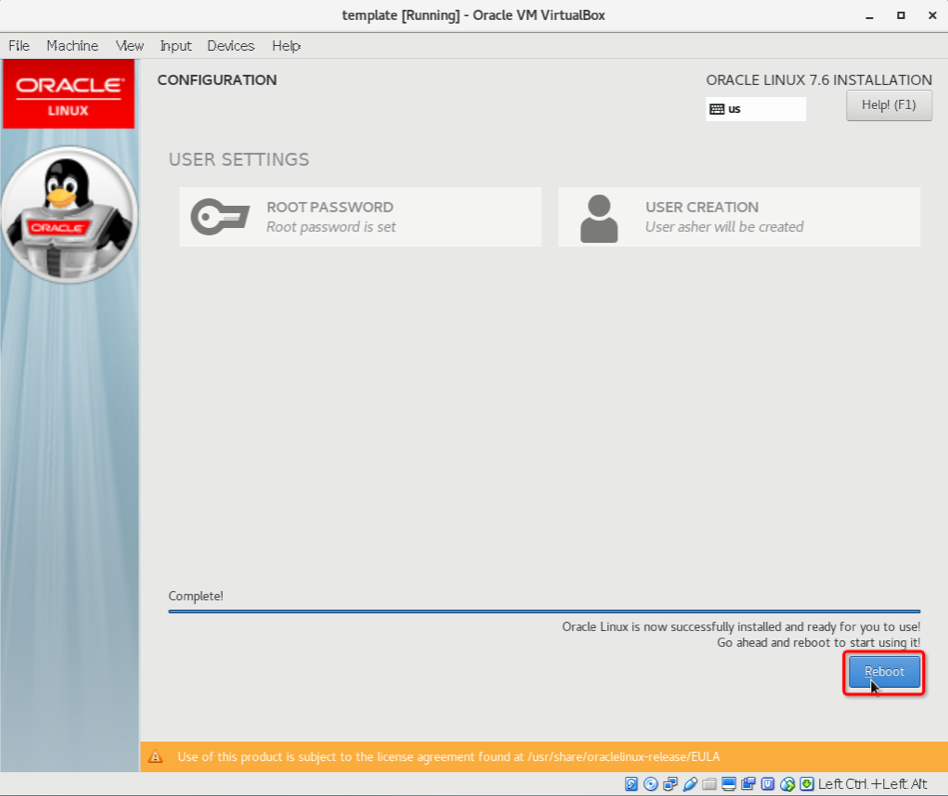
安装配置之后,选择reboot:
单击reboot:
选择接受license协议:
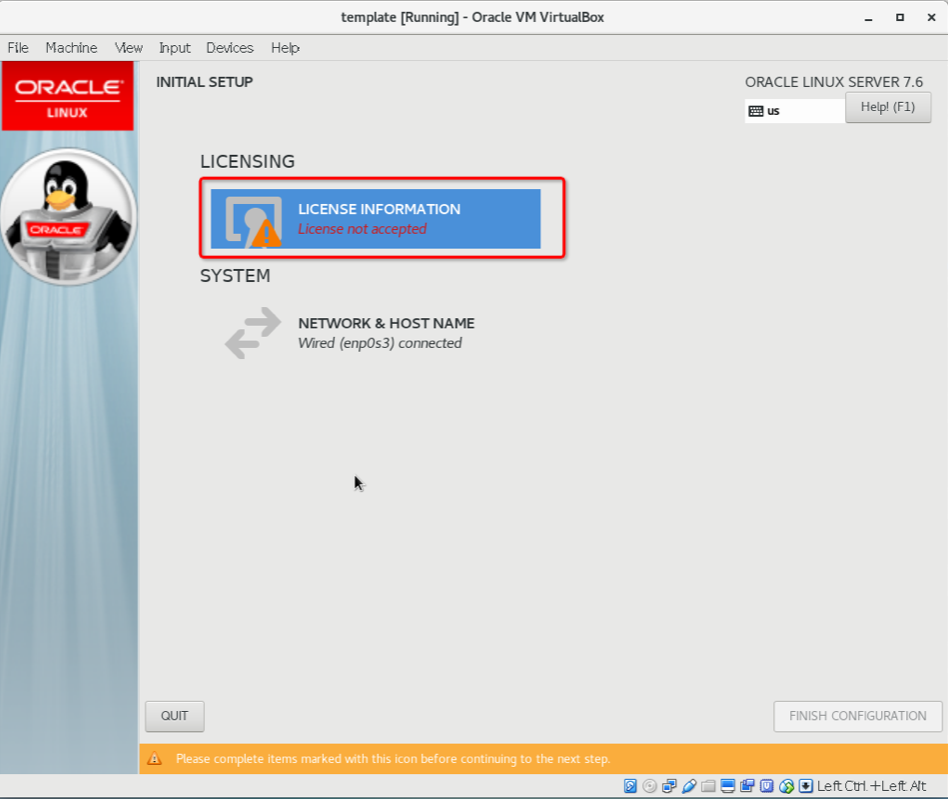
点击Network & Host name,确认两块网卡均为激活连接状态:
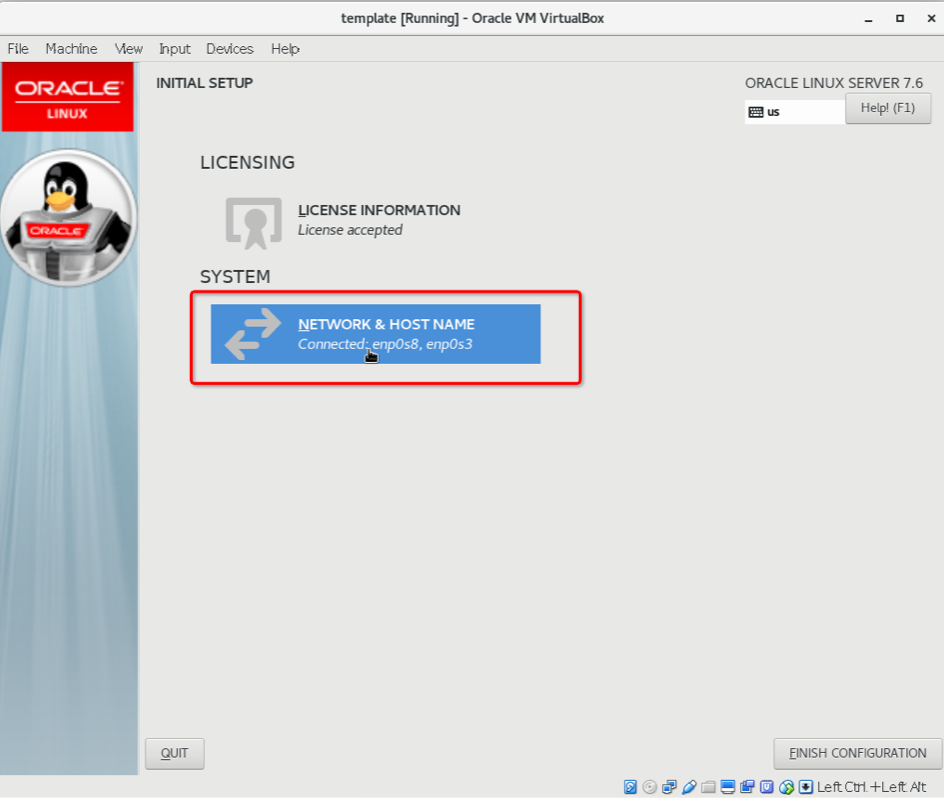
最后,点击FINISH CONFIGURATION
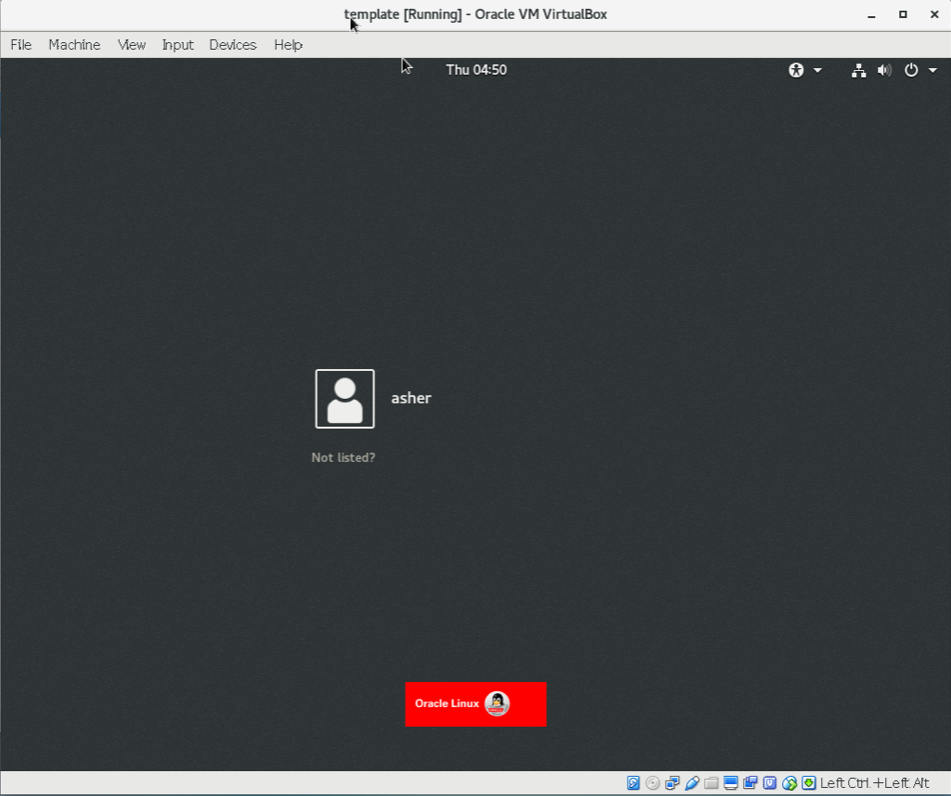
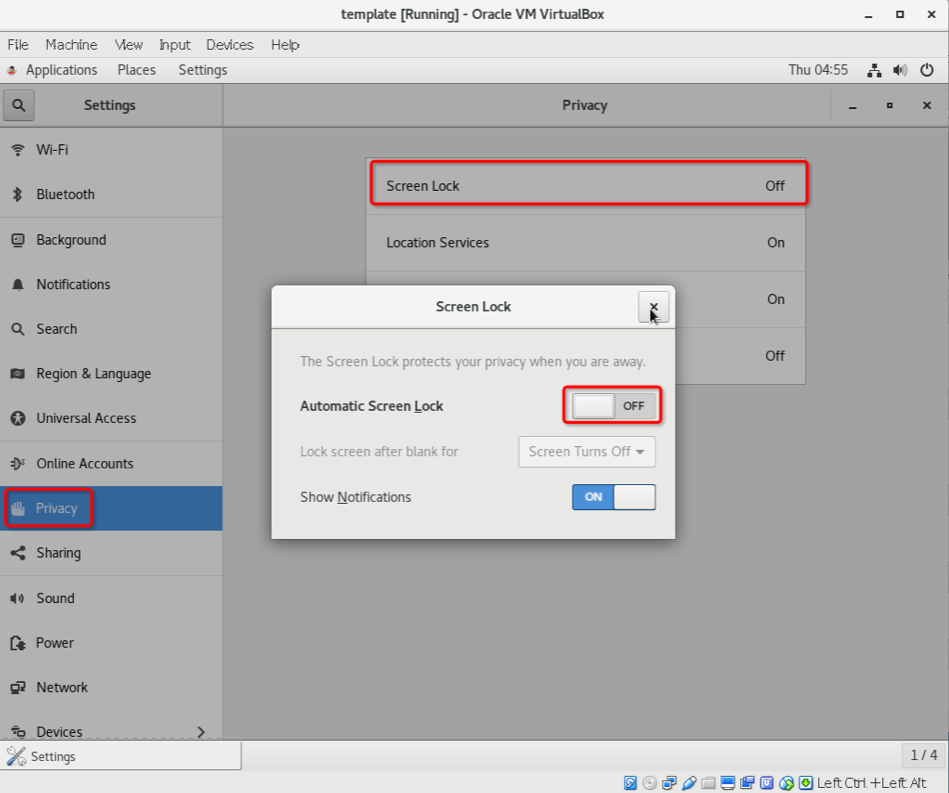
asher登录,设置省电模式,屏幕保护关闭,锁屏也关闭。
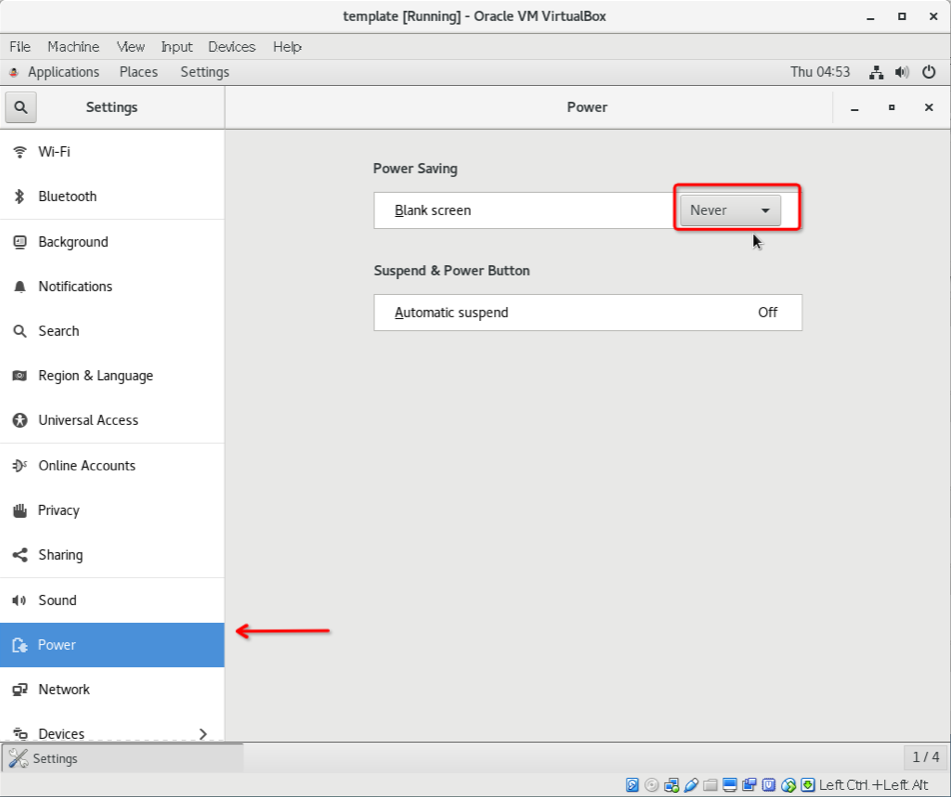
关闭锁屏:
至此,模板虚拟机template创建完成。
3 配置template虚拟机
3.1 template虚拟机安装Oracle ASM软件包
3.1.1 我们需要安装3个和ASM相关的软件包
kmod-oracleasm-2.0.8-22.0.3.el7.x86_64.rpm
oracleasm-support-2.1.11-2.el7.x86_64.rpm
oracleasmlib-2.0.12-1.el7.x86_64.rpm
前2个软件包在系统镜像光盘ISO文件里,第3个从Oracle官网下载。
3.1.2 控制台选择添加虚拟光驱ISO
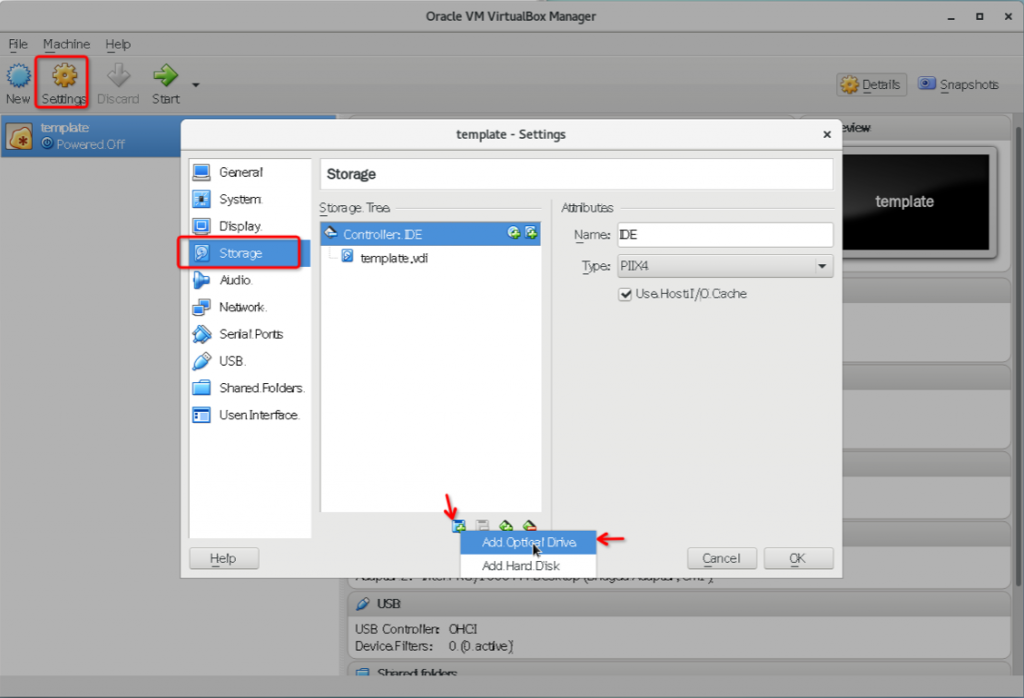
3.1.3 挂载虚拟光驱到/mnt,获取相关软件包
[root@centos-master OEL]# ssh root@172.16.11.110 The authenticity of host '172.16.11.110 (172.16.11.110)' can't be established. ECDSA key fingerprint is SHA256:GYtK5RGpHVp3kyG1JJd8mc3mnuWCprYkrSRAZMNu6sc. ECDSA key fingerprint is MD5:f9:68:8d:8c:ef:d3:af:fa:d6:05:ae:38:06:92:ee:03. Are you sure you want to continue connecting (yes/no)? yes Warning: Permanently added '172.16.11.110' (ECDSA) to the list of known hosts. root@172.16.11.110's password: [root@template ~]# df -Th 文件系统 类型 容量 已用 可用 已用% 挂载点 devtmpfs devtmpfs 4.8G 0 4.8G 0% /dev tmpfs tmpfs 4.8G 0 4.8G 0% /dev/shm tmpfs tmpfs 4.8G 9.4M 4.8G 1% /run tmpfs tmpfs 4.8G 0 4.8G 0% /sys/fs/cgroup /dev/mapper/ol-root xfs 39G 6.5G 32G 18% / /dev/sda1 xfs 1.9G 224M 1.7G 12% /boot tmpfs tmpfs 973M 56K 973M 1% /run/user/1000 tmpfs tmpfs 973M 0 973M 0% /run/user/0 [root@template ~]# mount /dev/sr0 /mnt/ mount: /dev/sr0 写保护,将以只读方式挂载 [root@template ~]# cd /mnt/ [root@template mnt]# ll 总用量 1226 drwxr-xr-x. 4 asher asher 2048 11月 19 2018 addons drwxr-xr-x. 3 asher asher 2048 11月 19 2018 EFI -rw-r--r--. 1 asher asher 8643 11月 19 2018 EULA -rw-r--r--. 1 asher asher 18390 11月 19 2018 GPL drwxr-xr-x. 3 asher asher 2048 11月 19 2018 images drwxr-xr-x. 2 asher asher 2048 11月 19 2018 isolinux drwxr-xr-x. 2 asher asher 2048 11月 19 2018 LiveOS drwxr-xr-x. 2 asher asher 839680 11月 19 2018 Packages -rw-r--r--. 1 asher asher 85929 11月 19 2018 RELEASE-NOTES-U6-en -rw-r--r--. 1 asher asher 282198 11月 19 2018 RELEASE-NOTES-U6-en.html drwxr-xr-x. 2 asher asher 4096 11月 19 2018 repodata -rw-r--r--. 1 asher asher 1011 11月 19 2018 RPM-GPG-KEY -rw-r--r--. 1 asher asher 1011 11月 19 2018 RPM-GPG-KEY-oracle -r--r--r--. 1 asher asher 3322 11月 19 2018 TRANS.TBL [root@template mnt]# cd Packages/ [root@template Packages]# ls -l kmod* -rw-rw-r--. 1 asher asher 123596 11月 1 2018 kmod-20-23.0.1.el7.x86_64.rpm -rw-rw-r--. 1 asher asher 3907080 11月 1 2018 kmod-kvdo-6.1.1.125-5.0.1.el7.x86_64.rpm -rw-rw-r--. 1 asher asher 54624 11月 1 2018 kmod-libs-20-23.0.1.el7.i686.rpm -rw-rw-r--. 1 asher asher 51412 11月 1 2018 kmod-libs-20-23.0.1.el7.x86_64.rpm -rw-rw-r--. 1 asher asher 302692 10月 1 2018 kmod-oracleasm-2.0.8-22.0.3.el7.x86_64.rpm [root@template Packages]# ls -l oracle* -rw-rw-r--. 1 asher asher 86908 2月 3 2018 oracleasm-support-2.1.11-2.el7.x86_64.rpm -rw-rw-r--. 1 asher asher 18244 6月 20 2018 oracle-database-preinstall-18c-1.0-1.el7.x86_64.rpm -rw-rw-r--. 1 asher asher 55096 11月 2 2018 oraclelinux-release-7.6-1.0.15.el7.x86_64.rpm -rw-rw-r--. 1 asher asher 4249128 9月 19 2018 oracle-logos-70.0.3-4.0.9.el7.noarch.rpm [root@template Packages]# cp kmod-oracleasm-2.0.8-22.0.3.el7.x86_64.rpm oracleasm-support-2.1.11-2.el7.x86_64.rpm ~ [root@template Packages]# cd [root@template ~]# ll 总用量 392 -rw-------. 1 root root 2462 12月 29 04:42 anaconda-ks.cfg -rw-r--r--. 1 root root 2493 12月 29 04:49 initial-setup-ks.cfg -rw-r--r--. 1 root root 302692 12月 29 20:25 kmod-oracleasm-2.0.8-22.0.3.el7.x86_64.rpm -rw-r--r--. 1 root root 86908 12月 29 20:25 oracleasm-support-2.1.11-2.el7.x86_64.rpm [root@template ~]# wget https://download.oracle.com/otn_software/asmlib/oracleasmlib-2.0.12-1.el7.x86_64.rpm --2022-12-29 20:25:24-- https://download.oracle.com/otn_software/asmlib/oracleasmlib-2.0.12-1.el7.x86_64.rpm 正在解析主机 download.oracle.com (download.oracle.com)... 23.192.208.88 正在连接 download.oracle.com (download.oracle.com)|23.192.208.88|:443... 已连接。 已发出 HTTP 请求,正在等待回应... 200 OK 长度:19360 (19K) [application/x-redhat-package-manager] 正在保存至: "oracleasmlib-2.0.12-1.el7.x86_64.rpm" 100%[=======================================================================================================================================================>] 19,360 --.-K/s 用时 0.01s 2022-12-29 20:25:25 (1.28 MB/s) - 已保存 "oracleasmlib-2.0.12-1.el7.x86_64.rpm" [19360/19360]) [root@template ~]# ll 总用量 412 -rw-------. 1 root root 2462 12月 29 04:42 anaconda-ks.cfg -rw-r--r--. 1 root root 2493 12月 29 04:49 initial-setup-ks.cfg -rw-r--r--. 1 root root 302692 12月 29 20:25 kmod-oracleasm-2.0.8-22.0.3.el7.x86_64.rpm -rw-r--r--. 1 root root 19360 10月 15 2015 oracleasmlib-2.0.12-1.el7.x86_64.rpm -rw-r--r--. 1 root root 86908 12月 29 20:25 oracleasm-support-2.1.11-2.el7.x86_64.rpm [root@template ~]#
3.1.4 安装ASM软件包
[root@template ~]# ll
总用量 412
-rw-------. 1 root root   2462 12月 29 04:42 anaconda-ks.cfg
-rw-r--r--. 1 root root   2493 12月 29 04:49 initial-setup-ks.cfg
-rw-r--r--. 1 root root 302692 12月 29 20:25 kmod-oracleasm-2.0.8-22.0.3.el7.x86_64.rpm
-rw-r--r--. 1 root root  19360 10月 15 2015 oracleasmlib-2.0.12-1.el7.x86_64.rpm
-rw-r--r--. 1 root root  86908 12月 29 20:25 oracleasm-support-2.1.11-2.el7.x86_64.rpm
[root@template ~]# rpm -ivh kmod-oracleasm-2.0.8-22.0.3.el7.x86_64.rpm
警告:kmod-oracleasm-2.0.8-22.0.3.el7.x86_64.rpm: 头V3 RSA/SHA256 Signature, 密钥 ID ec551f03: NOKEY
准备中...                          ################################# [100%]
正在升级/安装...
   1:kmod-oracleasm-2.0.8-22.0.3.el7  ################################# [100%]
[root@template ~]# rpm -ivh oracleasmlib-2.0.12-1.el7.x86_64.rpm
警告:oracleasmlib-2.0.12-1.el7.x86_64.rpm: 头V3 RSA/SHA256 Signature, 密钥 ID ec551f03: NOKEY
准备中...                          ################################# [100%]
正在升级/安装...
   1:oracleasmlib-2.0.12-1.el7        ################################# [100%]
[root@template ~]# rpm -ivh oracleasm-support-2.1.11-2.el7.x86_64.rpm
警告:oracleasm-support-2.1.11-2.el7.x86_64.rpm: 头V3 RSA/SHA256 Signature, 密钥 ID ec551f03: NOKEY
准备中...                          ################################# [100%]
正在升级/安装...
   1:oracleasm-support-2.1.11-2.el7   ################################# [100%]
注意:正在将请求转发到"systemctl enable oracleasm.service"。
Created symlink from /etc/systemd/system/multi-user.target.wants/oracleasm.service to /usr/lib/systemd/system/oracleasm.service.
[root@template ~]# systemctl enable oracleasm.service
[root@template ~]#
3.1.5 ASM配置参考
https://www.oracle.com/linux/downloads/linux-uln-downloads.html
https://access.redhat.com/solutions/315643
https://www.centlinux.com/2016/04/asmlib-installation-and-configuration.html
3.2 template虚拟机安装配置tigervnc-server
3.2.1 安装软件包tigervnc和tigervnc-server
[root@template ~]# yum install tigervnc tigervnc-server 已加载插件:langpacks, ulninfo ol7_UEKR5 | 3.0 kB 00:00:00 ol7_latest | 3.6 kB 00:00:00 正在解决依赖关系 --> 正在检查事务 ---> 软件包 tigervnc.x86_64.0.1.8.0-22.el7 将被 安装 --> 正在处理依赖关系 tigervnc-icons,它被软件包 tigervnc-1.8.0-22.el7.x86_64 需要 --> 正在处理依赖关系 libfltk.so.1.3()(64bit),它被软件包 tigervnc-1.8.0-22.el7.x86_64 需要 --> 正在处理依赖关系 libfltk_images.so.1.3()(64bit),它被软件包 tigervnc-1.8.0-22.el7.x86_64 需要 ---> 软件包 tigervnc-server.x86_64.0.1.8.0-22.el7 将被 安装 --> 正在检查事务 ---> 软件包 fltk.x86_64.0.1.3.4-3.el7_9 将被 安装 --> 正在处理依赖关系 libGLU.so.1()(64bit),它被软件包 fltk-1.3.4-3.el7_9.x86_64 需要 ---> 软件包 tigervnc-icons.noarch.0.1.8.0-22.el7 将被 安装 --> 正在检查事务 ---> 软件包 mesa-libGLU.x86_64.0.9.0.0-4.el7 将被 安装 --> 解决依赖关系完成 依赖关系解决 ================================================================================================================================================================================================= Package 架构 版本 源 大小 ================================================================================================================================================================================================= 正在安装: tigervnc x86_64 1.8.0-22.el7 ol7_latest 236 k tigervnc-server x86_64 1.8.0-22.el7 ol7_latest 211 k 为依赖而安装: fltk x86_64 1.3.4-3.el7_9 ol7_latest 560 k mesa-libGLU x86_64 9.0.0-4.el7 ol7_latest 193 k tigervnc-icons noarch 1.8.0-22.el7 ol7_latest 39 k 事务概要 ================================================================================================================================================================================================= 安装 2 软件包 (+3 依赖软件包) 总下载量:1.2 M 安装大小:3.0 M Is this ok [y/d/N]: y Downloading packages: 警告:/var/cache/yum/x86_64/7Server/ol7_latest/packages/mesa-libGLU-9.0.0-4.el7.x86_64.rpm: 头V3 RSA/SHA256 Signature, 密钥 ID ec551f03: NOKEY ] 0.0 B/s | 0 B --:--:-- ETA mesa-libGLU-9.0.0-4.el7.x86_64.rpm 的公钥尚未安装 (1/5): mesa-libGLU-9.0.0-4.el7.x86_64.rpm | 193 kB 00:00:00 (2/5): fltk-1.3.4-3.el7_9.x86_64.rpm | 560 kB 00:00:00 (3/5): tigervnc-icons-1.8.0-22.el7.noarch.rpm | 39 kB 00:00:00 (4/5): tigervnc-1.8.0-22.el7.x86_64.rpm | 236 kB 00:00:00 (5/5): tigervnc-server-1.8.0-22.el7.x86_64.rpm | 211 kB 00:00:00 ------------------------------------------------------------------------------------------------------------------------------------------------------------------------------------------------- 总计 973 kB/s | 1.2 MB 00:00:01 从 file:///etc/pki/rpm-gpg/RPM-GPG-KEY-oracle 检索密钥 导入 GPG key 0xEC551F03: 用户ID : "Oracle OSS group (Open Source Software group) <build@oss.oracle.com>" 指纹 : 4214 4123 fecf c55b 9086 313d 72f9 7b74 ec55 1f03 软件包 : 7:oraclelinux-release-7.6-1.0.15.el7.x86_64 (@anaconda/7.6) 来自 : /etc/pki/rpm-gpg/RPM-GPG-KEY-oracle 是否继续?[y/N]:y Running transaction check Running transaction test Transaction test succeeded Running transaction 警告:RPM 数据库已被非 yum 程序修改。 正在安装 : tigervnc-icons-1.8.0-22.el7.noarch 1/5 正在安装 : mesa-libGLU-9.0.0-4.el7.x86_64 2/5 正在安装 : fltk-1.3.4-3.el7_9.x86_64 3/5 正在安装 : tigervnc-1.8.0-22.el7.x86_64 4/5 正在安装 : tigervnc-server-1.8.0-22.el7.x86_64 5/5 验证中 : tigervnc-server-1.8.0-22.el7.x86_64 1/5 验证中 : mesa-libGLU-9.0.0-4.el7.x86_64 2/5 验证中 : tigervnc-icons-1.8.0-22.el7.noarch 3/5 验证中 : fltk-1.3.4-3.el7_9.x86_64 4/5 验证中 : tigervnc-1.8.0-22.el7.x86_64 5/5 已安装: tigervnc.x86_64 0:1.8.0-22.el7 tigervnc-server.x86_64 0:1.8.0-22.el7 作为依赖被安装: fltk.x86_64 0:1.3.4-3.el7_9 mesa-libGLU.x86_64 0:9.0.0-4.el7 tigervnc-icons.noarch 0:1.8.0-22.el7 完毕! [root@template ~]#
3.2.2 验证vnc server可用性
template机器上先启动vnc server:
执行vncserver命令,会提示输入通过vnc来访问主机的口令,并确认。
[root@template ~]# vncserver You will require a password to access your desktops. Password: Verify: Would you like to enter a view-only password (y/n)? n A view-only password is not used xauth: file /root/.Xauthority does not exist New 'template.localdomain:1 (root)' desktop is template.localdomain:1 Creating default startup script /root/.vnc/xstartup Creating default config /root/.vnc/config Starting applications specified in /root/.vnc/xstartup Log file is /root/.vnc/template.localdomain:1.log [root@template ~]#
客户端访问:通过template机器IP地址:5901端口
172.16.11.110:5901


键入前面设置的口令,即可登录。如果访问不了,则有可能是template主机上的防火墙未关闭。去关闭firewall:
[root@template ~]# systemctl stop firewalld.service
[root@template ~]#
4 根据模板虚拟机克隆2台虚拟机
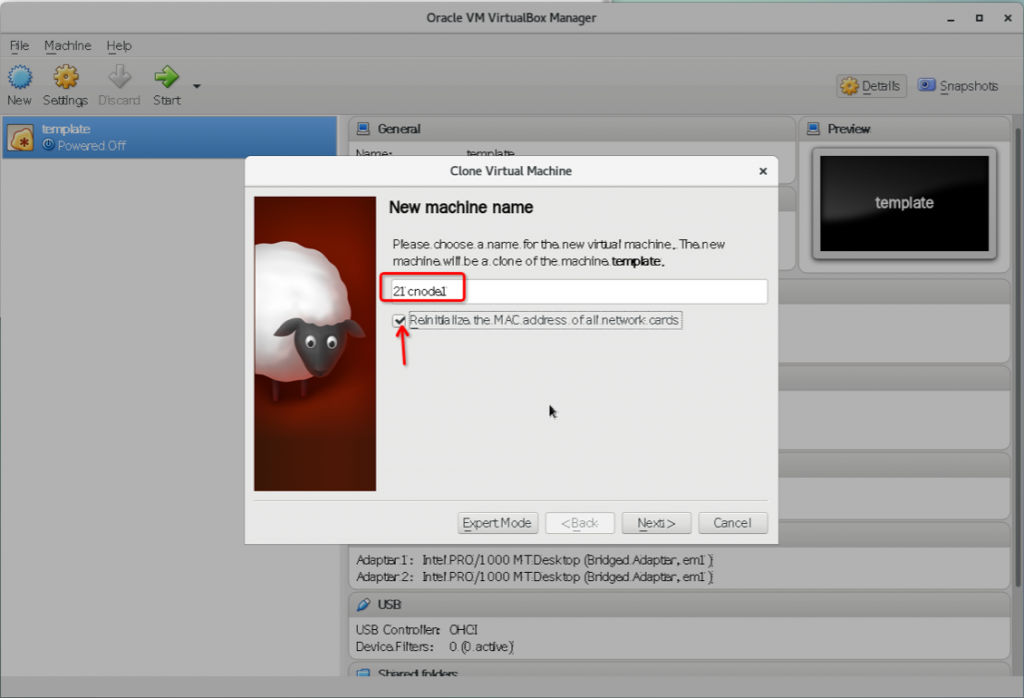
指定clone出来的虚拟机名称:21cnode1;
选择full clone:
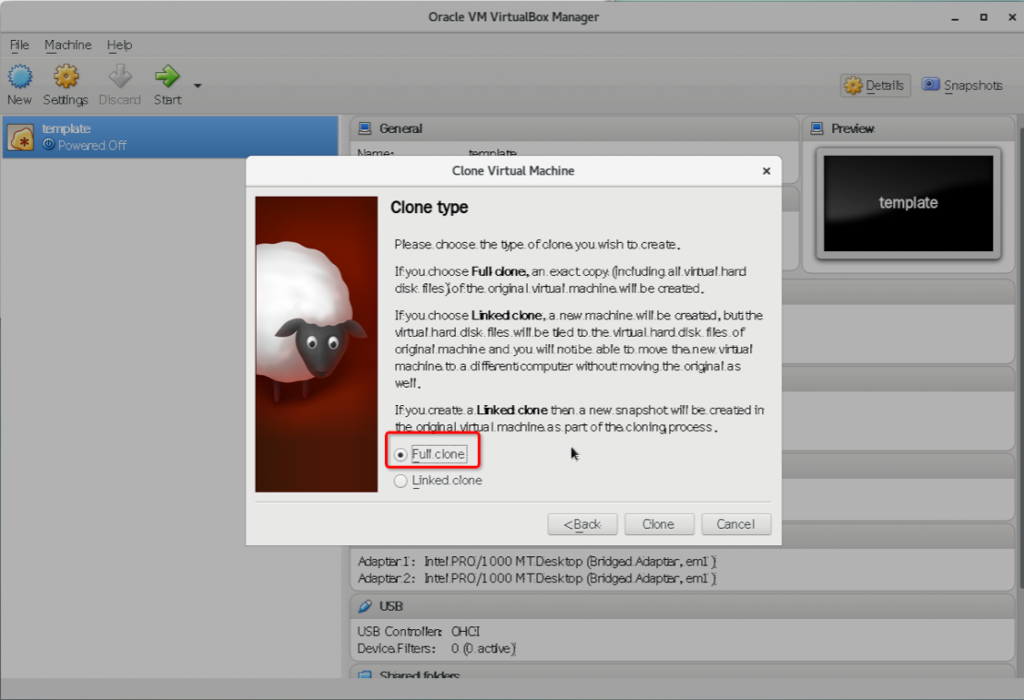
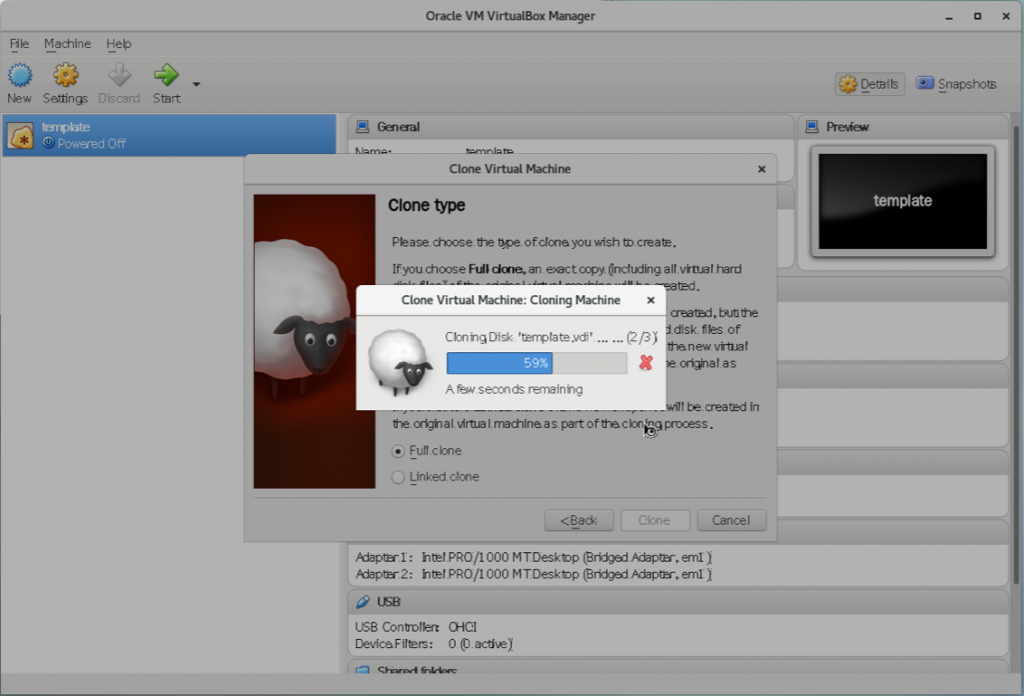
克隆需要一点儿时间:
clone之后:
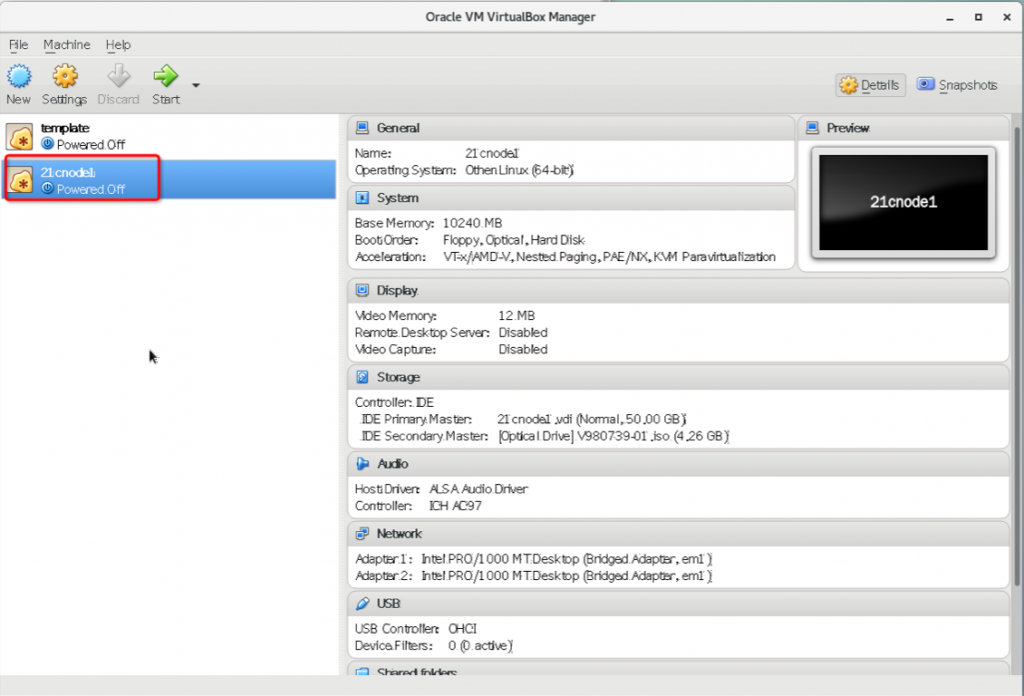
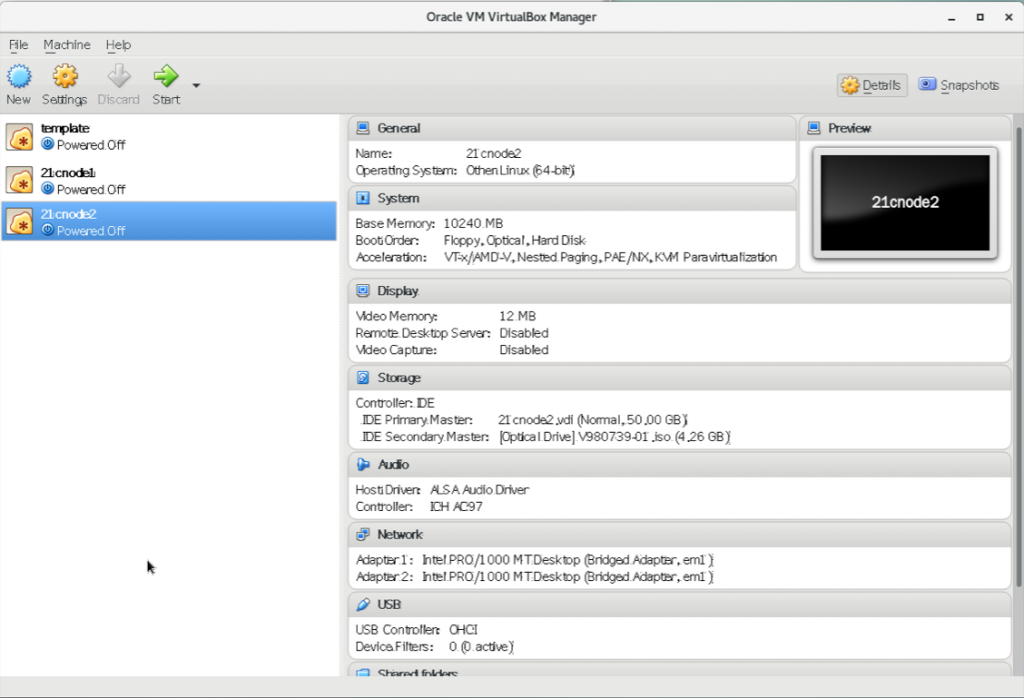
如法炮制,clone第2个虚拟机21cnode2出来。
5 配置共享存储
5.1 21cnode1添加共享磁盘
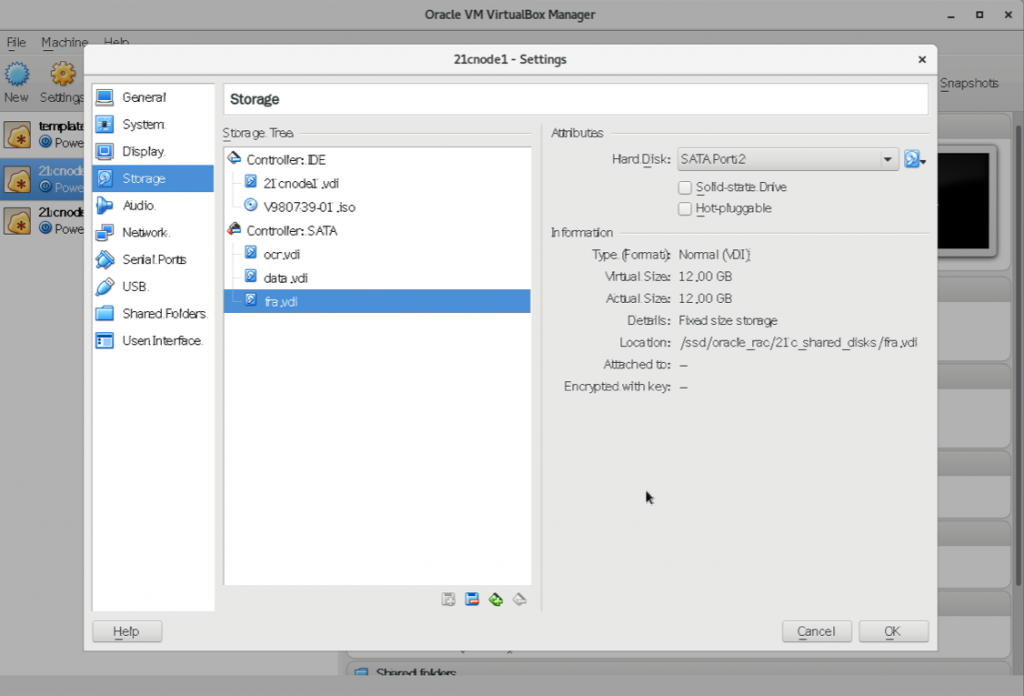
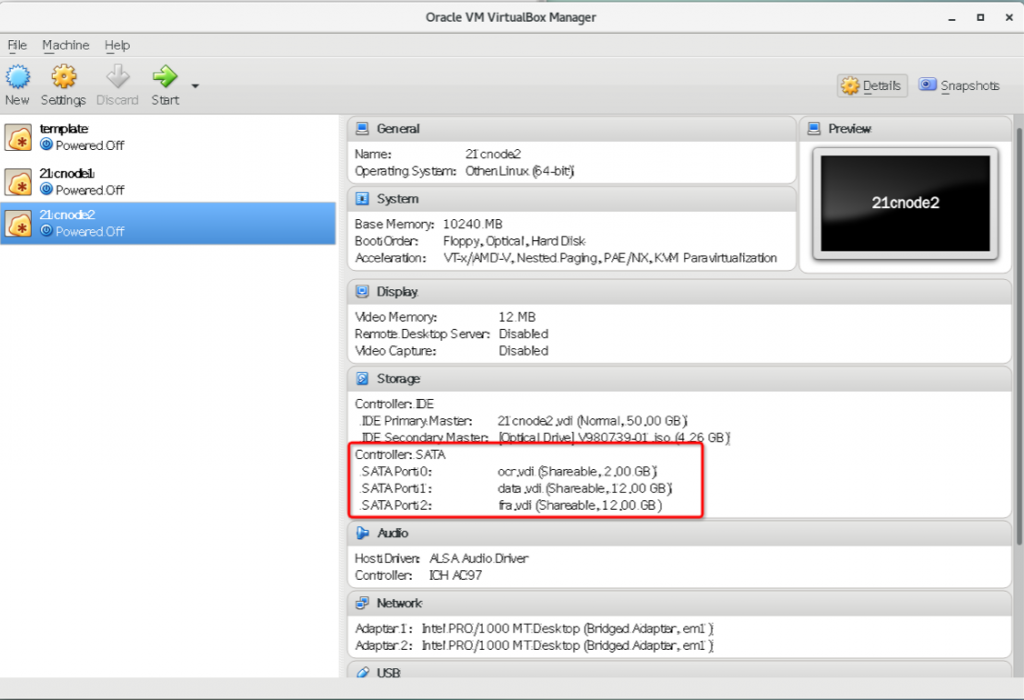
点击虚拟机设置,选择storage,分别添加3块磁盘。
ocr: 2GB,用于存储grid clusterware的OCR;
data: 12GB,用于存储数据库;
fra:12GB,用于存储Oracle闪回恢复区和备份文件。
存储路径,放在单独建立的用于共享磁盘存储的路径,/ssd/oracle_rac/21c_shared_disks
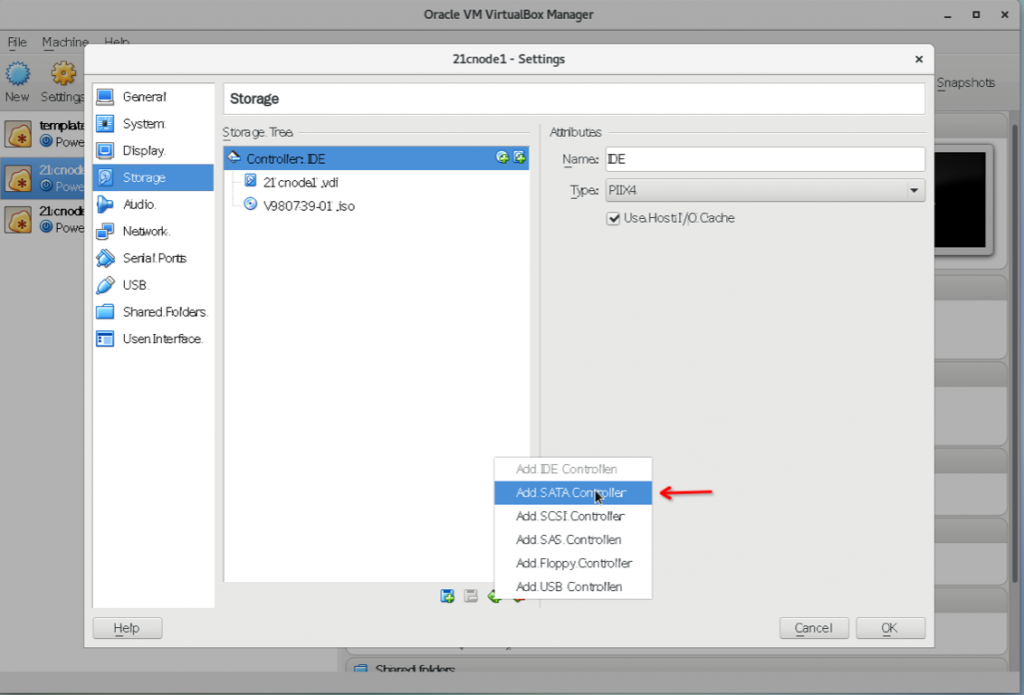
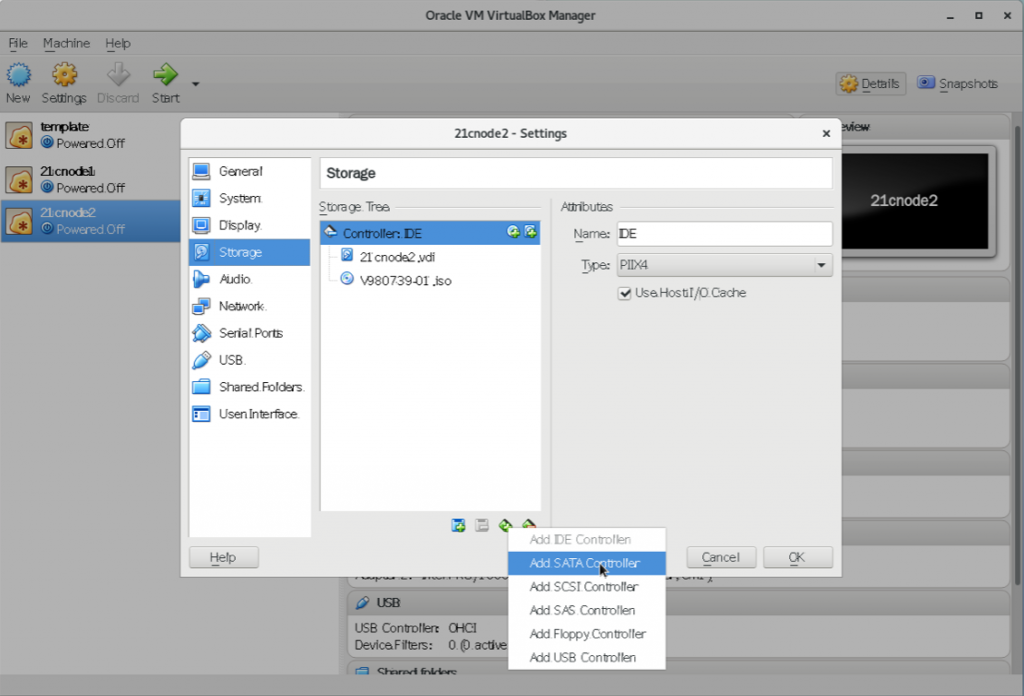
5.1.1 添加存储控制器:

选择添加SATA controller:
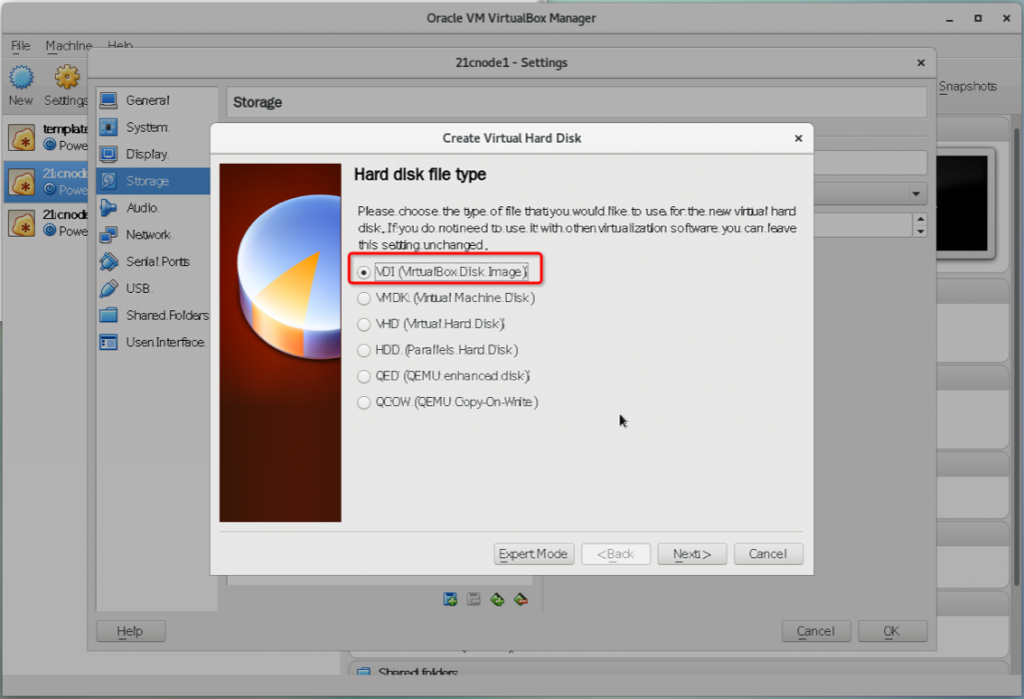
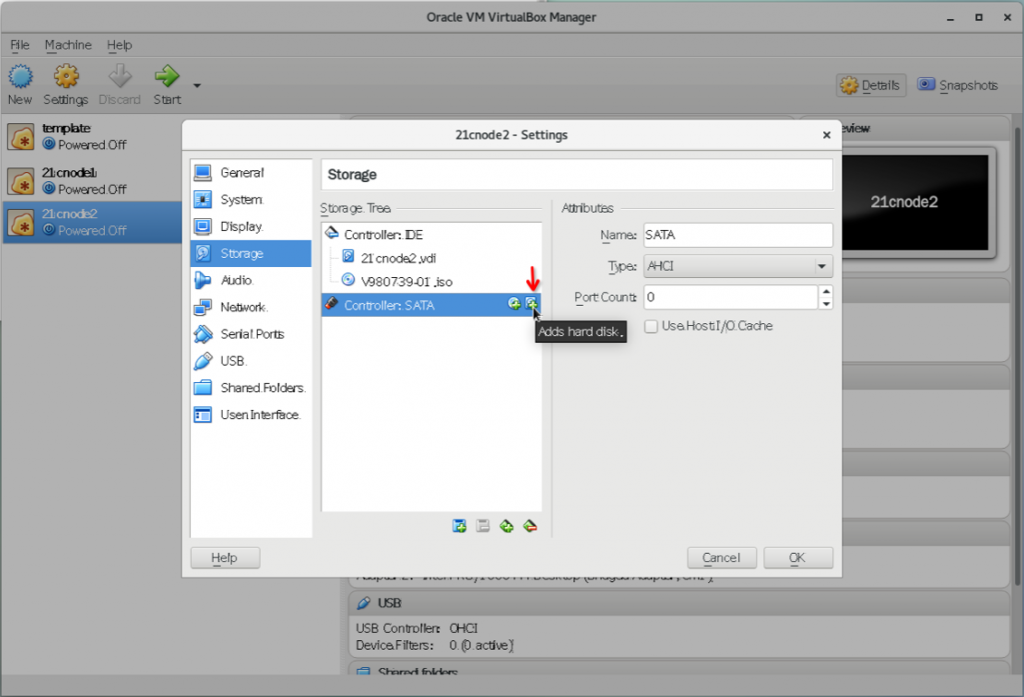
5.1.2 添加3块磁盘
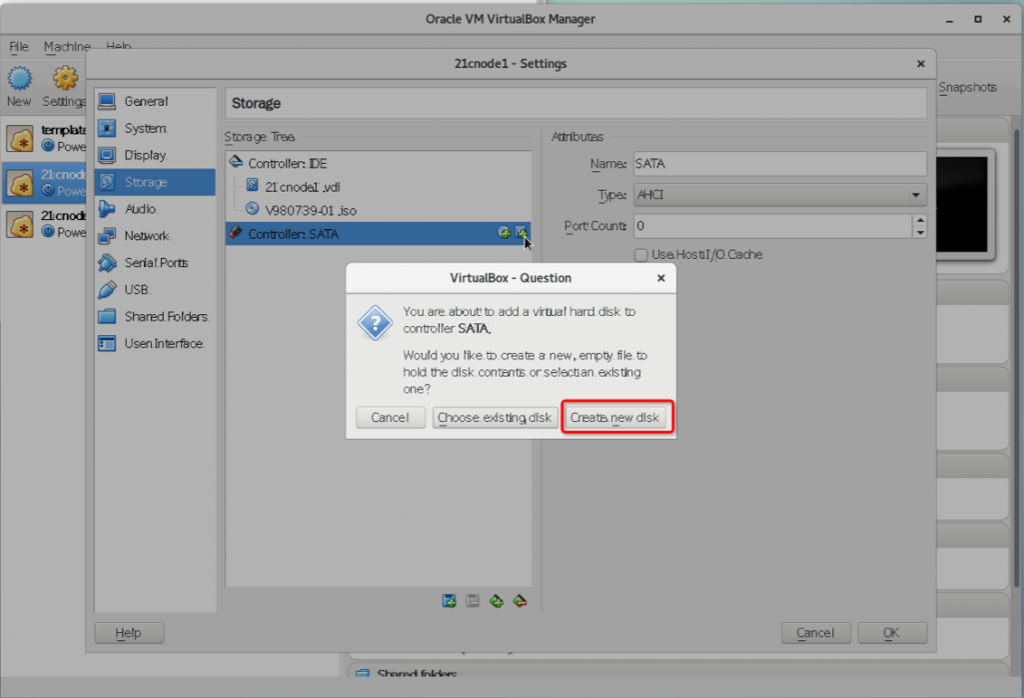
磁盘类型,VDI:
指定存储类型为fixed size,而不是Dynamically allocated:

大小为2GB:

如法炮制,添加另外2块磁盘,磁盘大小都指定为12GB。
5.2 修改存储属性
点击modify,改为Shareable:

如法炮制,其它2块磁盘也修改为shareable。
5.3 21cnode2添加磁盘
先添加控制器:
再添加磁盘:
选择:Choose existing disk:
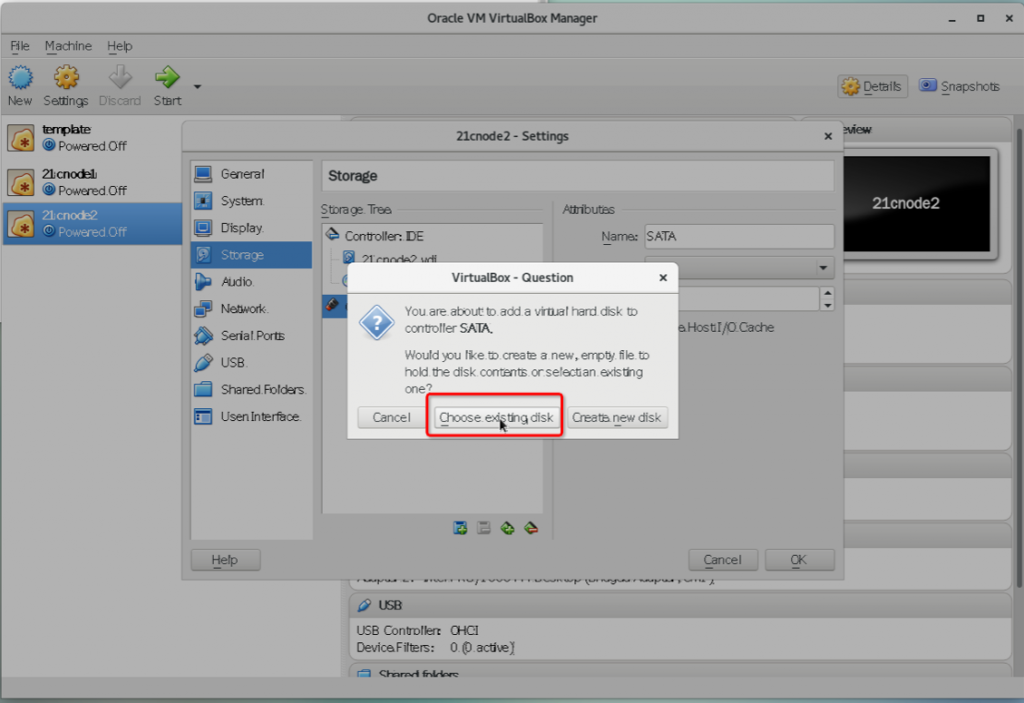
找到之前创建出来的ocr.vdi磁盘:
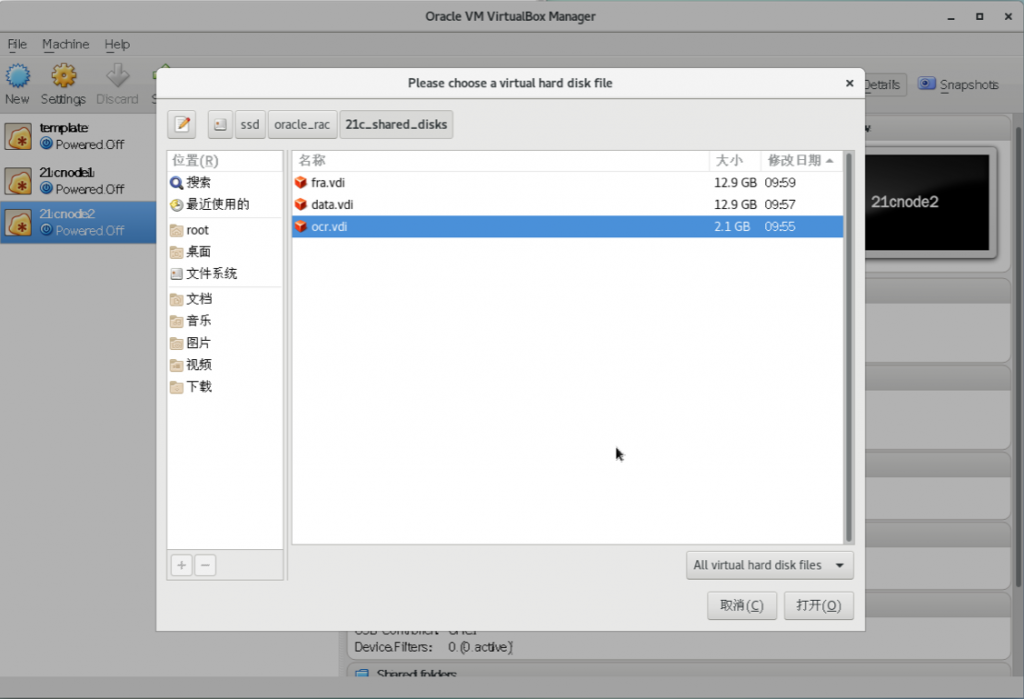
如法炮制,添加另外2块已经存在的磁盘:
6 配置2台服务器
6.1 需要配置的内容
修改IP地址
修改主机名
停防火墙
停SELINUX
NTP客户端
安装ksh
禁用avahi-daemon进程
设置NOZEROCONF
设置hosts
创建用户、组、路径、设置权限
设置操作系统内核参数
设置grid/oracle用户的操作系统limits参数
6.2 21cnode1配置
启动第一台机器,ssh连接到172.16.11.110这个IP地址,执行下列脚本:
#0修改IP地址,hostname,停防火墙,SELINUX sed -i $'s/IPADDR="172.16.11.110"/IPADDR="172.16.11.211"/g' /etc/sysconfig/network-scripts/ifcfg-enp0s3 sed -i $'s/IPADDR=10.10.10.10/IPADDR=10.10.10.211/g' /etc/sysconfig/network-scripts/ifcfg-enp0s8 hostnamectl set-hostname 21cnode1 # 1停防火墙 sed -i 's/SELINUX=enforcing/SELINUX=disabled/g' /etc/selinux/config systemctl stop firewalld systemctl disable firewalld # 2停NTP客户端 systemctl stop chronyd.service systemctl disable chronyd.service mv /etc/chrony.conf /etc/chrony.conf.bak #3 install ksh yum install ksh -y #4 禁用avahi-daemon进程 systemctl status avahi-daemon systemctl stop avahi-daemon systemctl disable avahi-daemon #5 修改/etc/sysconfig/network,添加NOZEROCONF=yes cat <<EOF>> /etc/sysconfig/network NOZEROCONF=yes EOF #6 设置hosts,参考链接:https://docs.oracle.com/en/database/oracle/oracle-database/21/cwlin/network-checklist-for-oracle-grid-infrastructure.html#GUID-B3B4F89A-7588-4F5A-80CF-BB84D9DF60D2 cat <<EOF>> /etc/hosts #public 172.16.11.211 21cnode1.localdomain 21cnode1 172.16.11.212 21cnode2.localdomain 21cnode2 #vip 172.16.11.213 21cnode1-vip.localdomain 21cnode1-vip 172.16.11.214 21cnode2-vip.localdomain 21cnode2-vip #private 10.10.10.211 21cnode1-priv.localdomain 21cnode1-priv 10.10.10.212 21cnode2-priv.localdomain 21cnode2-priv EOF # 7 创建用户、组、路径、设置权限 groupadd -g 54331 oinstall groupadd -g 54332 dba groupadd -g 54333 oper groupadd -g 54334 backupdba groupadd -g 54335 dgdba groupadd -g 54336 kmdba groupadd -g 54337 asmdba groupadd -g 54338 asmoper groupadd -g 54339 asmadmin groupadd -g 54340 racdba useradd -m -u 54332 -g oinstall -G dba,asmadmin,asmdba,asmoper -d /home/grid -s /bin/bash grid echo "grid" | passwd --stdin grid useradd -m -u 54331 -g oinstall -G dba,oper,backupdba,dgdba,kmdba,asmdba,asmadmin,racdba -d /home/oracle -s /bin/bash oracle echo "oracle" | passwd --stdin oracle mkdir -p /u01/app/grid mkdir -p /u01/app/21.3/grid mkdir -p /u01/app/oracle mkdir -p /u01/app/oracle/product/21.3 chmod -R 775 /u01 chown -R grid:oinstall /u01/app chown -R oracle:oinstall /u01/app/oracle #8 /home/grid/.bash_profie cat <<EOF>> /home/grid/.bash_profile export ORACLE_SID=+ASM1 export ORACLE_BASE=/u01/app/grid export ORACLE_HOME=/u01/app/21.3/grid export PATH=\$ORACLE_HOME/bin:\$ORACLE_HOME/OPatch:\$PATH umask 22 EOF #9 /home/oracle/.bash_profie cat <<EOF>> /home/oracle/.bash_profile export ORACLE_SID=orcl1 export ORACLE_BASE=/u01/app/oracle export ORACLE_HOME=\$ORACLE_BASE/product/21.3 export PATH=\$ORACLE_HOME/bin:\$ORACLE_HOME/OPatch:\$PATH umask 22 EOF #10 --------2个nodes分别执行下述------------------------------------------ cat <<EOF >> /etc/sysctl.d/98-oracle.conf fs.aio-max-nr = 1048576 fs.file-max = 6815744 kernel.sem = 250 32000 100 128 kernel.shmmni = 4096 kernel.shmall = 1073741824 kernel.shmmax = 4398046511104 kernel.panic_on_oops = 1 net.core.rmem_default = 262144 net.core.rmem_max = 4194304 net.core.wmem_default = 262144 net.core.wmem_max = 1048576 net.ipv4.conf.all.rp_filter = 2 net.ipv4.conf.default.rp_filter = 2 net.ipv4.ip_local_port_range = 9000 65500 EOF #11使之生效 /sbin/sysctl -p /etc/sysctl.d/98-oracle.conf #12 --------/etc/security/limits.d/oracle-database-server-21c-preinstall.conf---------------------------------- cat <<EOF>> /etc/security/limits.d/oracle-database-server-21c-preinstall.conf oracle soft nofile 1024 oracle hard nofile 65536 oracle soft nproc 16384 oracle hard nproc 16384 oracle soft stack 10240 oracle hard stack 32768 oracle hard memlock 134217728 oracle soft memlock 134217728 grid soft nofile 1024 grid hard nofile 65536 grid soft nproc 16384 grid hard nproc 16384 grid soft stack 10240 grid hard stack 32768 grid hard memlock 134217728 grid soft memlock 134217728 EOF
6.3 21cnode2配置
#0修改IP地址,hostname,停防火墙,SELINUX sed -i $'s/IPADDR="172.16.11.110"/IPADDR="172.16.11.212"/g' /etc/sysconfig/network-scripts/ifcfg-enp0s3 sed -i $'s/IPADDR=10.10.10.10/IPADDR=10.10.10.212/g' /etc/sysconfig/network-scripts/ifcfg-enp0s8 hostnamectl set-hostname 21cnode2 #1 停防火墙 sed -i 's/SELINUX=enforcing/SELINUX=disabled/g' /etc/selinux/config systemctl stop firewalld systemctl disable firewalld #2 停NTP客户端 systemctl stop chronyd.service systemctl disable chronyd.service mv /etc/chrony.conf /etc/chrony.conf.bak #3 install ksh yum install ksh -y #4 禁用avahi-daemon进程 systemctl status avahi-daemon systemctl stop avahi-daemon systemctl disable avahi-daemon #5 修改/etc/sysconfig/network,添加NOZEROCONF=yes cat <<EOF>> /etc/sysconfig/network NOZEROCONF=yes EOF #6 设置hosts cat <<EOF>> /etc/hosts #public 172.16.11.211 21cnode1.localdomain 21cnode1 172.16.11.212 21cnode2.localdomain 21cnode2 #vip 172.16.11.213 21cnode1-vip.localdomain 21cnode1-vip 172.16.11.214 21cnode2-vip.localdomain 21cnode2-vip #private 10.10.10.211 21cnode1-priv.localdomain 21cnode1-priv 10.10.10.212 21cnode2-priv.localdomain 21cnode2-priv EOF # 7 创建用户、组、路径、设置权限 groupadd -g 54331 oinstall groupadd -g 54332 dba groupadd -g 54333 oper groupadd -g 54334 backupdba groupadd -g 54335 dgdba groupadd -g 54336 kmdba groupadd -g 54337 asmdba groupadd -g 54338 asmoper groupadd -g 54339 asmadmin groupadd -g 54340 racdba useradd -m -u 54332 -g oinstall -G dba,asmadmin,asmdba,asmoper -d /home/grid -s /bin/bash grid echo "grid" | passwd --stdin grid useradd -m -u 54331 -g oinstall -G dba,oper,backupdba,dgdba,kmdba,asmdba,asmadmin,racdba -d /home/oracle -s /bin/bash oracle echo "oracle" | passwd --stdin oracle mkdir -p /u01/app/grid mkdir -p /u01/app/21.3/grid mkdir -p /u01/app/oracle mkdir -p /u01/app/oracle/product/21.3 chmod -R 775 /u01 chown -R grid:oinstall /u01/app chown -R oracle:oinstall /u01/app/oracle #8 /home/grid/.bash_profie cat <<EOF>> /home/grid/.bash_profile export ORACLE_SID=+ASM2 export ORACLE_BASE=/u01/app/grid export ORACLE_HOME=/u01/app/21.3/grid export PATH=\$ORACLE_HOME/bin:\$ORACLE_HOME/OPatch:\$PATH umask 22 EOF #9 /home/oracle/.bash_profie cat <<EOF>> /home/oracle/.bash_profile export ORACLE_SID=orcl2 export ORACLE_BASE=/u01/app/oracle export ORACLE_HOME=\$ORACLE_BASE/product/21.3 export PATH=\$ORACLE_HOME/bin:\$ORACLE_HOME/OPatch:\$PATH umask 22 EOF #10 --------2个nodes分别执行下述------------------------------------------ cat <<EOF >> /etc/sysctl.d/98-oracle.conf fs.aio-max-nr = 1048576 fs.file-max = 6815744 kernel.sem = 250 32000 100 128 kernel.shmmni = 4096 kernel.shmall = 1073741824 kernel.shmmax = 4398046511104 kernel.panic_on_oops = 1 net.core.rmem_default = 262144 net.core.rmem_max = 4194304 net.core.wmem_default = 262144 net.core.wmem_max = 1048576 net.ipv4.conf.all.rp_filter = 2 net.ipv4.conf.default.rp_filter = 2 net.ipv4.ip_local_port_range = 9000 65500 EOF #11使之生效 /sbin/sysctl -p /etc/sysctl.d/98-oracle.conf #12--------/etc/security/limits.d/oracle-database-server-21c-preinstall.conf---------------------------------- cat <<EOF>> /etc/security/limits.d/oracle-database-server-21c-preinstall.conf oracle soft nofile 1024 oracle hard nofile 65536 oracle soft nproc 16384 oracle hard nproc 16384 oracle soft stack 10240 oracle hard stack 32768 oracle hard memlock 134217728 oracle soft memlock 134217728 grid soft nofile 1024 grid hard nofile 65536 grid soft nproc 16384 grid hard nproc 16384 grid soft stack 10240 grid hard stack 32768 grid hard memlock 134217728 grid soft memlock 134217728 EOF
6.4 配置参考地址
7 配置ASM磁盘
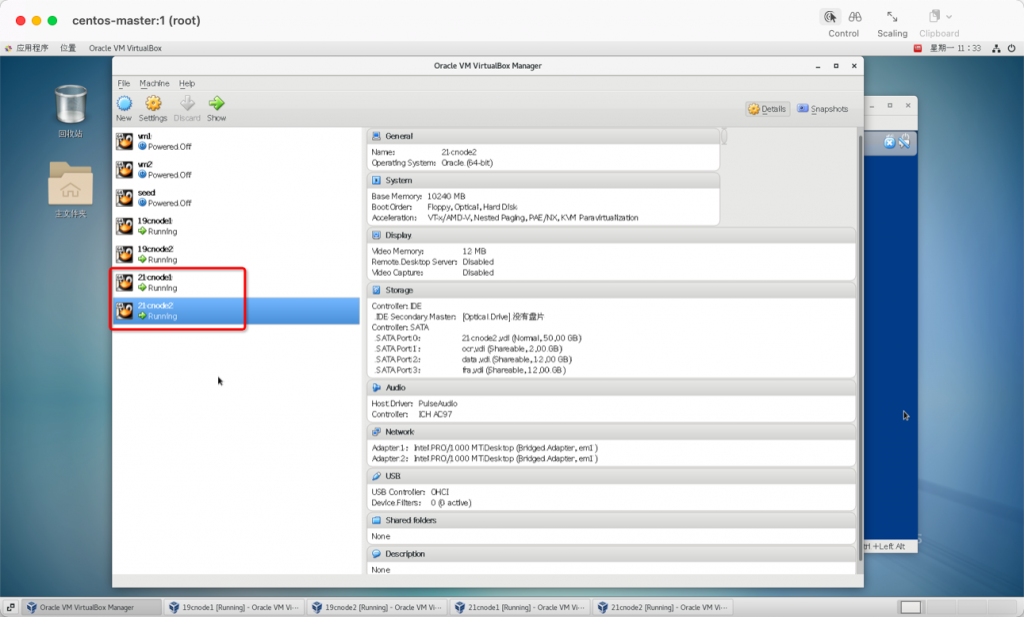
7.1 启动2台虚拟机21cnode1和21cnode2
7.2 格式化共享磁盘
ssh连接到21cnode1,以下操作只在该机器上执行:
[root@centos-master ~]# ssh root@172.16.11.211
root@172.16.11.211's password:
Last failed login: Sun Dec 25 22:05:17 EST 2022 from 172.16.11.36 on ssh:notty
There were 2 failed login attempts since the last successful login.
Last login: Sun Dec 25 21:51:22 2022 from 172.16.11.36
[root@21cnode1 ~]# ls -l /dev/sd*
brw-rw---- 1 root disk 8,  0 12月 25 22:33 /dev/sda
brw-rw---- 1 root disk 8,  1 12月 25 22:33 /dev/sda1
brw-rw---- 1 root disk 8,  2 12月 25 22:33 /dev/sda2
brw-rw---- 1 root disk 8, 16 12月 25 22:33 /dev/sdb
brw-rw---- 1 root disk 8, 32 12月 25 22:33 /dev/sdc
brw-rw---- 1 root disk 8, 48 12月 25 22:33 /dev/sdd
[root@21cnode1 ~]#
格式化磁盘/dev/sdb
[root@21cnode1 ~]# fdisk /dev/sdb
欢迎使用 fdisk (util-linux 2.23.2)。
更改将停留在内存中,直到您决定将更改写入磁盘。
使用写入命令前请三思。
Device does not contain a recognized partition table
使用磁盘标识符 0x7b7a9c2a 创建新的 DOS 磁盘标签。
命令(输入 m 获取帮助):n #选择n,新建磁盘分区
Partition type:
p primary (0 primary, 0 extended, 4 free)
e extended
Select (default p): p #选择p,创建主分区
分区号 (1-4,默认 1):1 #磁盘分区号,选择1
起始 扇区 (2048-4194303,默认为 2048): #起始扇区,选择默认,直接回车
将使用默认值 2048
Last 扇区, +扇区 or +size{K,M,G} (2048-4194303,默认为 4194303): #终止扇区,选择默认,全部放到第1个主分区,直接回车
将使用默认值 4194303
分区 1 已设置为 Linux 类型,大小设为 2 GiB
命令(输入 m 获取帮助):w #输入w,保存退出
The partition table has been altered!
Calling ioctl() to re-read partition table.
正在同步磁盘。
[root@21cnode1 ~]# 如法炮制,格式化另外两块磁盘/dev/sdc和/dev/sdd。
格式化3块共享磁盘之后:
[root@21cnode1 ~]# ll /dev/sd*
brw-rw---- 1 root disk 8,  0 12月 25 22:33 /dev/sda
brw-rw---- 1 root disk 8,  1 12月 25 22:33 /dev/sda1
brw-rw---- 1 root disk 8,  2 12月 25 22:33 /dev/sda2
brw-rw---- 1 root disk 8, 16 12月 25 22:38 /dev/sdb
brw-rw---- 1 root disk 8, 17 12月 25 22:38 /dev/sdb1
brw-rw---- 1 root disk 8, 32 12月 25 22:40 /dev/sdc
brw-rw---- 1 root disk 8, 33 12月 25 22:40 /dev/sdc1
brw-rw---- 1 root disk 8, 48 12月 25 22:40 /dev/sdd
brw-rw---- 1 root disk 8, 49 12月 25 22:40 /dev/sdd1
[root@21cnode1 ~]# lsblk
NAME        MAJ:MIN RM  SIZE RO TYPE MOUNTPOINT
sdd           8:48   0   12G  0 disk
└─sdd1        8:49   0   12G  0 part
sdb           8:16   0    2G  0 disk
└─sdb1        8:17   0    2G  0 part
sr0          11:0    1 1024M  0 rom
sdc           8:32   0   12G  0 disk
└─sdc1        8:33   0   12G  0 part
sda           8:0    0   50G  0 disk
├─sda2        8:2    0   48G  0 part
│ ├─ol-swap 252:1    0   10G  0 lvm  [SWAP]
│ └─ol-root 252:0    0   38G  0 lvm  /
└─sda1        8:1    0    2G  0 part /boot
[root@21cnode1 ~]#
ssh连接到21cnode2,以下操作只在该节点执行:
在该节点上,只需要执行partprobe命令,就可以看到新建的共享磁盘分区:
[root@centos-master ~]# ssh root@172.16.11.212
root@172.16.11.212's password:
Last login: Sun Dec 25 22:05:21 2022 from 172.16.11.36
[root@21cnode2 ~]# lsblk
NAME        MAJ:MIN RM  SIZE RO TYPE MOUNTPOINT
sdd           8:48   0   12G  0 disk
sdb           8:16   0    2G  0 disk
sr0          11:0    1 1024M  0 rom
sdc           8:32   0   12G  0 disk
sda           8:0    0   50G  0 disk
├─sda2        8:2    0   48G  0 part
│ ├─ol-swap 252:1    0   10G  0 lvm  [SWAP]
│ └─ol-root 252:0    0   38G  0 lvm  /
└─sda1        8:1    0    2G  0 part /boot
[root@21cnode2 ~]# partprobe
[root@21cnode2 ~]# lsblk
NAME        MAJ:MIN RM  SIZE RO TYPE MOUNTPOINT
sdd           8:48   0   12G  0 disk
└─sdd1        8:49   0   12G  0 part
sdb           8:16   0    2G  0 disk
└─sdb1        8:17   0    2G  0 part
sr0          11:0    1 1024M  0 rom
sdc           8:32   0   12G  0 disk
└─sdc1        8:33   0   12G  0 part
sda           8:0    0   50G  0 disk
├─sda2        8:2    0   48G  0 part
│ ├─ol-swap 252:1    0   10G  0 lvm  [SWAP]
│ └─ol-root 252:0    0   38G  0 lvm  /
└─sda1        8:1    0    2G  0 part /boot
[root@21cnode2 ~]# ll /dev/sd*
brw-rw---- 1 root disk 8,  0 12月 25 22:43 /dev/sda
brw-rw---- 1 root disk 8,  1 12月 25 22:43 /dev/sda1
brw-rw---- 1 root disk 8,  2 12月 25 22:43 /dev/sda2
brw-rw---- 1 root disk 8, 16 12月 25 22:43 /dev/sdb
brw-rw---- 1 root disk 8, 17 12月 25 22:43 /dev/sdb1
brw-rw---- 1 root disk 8, 32 12月 25 22:43 /dev/sdc
brw-rw---- 1 root disk 8, 33 12月 25 22:43 /dev/sdc1
brw-rw---- 1 root disk 8, 48 12月 25 22:43 /dev/sdd
brw-rw---- 1 root disk 8, 49 12月 25 22:43 /dev/sdd1
[root@21cnode2 ~]#
7.3 配置启动oracleasm服务
双节点均执行:
oracleasm configure -i
systemctl start oracleasm
systemctl enable oracleasm
oracleasm init
oracleasm status
[root@21cnode1 ~]# oracleasm configure -i
Configuring the Oracle ASM library driver.
This will configure the on-boot properties of the Oracle ASM library
driver. The following questions will determine whether the driver is
loaded on boot and what permissions it will have. The current values
will be shown in brackets ('[]'). Hitting <ENTER> without typing an
answer will keep that current value. Ctrl-C will abort.
Default user to own the driver interface []: grid
Default group to own the driver interface []: asmadmin
Start Oracle ASM library driver on boot (y/n) [n]: y
Scan for Oracle ASM disks on boot (y/n) [y]: y
Writing Oracle ASM library driver configuration: done
[root@21cnode1 ~]#
[root@21cnode1 ~]# oracleasm init
[root@21cnode1 ~]# systemctl start oracleasm
[root@21cnode1 ~]# systemctl enable oracleasm
[root@21cnode1 ~]# oracleasm status
Checking if ASM is loaded: yes
Checking if /dev/oracleasm is mounted: yes
[root@21cnode1 ~]# 7.4 创建ASM磁盘
21cnode1上执行:
[root@21cnode1 ~]# oracleasm createdisk ocr /dev/sdb1
Writing disk header: done
Instantiating disk: done
[root@21cnode1 ~]# oracleasm createdisk data /dev/sdc1
Writing disk header: done
Instantiating disk: done
[root@21cnode1 ~]# oracleasm createdisk fra /dev/sdd1
Writing disk header: done
Instantiating disk: done
[root@21cnode1 ~]# oracleasm listdisks
DATA
FRA
OCR
[root@21cnode1 ~]#
21cnode2上执行:oracleasm scandisks
[root@21cnode2 ~]# oracleasm status
Checking if ASM is loaded: yes
Checking if /dev/oracleasm is mounted: yes
[root@21cnode2 ~]# oracleasm listdisks
[root@21cnode2 ~]# oracleasm scandisks
Reloading disk partitions: done
Cleaning any stale ASM disks...
Scanning system for ASM disks...
Instantiating disk "OCR"
Instantiating disk "DATA"
Instantiating disk "FRA"
[root@21cnode2 ~]# oracleasm listdisks
DATA
FRA
OCR
[root@21cnode2 ~]#
8 安装配置验证DNS服务器
8.1 dns server配置
172.16.11.36机器:
安装:
[root@centos-master ~]# yum install bind bind-utils -y 已加载插件:fastestmirror, langpacks, product-id, search-disabled-repos, subscription-manager This system is not registered with an entitlement server. You can use subscription-manager to register. Loading mirror speeds from cached hostfile * base: mirrors.ustc.edu.cn * centos-sclo-rh: mirrors.ustc.edu.cn * centos-sclo-sclo: mirrors.ustc.edu.cn * epel: ftp.iij.ad.jp * extras: mirrors.163.com * updates: mirrors.ustc.edu.cn 正在解决依赖关系 --> 正在检查事务 ---> 软件包 bind.x86_64.32.9.11.4-26.P2.el7_9.10 将被 安装 ---> 软件包 bind-utils.x86_64.32.9.11.4-26.P2.el7_9.10 将被 安装 --> 解决依赖关系完成 依赖关系解决 ================================================================================================================================================================================== Package 架构 版本 源 大小 ================================================================================================================================================================================== 正在安装: bind x86_64 32:9.11.4-26.P2.el7_9.10 updates 2.3 M bind-utils x86_64 32:9.11.4-26.P2.el7_9.10 updates 261 k 事务概要 ================================================================================================================================================================================== 安装 2 软件包 总下载量:2.6 M 安装大小:6.0 M Downloading packages: (1/2): bind-utils-9.11.4-26.P2.el7_9.10.x86_64.rpm | 261 kB 00:00:00 (2/2): bind-9.11.4-26.P2.el7_9.10.x86_64.rpm | 2.3 MB 00:00:01 ---------------------------------------------------------------------------------------------------------------------------------------------------------------------------------- 总计 1.4 MB/s | 2.6 MB 00:00:01 Running transaction check Running transaction test Transaction test succeeded Running transaction 正在安装 : 32:bind-utils-9.11.4-26.P2.el7_9.10.x86_64 1/2 正在安装 : 32:bind-9.11.4-26.P2.el7_9.10.x86_64 2/2 验证中 : 32:bind-9.11.4-26.P2.el7_9.10.x86_64 1/2 验证中 : 32:bind-utils-9.11.4-26.P2.el7_9.10.x86_64 2/2 已安装: bind.x86_64 32:9.11.4-26.P2.el7_9.10 bind-utils.x86_64 32:9.11.4-26.P2.el7_9.10 完毕! [root@centos-master ~]#
配置:
[root@centos-master ~]# cp /etc/named.conf /etc/named.conf.bak
[root@centos-master ~]# vi /etc/named.conf
//
// named.conf
...
listen-on port 53 { 127.0.0.1; 172.16.11.36;}; #添加本地地址
...
allow-query { localhost; any;}; #添加any
include "/etc/named.rfc1912.zones";
include "/etc/named.root.key";
include "/etc/named/named.conf.local"; #此行是新添加的配置文件,配置/etc/named/named.conf.local,该文件中分别添加forward zone和reverse zone文件:
[root@centos-master ~]# vi /etc/named/named.conf.local
zone "scan-cluster-21c.localdomain" {
type master;
file "/etc/named/zones/db.scan-cluster-21c.localdomain"; # zone file path
};
zone "16.172.in-addr.arpa" {
type master;
file "/etc/named/zones/db.172.16"; # 172.16.0.0/16 subnet
};配置forward zone文件:/etc/named/zones/db.scan-cluster-21c.localdomain
[root@centos-master ~]# mkdir -p /etc/named/zones/
[root@centos-master ~]# vi /etc/named/zones/db.scan-cluster-21c.localdomain
$TTL 604800
@ IN SOA scan-cluster-21c.localdomain root.localdomain. (
3 ; Serial
604800 ; Refresh
86400 ; Retry
2419200 ; Expire
604800 ) ; Negative Cache TTL
;
; name servers - NS records
IN NS scan-cluster-21c.localdomain.
; name servers - A records
scan-cluster-21c.localdomain. IN A 172.16.11.241
scan-cluster-21c.localdomain. IN A 172.16.11.242
scan-cluster-21c.localdomain. IN A 172.16.11.243
scan-cluster-21c.localdomain. IN A 172.16.11.244
; 10.128.0.0/16 - A records
;host1.nyc3.example.com. IN A 10.128.100.101
;host2.nyc3.example.com. IN A 10.128.200.102配置reverse zone文件:
[root@centos-master ~]# vi /etc/named/zones/db.172.16
$TTL 604800
@ IN SOA scan-cluster-21c.localdomain. root.localdomain (
3 ; Serial
604800 ; Refresh
86400 ; Retry
2419200 ; Expire
604800 ) ; Negative Cache TTL
; name servers
IN NS scan-cluster-21c.localdomain.
; PTR Records
241 IN PTR scan-cluster-21c.localdomain. ; 172.16.11.241
242 IN PTR scan-cluster-21c.localdomain. ; 172.16.11.242
243 IN PTR scan-cluster-21c.localdomain. ; 172.16.11.243
244 IN PTR scan-cluster-21c.localdomain. ; 172.16.11.244
;11.10 IN PTR ns1.nyc3.example.com. ; 10.128.10.11
;101.100 IN PTR host1.nyc3.example.com. ; 10.128.100.101
;102.200 IN PTR host2.nyc3.example.com. ; 10.128.200.102
~检查配置:
[root@centos-master ~]# named-checkconf /etc/named.conf
[root@centos-master ~]#
检查forward zone:
[root@centos-master ~]# named-checkzone localdomain /etc/named/zones/db.scan-cluster-21c.localdomain
zone localdomain/IN: loaded serial 3
OK
[root@centos-master ~]#
检查reverse zone:
[root@centos-master ~]# named-checkzone 172.16.in-addr.arpa /etc/named/zones/db.172.16
zone 172.16.in-addr.arpa/IN: loaded serial 3
OK
[root@centos-master ~]#
启动服务:
[root@centos-master ~]# systemctl start named
[root@centos-master ~]#
8.2 dns client配置
双节点均执行下述配置和测试:
[root@21cnode1 ~]# cat /etc/resolv.conf # Generated by NetworkManager nameserver 172.16.11.36 nameserver 172.16.6.11 nameserver 172.16.6.12 [root@21cnode1 ~]# nslookup scan-cluster-21c.localdomain Server: 172.16.11.36 Address: 172.16.11.36#53 Name: scan-cluster-21c.localdomain Address: 172.16.11.242 Name: scan-cluster-21c.localdomain Address: 172.16.11.244 Name: scan-cluster-21c.localdomain Address: 172.16.11.243 Name: scan-cluster-21c.localdomain Address: 172.16.11.241 [root@21cnode1 ~]#
8.3 安装配置脚本
yum install bind bind-utils -y
cp /etc/named.conf /etc/named.conf.bak
vi /etc/named.conf
....
....
cat <<EOF> /etc/named/named.conf.local
zone "scan-cluster-21c.localdomain" {
type master;
file "/etc/named/zones/db.scan-cluster-21c.localdomain"; # zone file path
};
zone "16.172.in-addr.arpa" {
type master;
file "/etc/named/zones/db.172.16"; # 172.16.0.0/16 subnet
};
EOF
mkdir -p /etc/named/zones/
cat <<EOF>> /etc/named/zones/db.scan-cluster-21c.localdomain
\$TTL 604800
@ IN SOA scan-cluster-21c.localdomain root.localdomain. (
3 ; Serial
604800 ; Refresh
86400 ; Retry
2419200 ; Expire
604800 ) ; Negative Cache TTL
;
; name servers - NS records
IN NS scan-cluster-21c.localdomain.
; name servers - A records
scan-cluster-21c.localdomain. IN A 172.16.11.241
scan-cluster-21c.localdomain. IN A 172.16.11.242
scan-cluster-21c.localdomain. IN A 172.16.11.243
scan-cluster-21c.localdomain. IN A 172.16.11.244
; 10.128.0.0/16 - A records
;host1.nyc3.example.com. IN A 10.128.100.101
;host2.nyc3.example.com. IN A 10.128.200.102
EOF
cat <<EOF> /etc/named/zones/db.172.16
\$TTL 604800
@ IN SOA scan-cluster-21c.localdomain. root.localdomain (
3 ; Serial
604800 ; Refresh
86400 ; Retry
2419200 ; Expire
604800 ) ; Negative Cache TTL
; name servers
IN NS scan-cluster-21c.localdomain.
; PTR Records
241 IN PTR scan-cluster-21c.localdomain. ; 172.16.11.241
242 IN PTR scan-cluster-21c.localdomain. ; 172.16.11.242
243 IN PTR scan-cluster-21c.localdomain. ; 172.16.11.243
244 IN PTR scan-cluster-21c.localdomain. ; 172.16.11.244
;11.10 IN PTR ns1.nyc3.example.com. ; 10.128.10.11
;101.100 IN PTR host1.nyc3.example.com. ; 10.128.100.101
;102.200 IN PTR host2.nyc3.example.com. ; 10.128.200.102
EOF
named-checkconf /etc/named.conf
named-checkzone localdomain /etc/named/zones/db.scan-cluster-21c.localdomain
named-checkzone 172.16.in-addr.arpa /etc/named/zones/db.172.16
systemctl start named
#删除
systemcstl stop named
yum erase bind bind-utils -y
rm -rf /etc/named/zones
rm -rf /etc/named/named.conf.local
rm -rf /etc/named.conf.bakRAC双节点机器的/etc/resolv.conf指向DNS服务器。
9 安装配置grid集群件
9.1 上传grid集群件到21cnode1:
[root@centos-master OEL]# pwd
/root/OEL
[root@centos-master OEL]# ll
总用量 31711916
-rw-r--r-- 1 root root       3112 9月   2 13:55 12.wget.sh
-rw-r--r-- 1 root root       3116 9月   2 13:50 18.wget.sh
-rw-r--r-- 1 root root          0 9月   2 13:50 cliauth
-rw-r--r-- 1 root root          0 9月   2 14:10 cliauth.1
-rw-r--r-- 1 root root 3453696911 6月  24 2020 LINUX.X64_122010_db_home.zip
-rw-r--r-- 1 root root 2994687209 6月  24 2020 LINUX.X64_122010_grid_home.zip
-rw-r--r-- 1 root root 5382265496 7月  19 2018 LINUX.X64_180000_db_home.zip
-rw-r--r-- 1 root root 4564649047 7月  19 2018 LINUX.X64_180000_grid_home.zip
-rw-r--r-- 1 root root 3059705302 4月  24 2019 LINUX.X64_193000_db_home.zip
-rw-r--r-- 1 root root 2889184573 4月  24 2019 LINUX.X64_193000_grid_home.zip
-rw-r--r-- 1 root root 3109225519 8月  10 2021 LINUX.X64_213000_db_home.zip
-rw-r--r-- 1 root root 2422217613 8月  10 2021 LINUX.X64_213000_grid_home.zip
-rw-r--r-- 1 root root 4571791360 8月  26 08:41 V980739-01.iso
-rw-r--r-- 1 root root   15496464 9月   2 14:24 wgetlog-09-02-22-13:50.log
-rw-r--r-- 1 root root   10016155 9月   2 14:34 wgetlog-09-02-22-14:10.log
[root@centos-master OEL]# scp LINUX.X64_213000_grid_home.zip grid@172.16.11.211:/home/grid/
grid@172.16.11.211's password:                                                                                                                                       LINUX.X64_213000_grid_home.zip                                                                                                     100% 2310MB  28.5MB/s   01:21
[root@centos-master OEL]#
9.2 grid用户解压集群件
[root@21cnode1 ~]# su - grid
上一次登录:一 12月 26 03:30:37 EST 2022pts/0 上
[grid@21cnode1 ~]$ ll
total 2365448
-rw-r--r-- 1 grid oinstall 2422217613 Dec 26 04:22 LINUX.X64_213000_grid_home.zip
[grid@21cnode1 ~]$ unzip LINUX.X64_213000_grid_home.zip -d /u01/app/21.3/grid/
...
  /u01/app/21.3/grid/javavm/lib/security/java.security -> ../../../javavm/jdk/jdk8/lib/security/java.security
  /u01/app/21.3/grid/jdk/jre/lib/amd64/server/libjsig.so -> ../libjsig.so
[grid@21cnode1 ~]$
9.3 grid用户启动vncserver
[root@21cnode1 ~]# su - grid 上一次登录:一 12月 26 20:47:59 EST 2022pts/0 上 [grid@21cnode1 ~]$ vncserver xauth: file /home/grid/.Xauthority does not exist New '21cnode1:1 (grid)' desktop is 21cnode1:1 Creating default startup script /home/grid/.vnc/xstartup Creating default config /home/grid/.vnc/config Starting applications specified in /home/grid/.vnc/xstartup Log file is /home/grid/.vnc/21cnode1:1.log [grid@21cnode1 ~]$
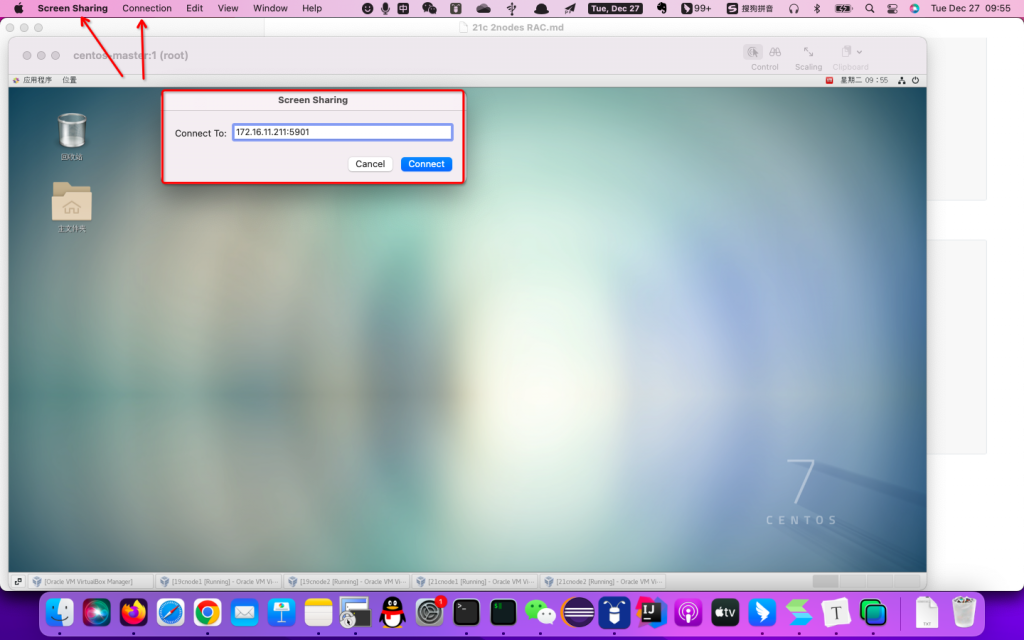
Mac上通过vnc客户端,连接到21cnode1的172.16.11.211机器的5901端口:
设置图形界面配置信息:
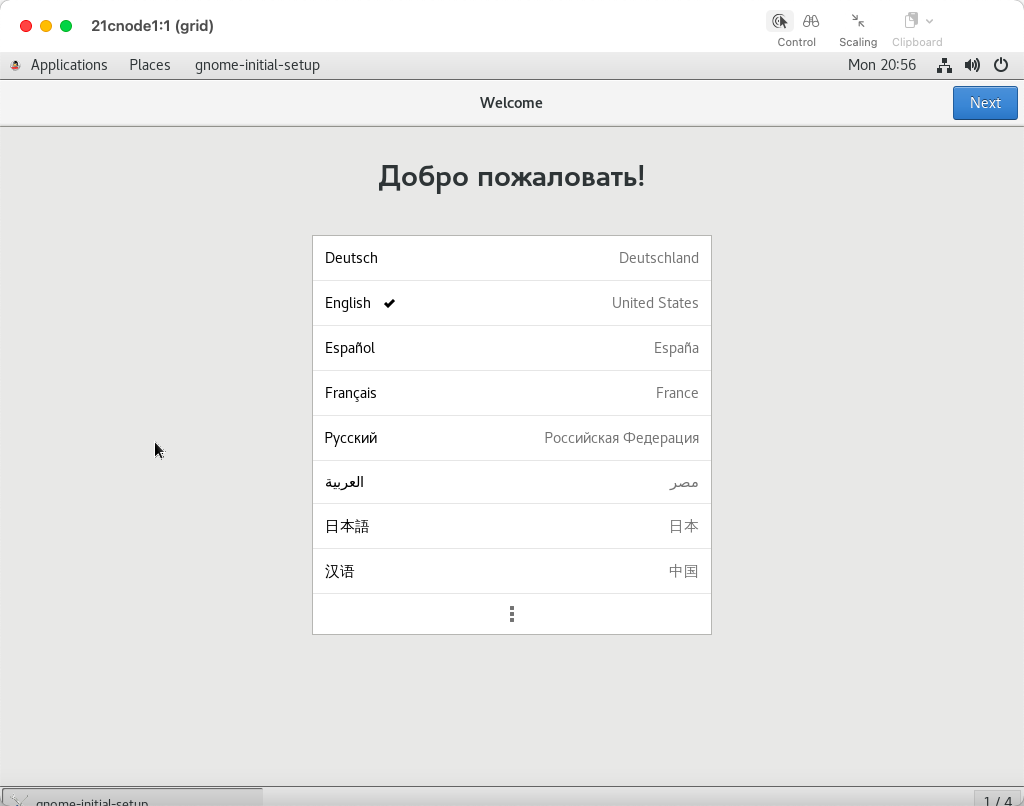
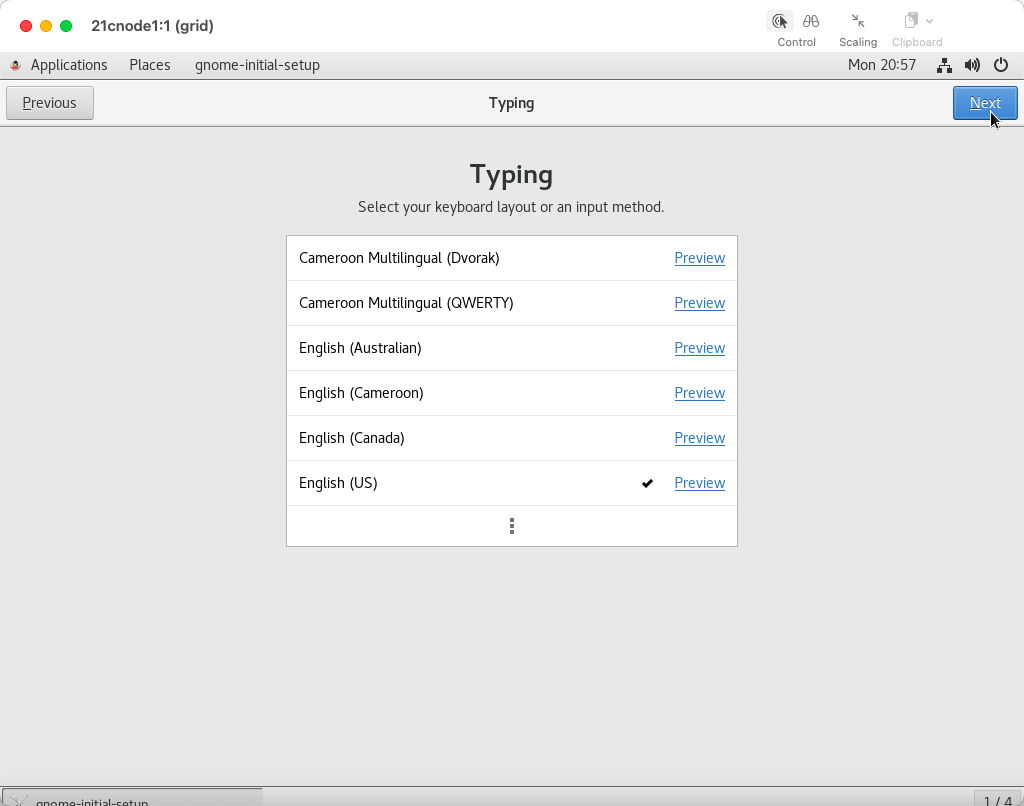
键盘输入法:
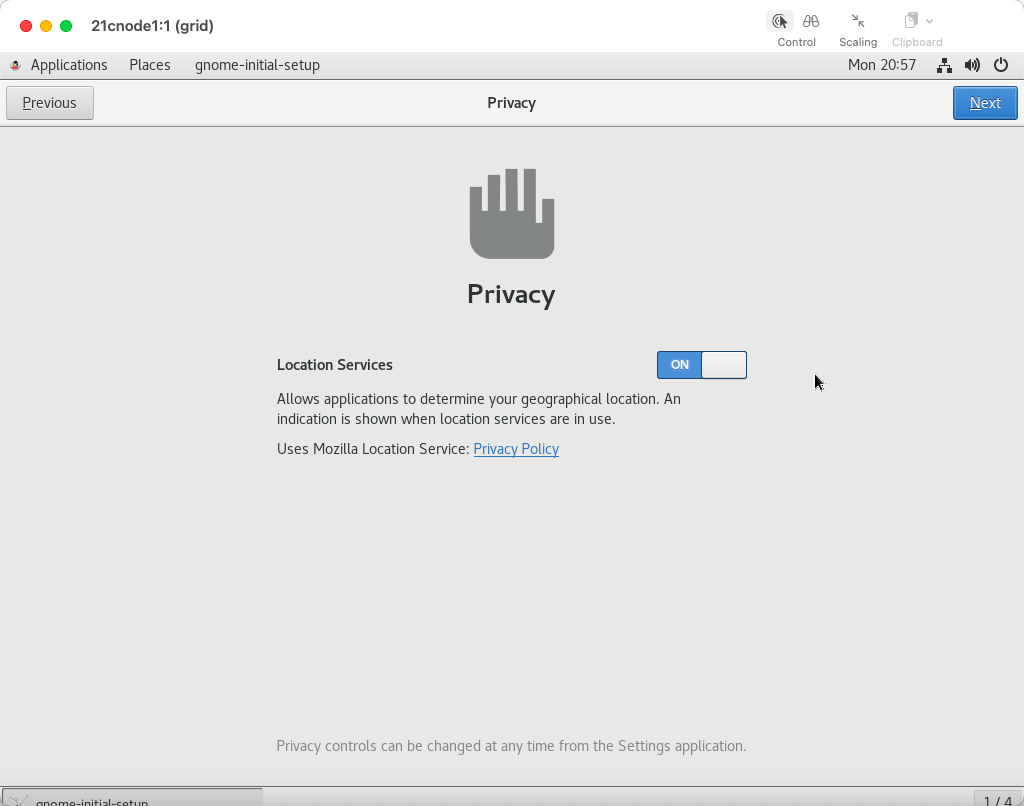
隐私设置:
跳过在线账户设置:

开始使用Oracle Linux Server:

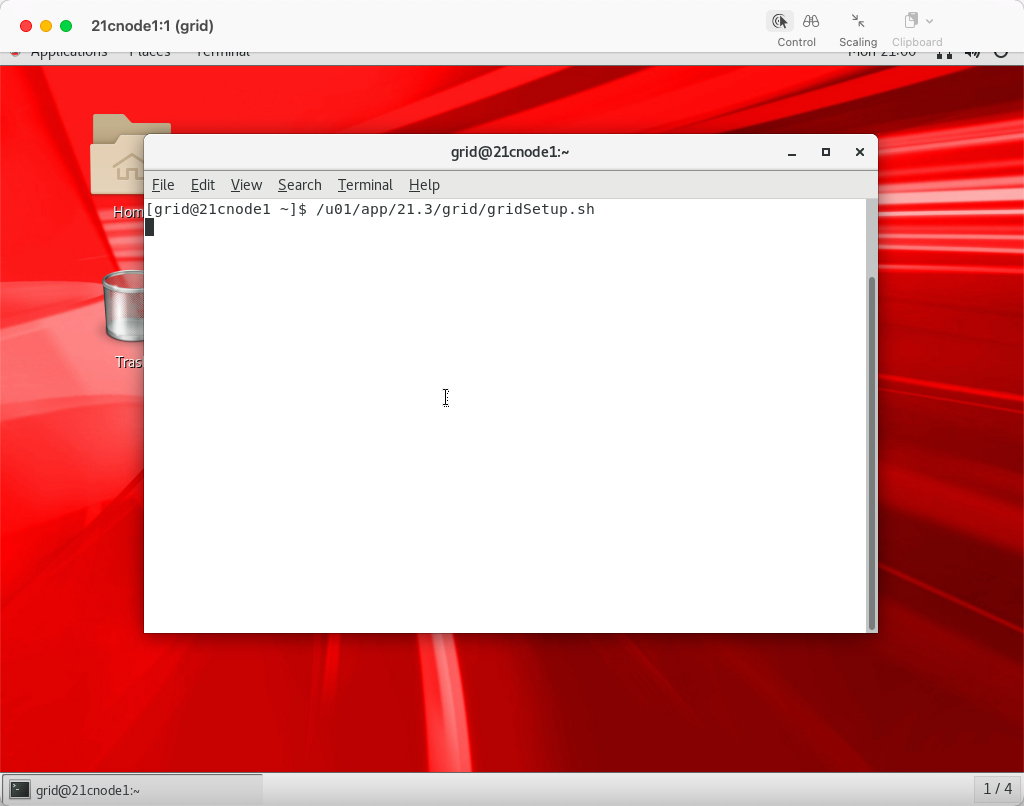
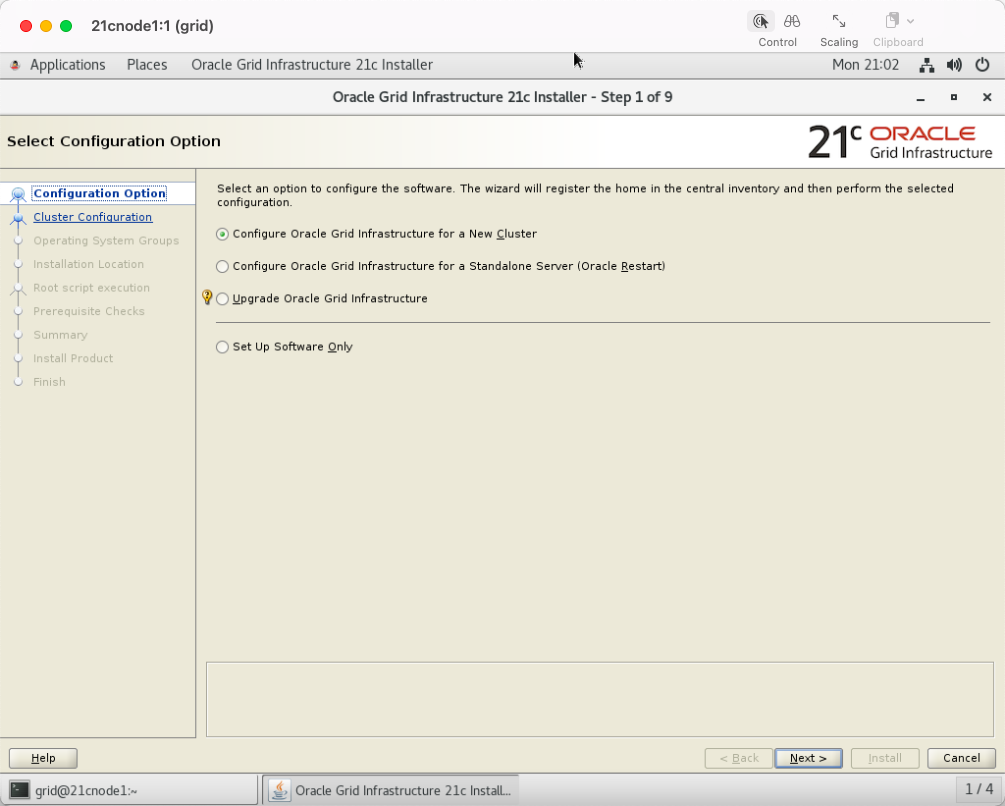
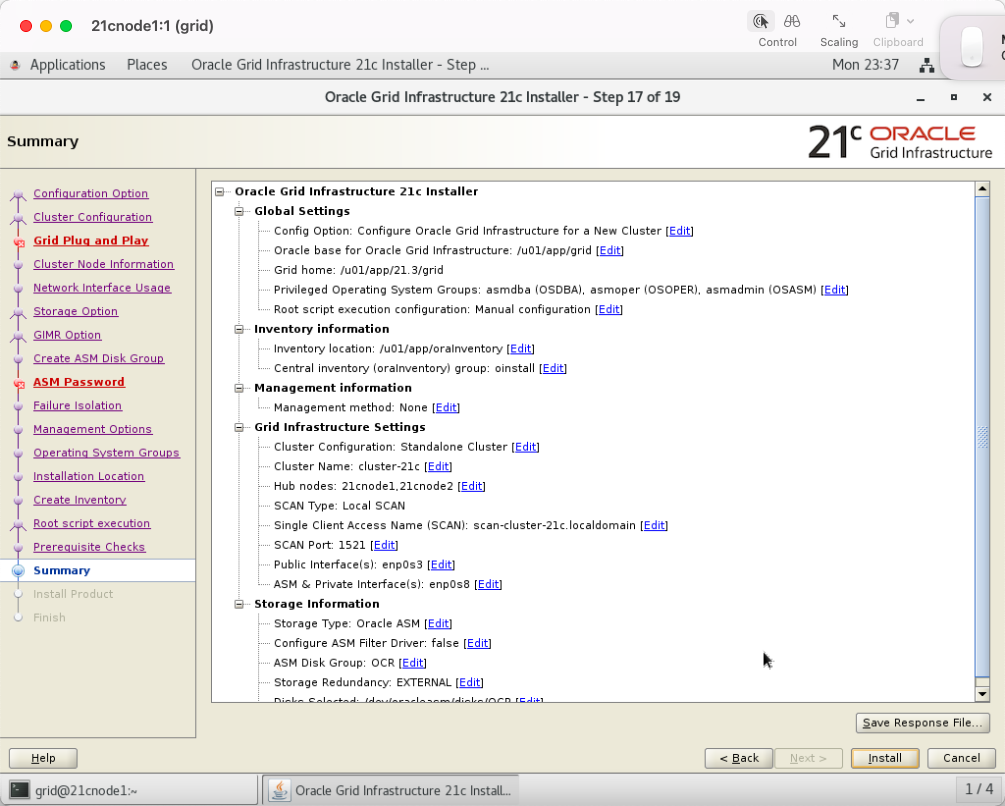
9.4 执行安装:/u01/app/21.3/grid/gridSetup.sh
选择设置一个全新的带有Oracle grid infrastructure的cluster:
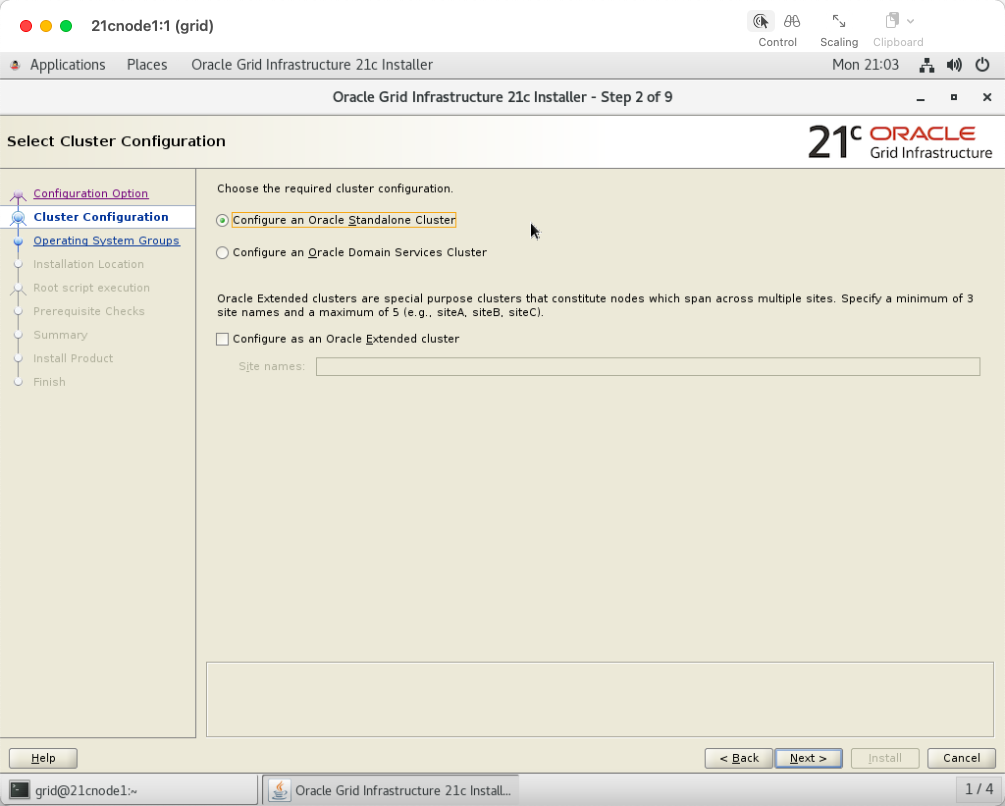
配置standalone cluster:
设置scan信息,cluster name注意事项:
不能以数字开头;
不能超过15个字符;
更多限制信息,可以参考官网链接:

进入下一步:
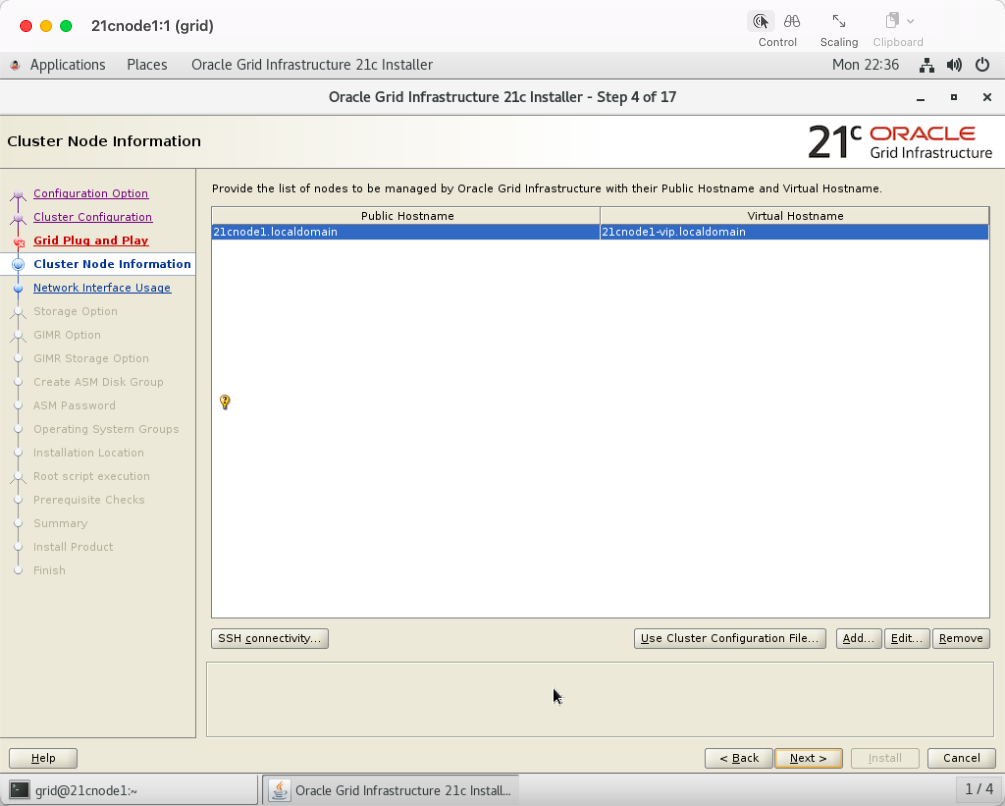
添加节点2:
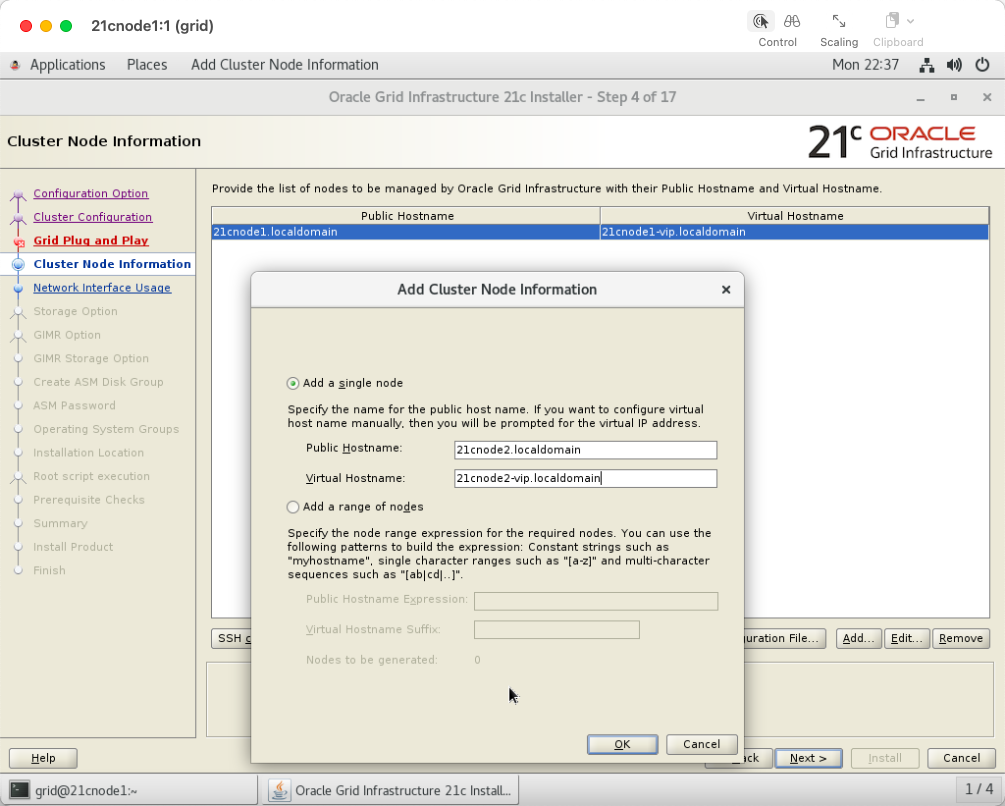
添加节点2之后:
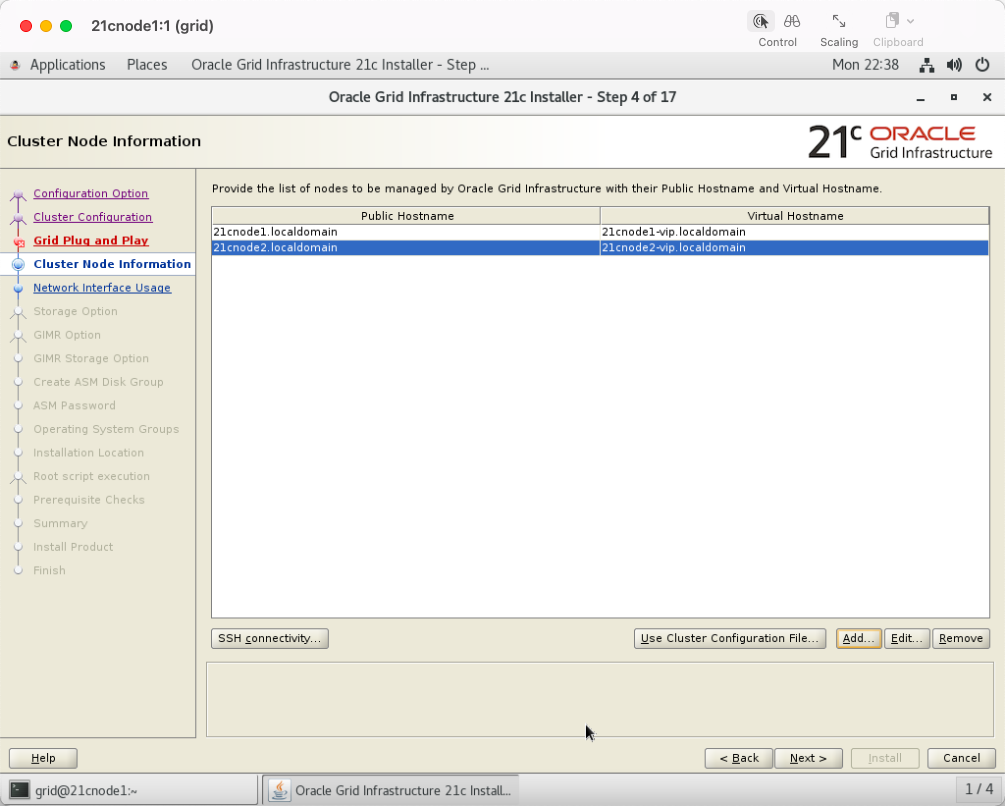
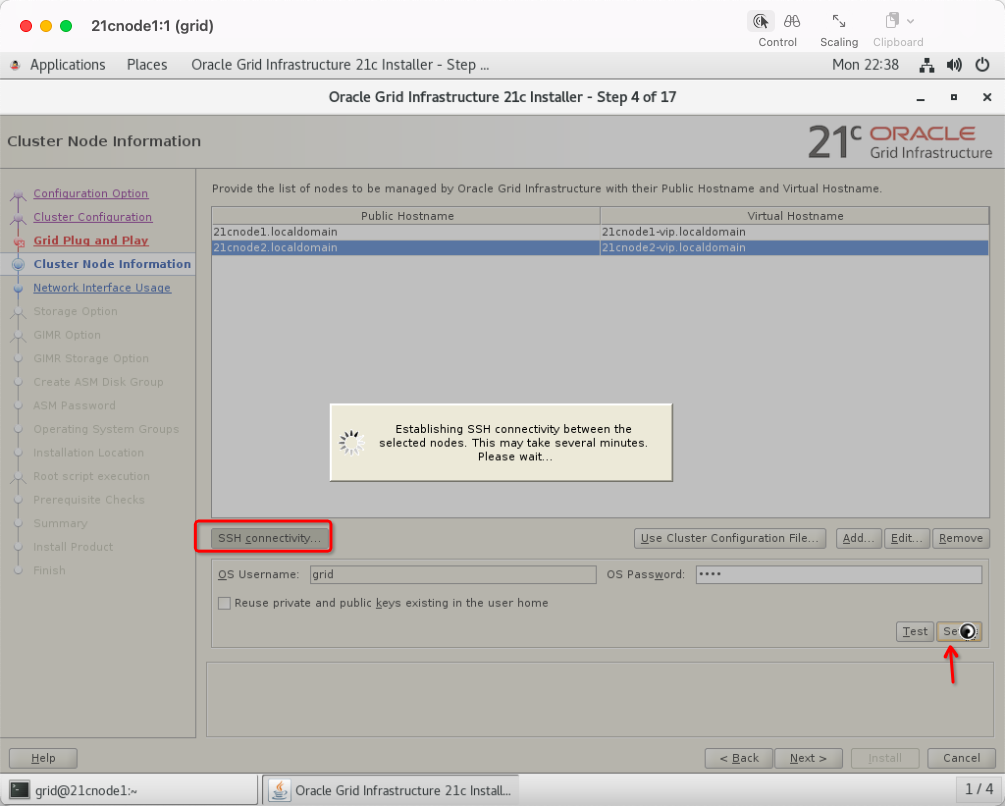
设置grid用户在双节点之间的SSH 免密码对等性:
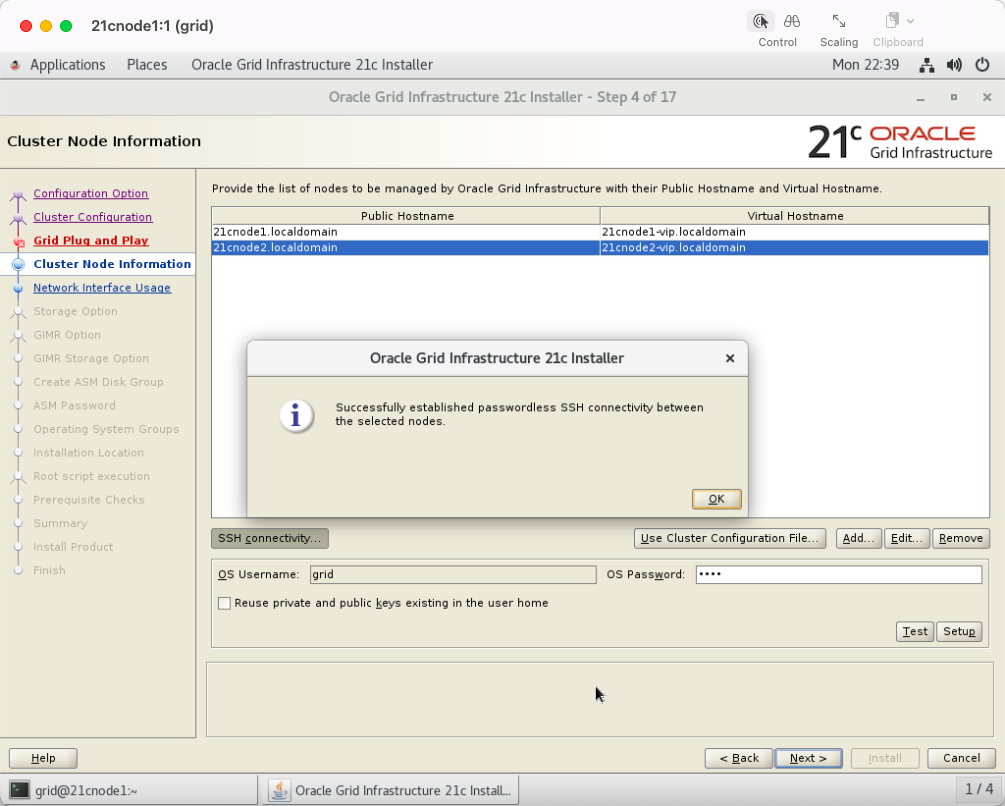
设置SSH成功:
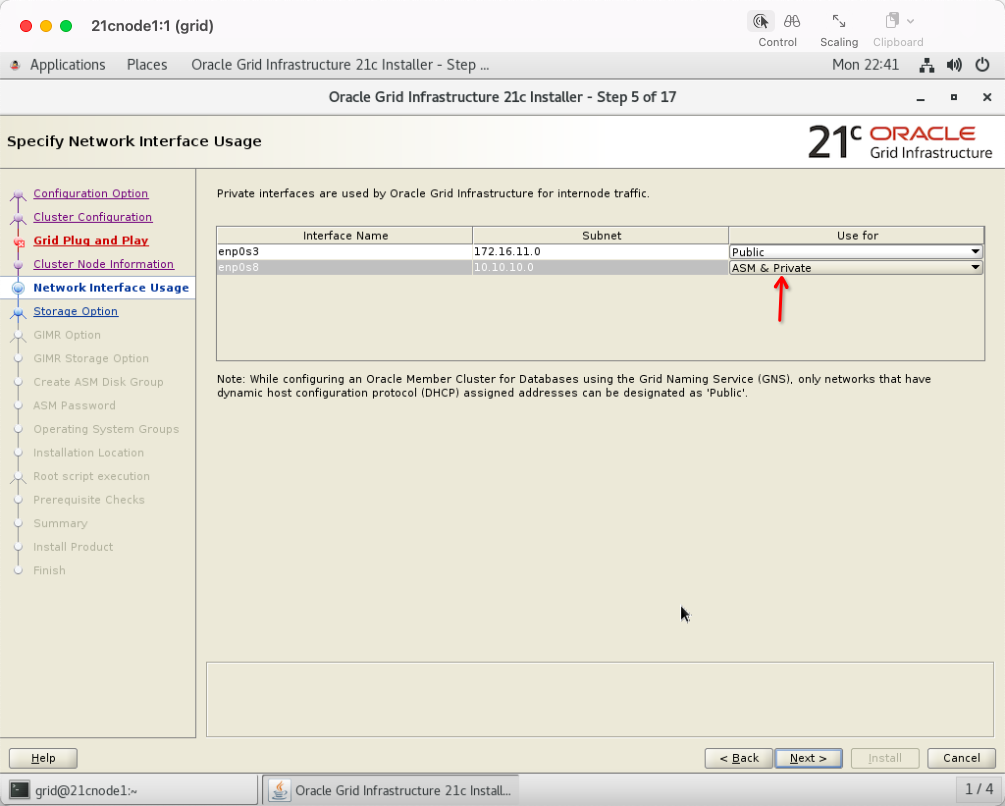
注意,private网络选择,要用ASM & Private,而不能单独使用Private。否则,后续步骤,通过ASM来存放OCR和voting disk时会报错。
选择第一项:
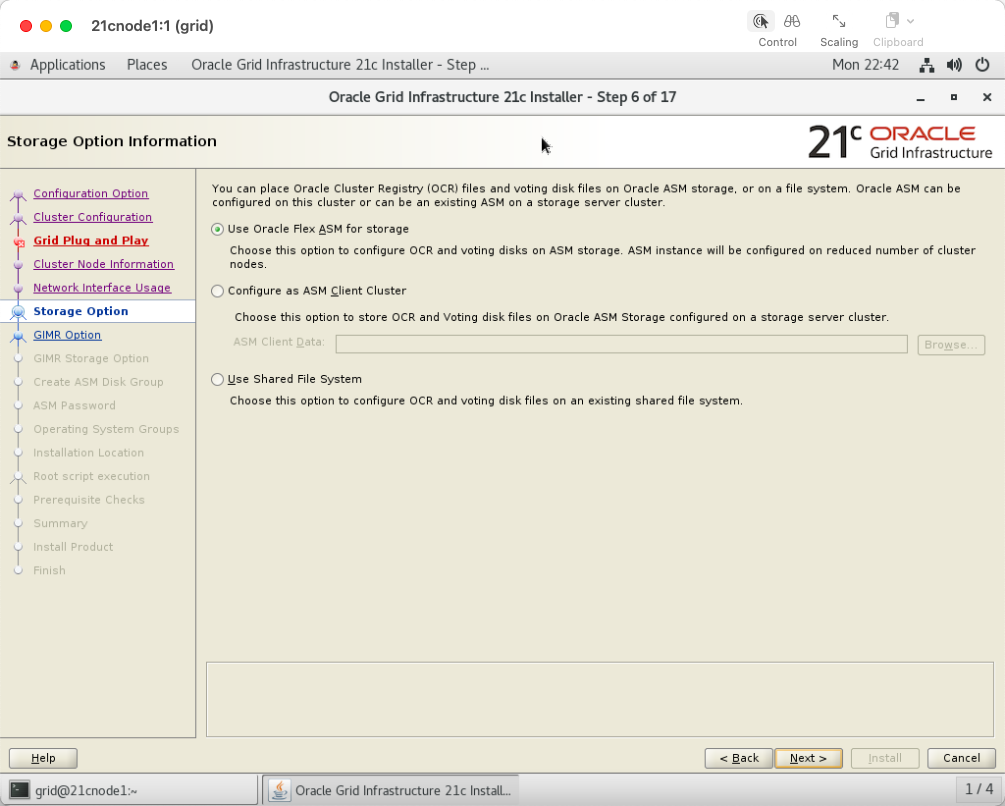
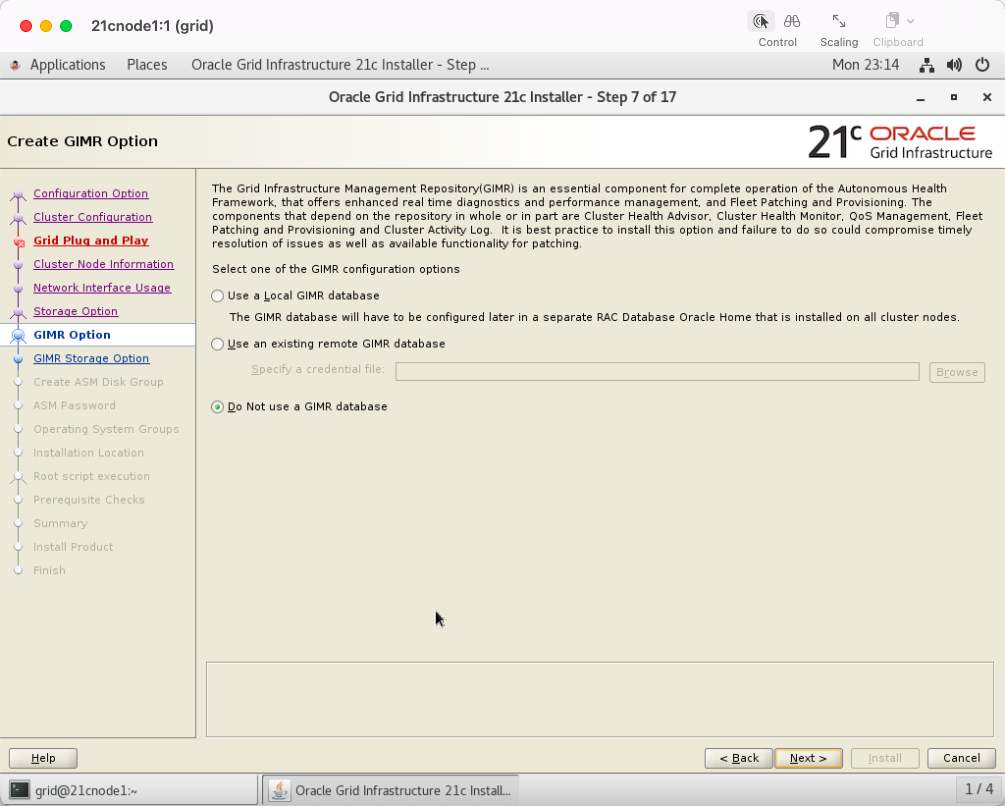
不使用GIMR:
指定磁盘组:
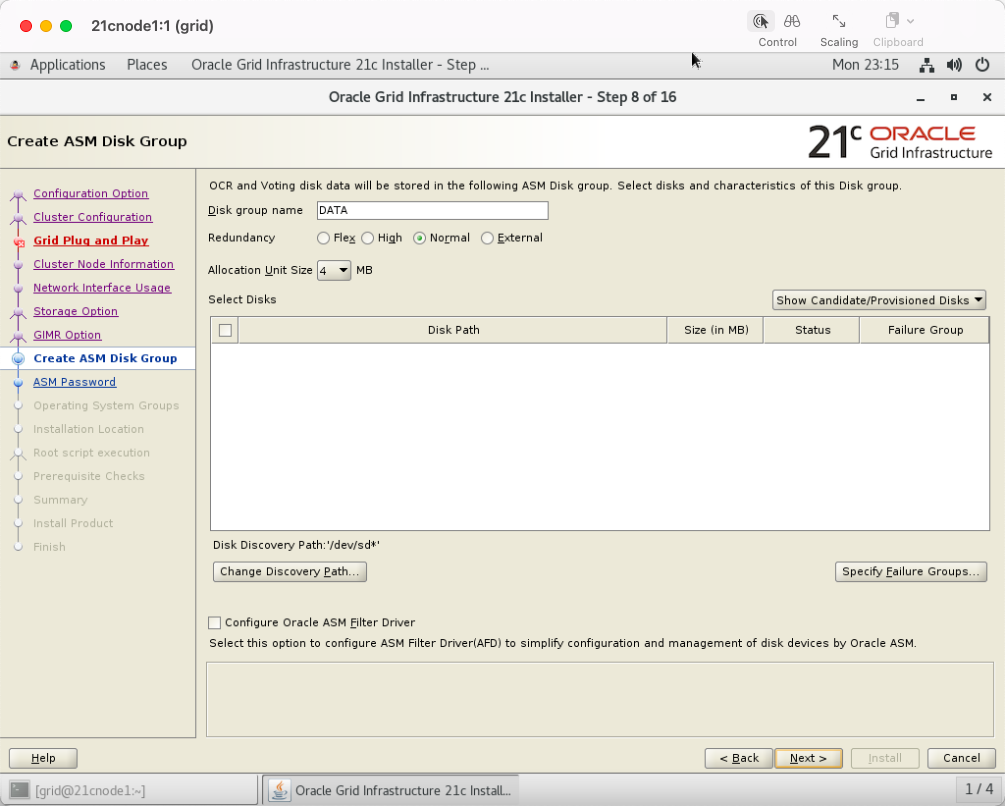
更改ASM磁盘扫描路径为/dev/oracleasm/disks/*
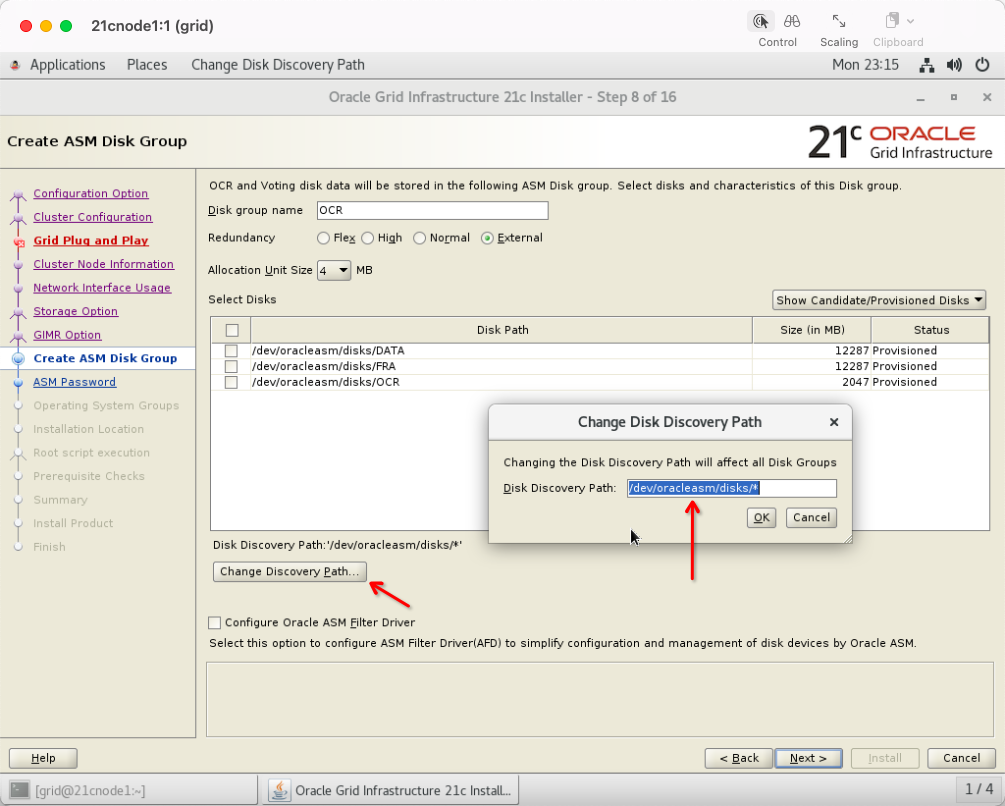
指定磁盘组名为OCR,磁盘路径为/dev/oracleasm/disks/OCR

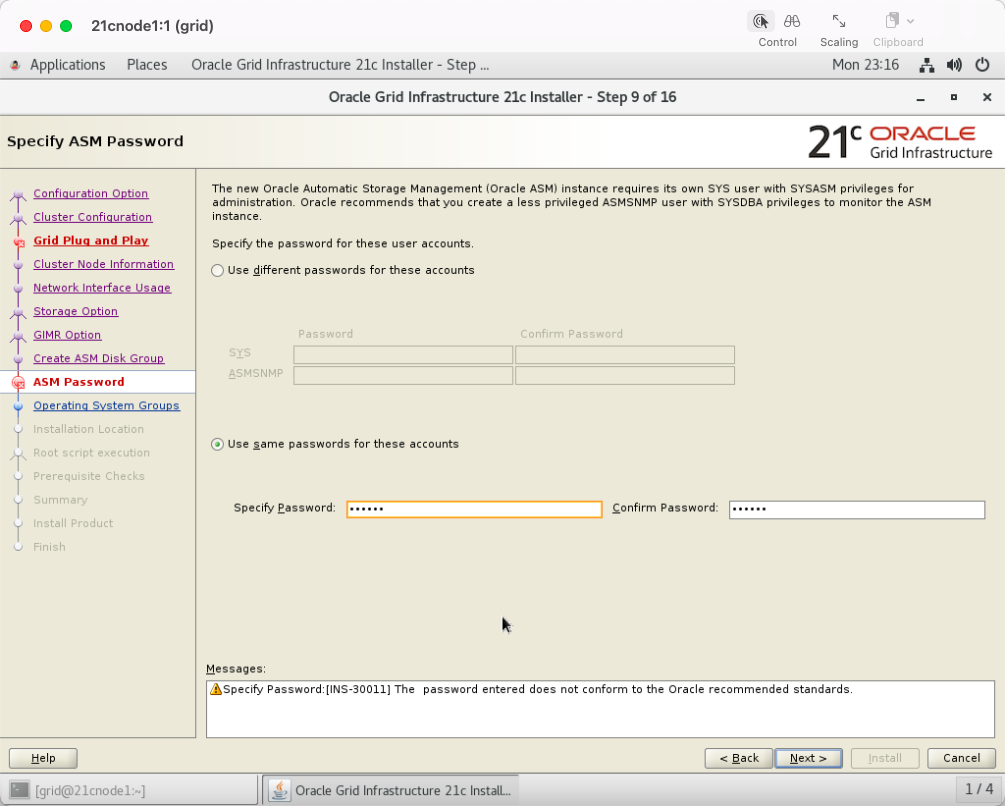
设置ASM实例管理用户密码:
不使用Intelligent platform management interface:

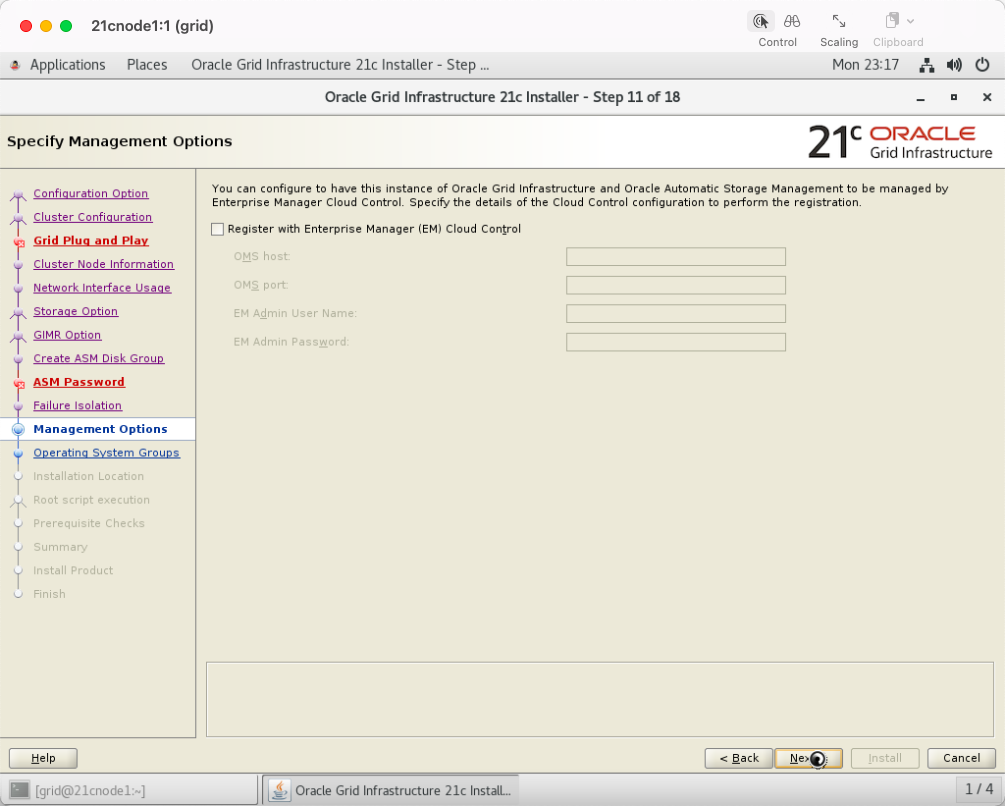
不配置EM:
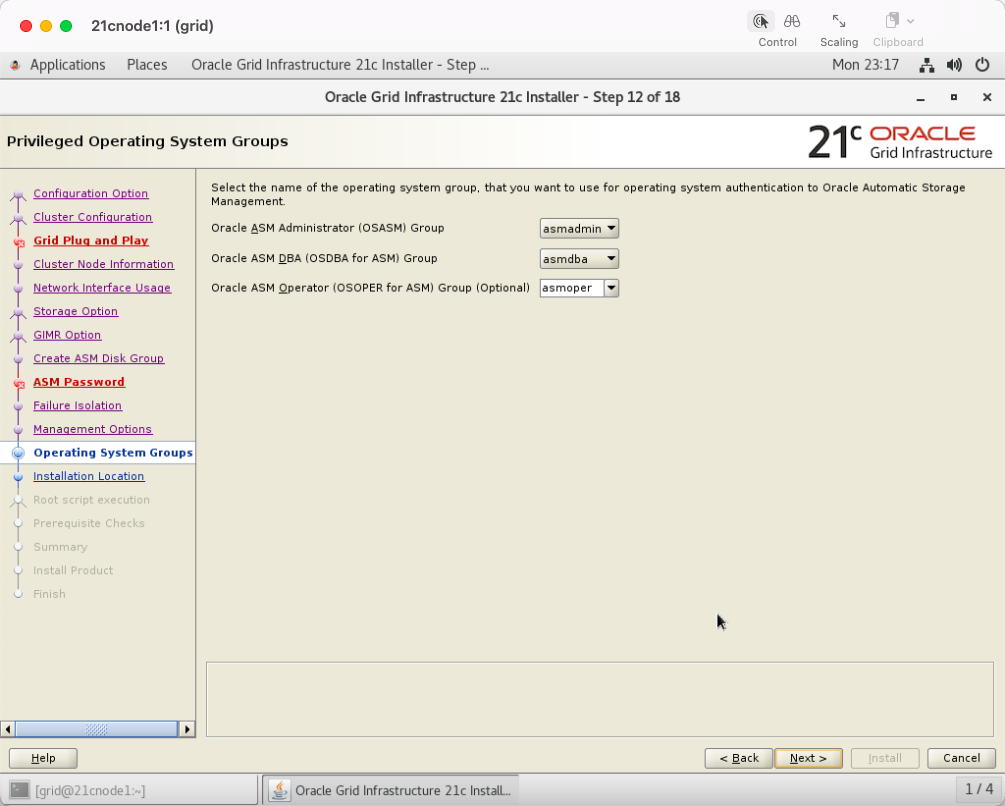
确认用户组信息:
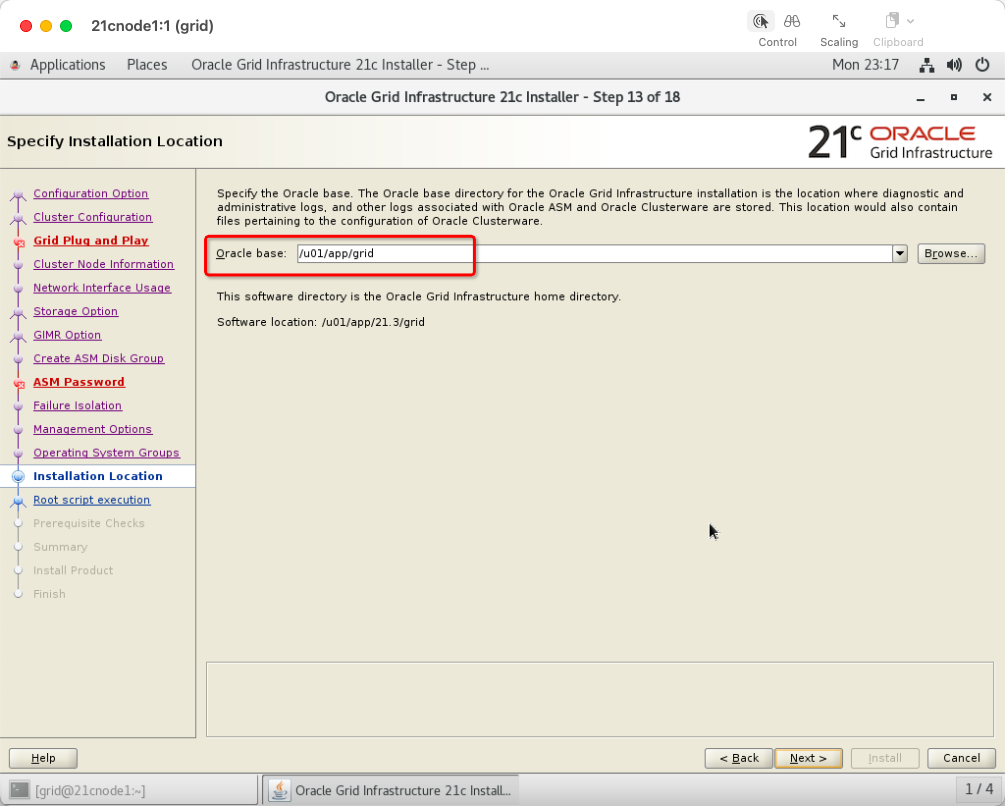
指定grid软件的ORACLE_BASE路径:/u01/app/grid
确认inventory信息:
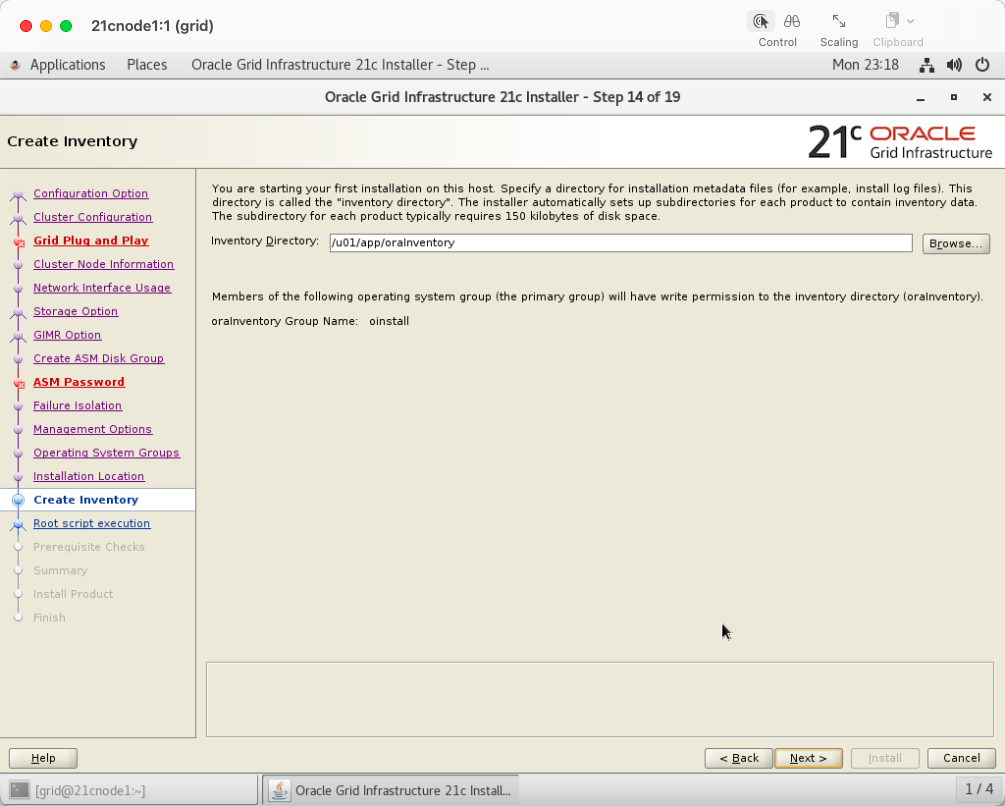
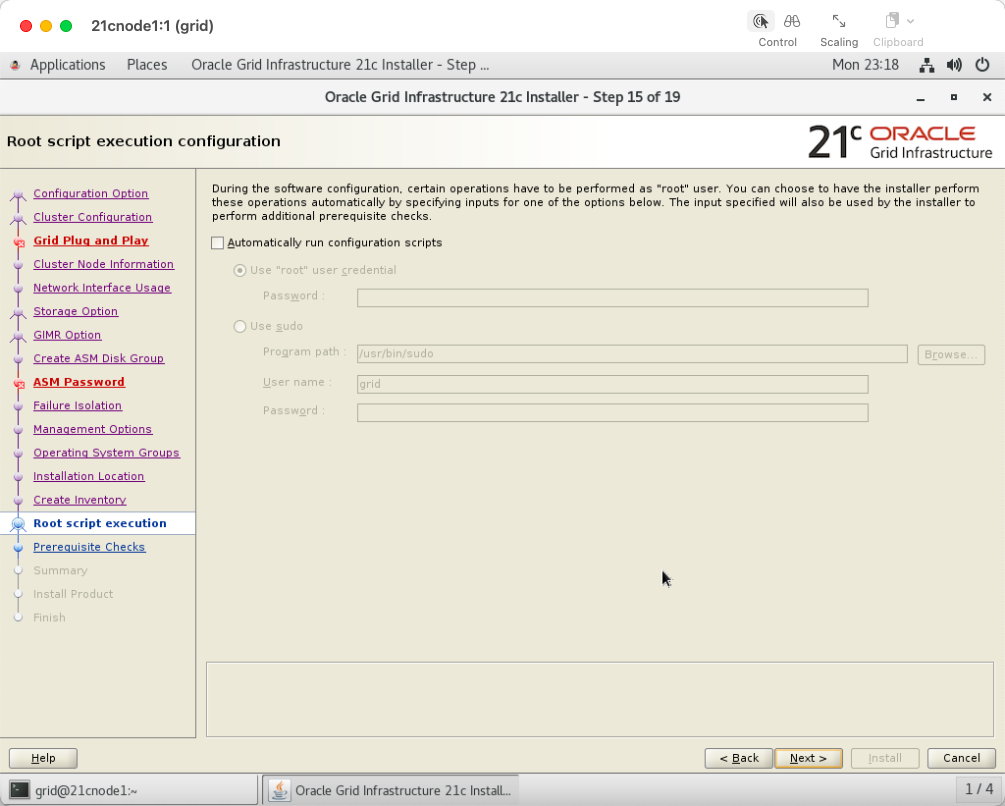
暂不需要执行其它的配置脚本:
开始执行安装前校验:
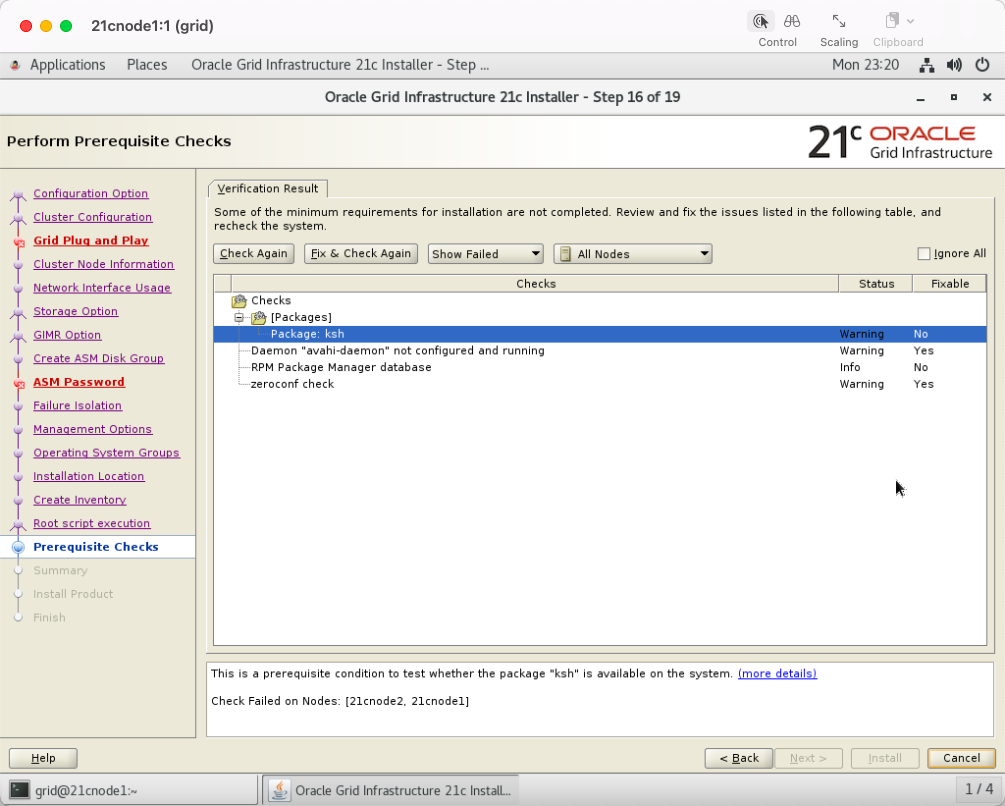
根据提示到2个节点上分别执行下述操作:
安装ksh软件包
禁用avahi-daemon进程
修改/etc/sysconfig/network,添加NOZEROCONF=yes
#0 安装ksh软件包,yum install ksh -y
[root@21cnode1 ~]# yum install ksh -y
已加载插件:langpacks, ulninfo
正在解决依赖关系
--> 正在检查事务
---> 软件包 ksh.x86_64.0.20120801-144.0.1.el7_9 将被 安装
--> 解决依赖关系完成
依赖关系解决
=====================================================================================================================================================================
Package 架构 版本 源 大小
=====================================================================================================================================================================
正在安装:
ksh x86_64 20120801-144.0.1.el7_9 ol7_latest 882 k
事务概要
=====================================================================================================================================================================
安装 1 软件包
总下载量:882 k
安装大小:3.1 M
Downloading packages:
ksh-20120801-144.0.1.el7_9.x86_64.rpm | 882 kB 00:00:03
Running transaction check
Running transaction test
Transaction test succeeded
Running transaction
正在安装 : ksh-20120801-144.0.1.el7_9.x86_64 1/1
验证中 : ksh-20120801-144.0.1.el7_9.x86_64 1/1
已安装:
ksh.x86_64 0:20120801-144.0.1.el7_9
完毕!
[root@21cnode1 ~]#
#1 禁用avahi-daemon进程
systemctl status avahi-daemon
systemctl stop avahi-daemon
systemctl disable avahi-daemon
[root@21cnode1 ~]# systemctl status avahi-daemon
● avahi-daemon.service - Avahi mDNS/DNS-SD Stack
Loaded: loaded (/usr/lib/systemd/system/avahi-daemon.service; enabled; vendor preset: enabled)
Active: active (running) since 日 2022-12-25 22:33:55 EST; 24h ago
Main PID: 3195 (avahi-daemon)
Status: "avahi-daemon 0.6.31 starting up."
Tasks: 2
CGroup: /system.slice/avahi-daemon.service
├─3195 avahi-daemon: running [21cnode1.local]
└─3232 avahi-daemon: chroot helper
12月 25 22:34:00 21cnode1 avahi-daemon[3195]: Withdrawing address record for fe80::e404:7cc9:7f2d:7f9 on enp0s8.
12月 25 22:34:00 21cnode1 avahi-daemon[3195]: Withdrawing address record for fe80::b4d9:9d3e:c444:8d9f on enp0s8.
12月 25 22:34:01 21cnode1 avahi-daemon[3195]: Registering new address record for fe80::b4d9:9d3e:c444:8d9f on enp0s8.*.
12月 25 22:34:01 21cnode1 avahi-daemon[3195]: Registering new address record for fe80::e404:7cc9:7f2d:7f9 on enp0s8.*.
12月 25 22:34:02 21cnode1 avahi-daemon[3195]: Registering new address record for fe80::cdba:5d80:c9ed:1550 on enp0s8.*.
12月 25 22:34:18 21cnode1 avahi-daemon[3195]: Registering new address record for fe80::5054:ff:fef7:ac91 on virbr0-nic.*.
12月 25 22:34:18 21cnode1 avahi-daemon[3195]: Joining mDNS multicast group on interface virbr0.IPv4 with address 192.168.122.1.
12月 25 22:34:18 21cnode1 avahi-daemon[3195]: New relevant interface virbr0.IPv4 for mDNS.
12月 25 22:34:18 21cnode1 avahi-daemon[3195]: Registering new address record for 192.168.122.1 on virbr0.IPv4.
12月 25 22:34:18 21cnode1 avahi-daemon[3195]: Withdrawing address record for fe80::5054:ff:fef7:ac91 on virbr0-nic.
[root@21cnode1 ~]# systemctl stop avahi-daemon
Warning: Stopping avahi-daemon.service, but it can still be activated by:
avahi-daemon.socket
[root@21cnode1 ~]# systemctl disable avahi-daemon
Removed symlink /etc/systemd/system/multi-user.target.wants/avahi-daemon.service.
Removed symlink /etc/systemd/system/sockets.target.wants/avahi-daemon.socket.
Removed symlink /etc/systemd/system/dbus-org.freedesktop.Avahi.service.
[root@21cnode1 ~]#
#2 修改/etc/sysconfig/network,添加NOZEROCONF=yes
[root@21cnode1 ~]# vi /etc/sysconfig/network
# Created by anaconda
NOZEROCONF=yes
...
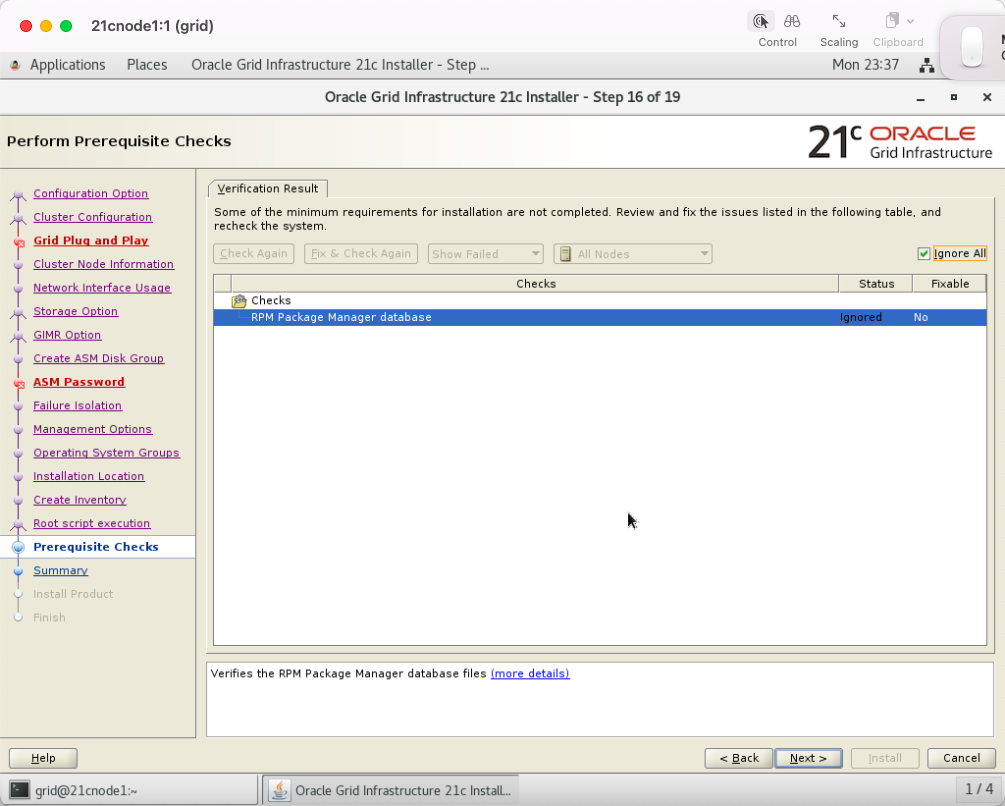
忽略RPM软件包仓库的警告:
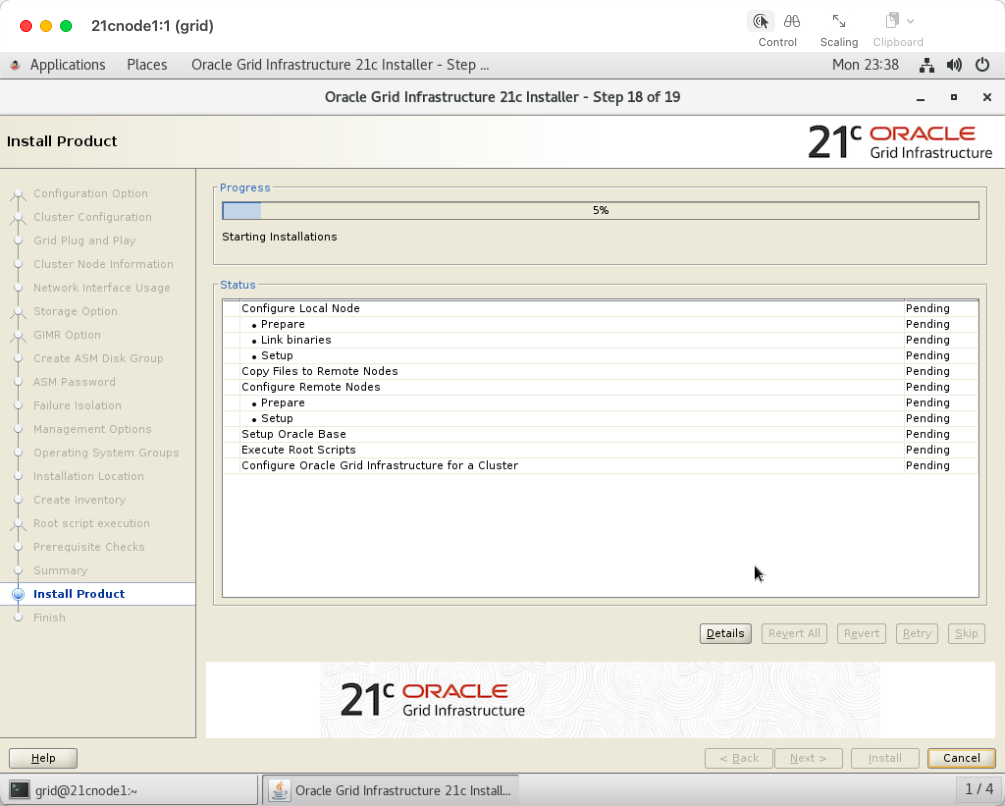
开始执行安装:
安装过程会持续一段时间:
根据提示到两个节点上分别执行脚本:
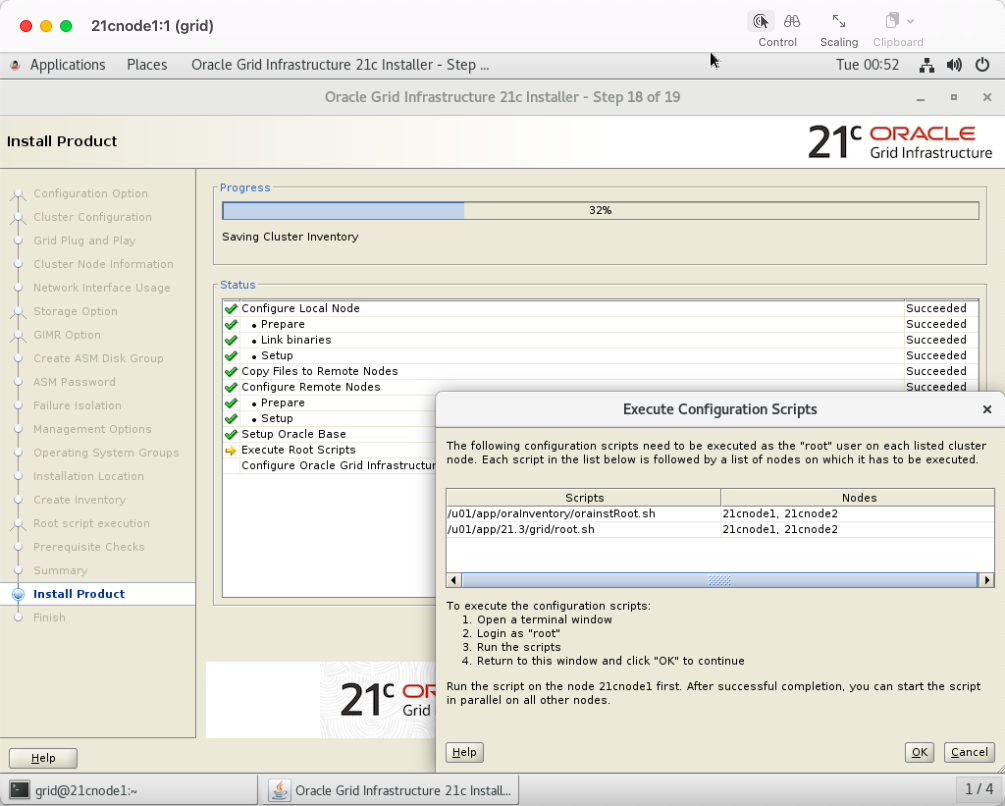
21cnode1先执行:
[root@21cnode1 ~]# /u01/app/oraInventory/orainstRoot.sh
Changing permissions of /u01/app/oraInventory.
Adding read,write permissions for group.
Removing read,write,execute permissions for world.
Changing groupname of /u01/app/oraInventory to oinstall.
The execution of the script is complete.
[root@21cnode1 ~]#
[root@21cnode1 ~]# /u01/app/21.3/grid/root.sh
Performing root user operation.
The following environment variables are set as:
ORACLE_OWNER= grid
ORACLE_HOME= /u01/app/21.3/grid
Enter the full pathname of the local bin directory: [/usr/local/bin]:
Copying dbhome to /usr/local/bin ...
Copying oraenv to /usr/local/bin ...
Copying coraenv to /usr/local/bin ...
Creating /etc/oratab file...
Entries will be added to the /etc/oratab file as needed by
Database Configuration Assistant when a database is created
Finished running generic part of root script.
Now product-specific root actions will be performed.
Relinking oracle with rac_on option
Using configuration parameter file: /u01/app/21.3/grid/crs/install/crsconfig_params
2022-12-27 01:06:57: Got permissions of file /u01/app/grid/crsdata/21cnode1/crsconfig: 0775
2022-12-27 01:06:57: Got permissions of file /u01/app/grid/crsdata: 0775
2022-12-27 01:06:57: Got permissions of file /u01/app/grid/crsdata/21cnode1: 0775
The log of current session can be found at:
/u01/app/grid/crsdata/21cnode1/crsconfig/rootcrs_21cnode1_2022-12-27_01-06-57AM.log
2022/12/27 01:07:16 CLSRSC-594: Executing installation step 1 of 19: 'SetupTFA'.
2022/12/27 01:07:16 CLSRSC-594: Executing installation step 2 of 19: 'ValidateEnv'.
2022/12/27 01:07:17 CLSRSC-594: Executing installation step 3 of 19: 'CheckFirstNode'.
2022/12/27 01:07:22 CLSRSC-594: Executing installation step 4 of 19: 'GenSiteGUIDs'.
2022/12/27 01:07:24 CLSRSC-594: Executing installation step 5 of 19: 'SetupOSD'.
Redirecting to /bin/systemctl restart rsyslog.service
2022/12/27 01:07:26 CLSRSC-594: Executing installation step 6 of 19: 'CheckCRSConfig'.
2022/12/27 01:07:27 CLSRSC-594: Executing installation step 7 of 19: 'SetupLocalGPNP'.
2022/12/27 01:08:17 CLSRSC-594: Executing installation step 8 of 19: 'CreateRootCert'.
2022/12/27 01:08:33 CLSRSC-594: Executing installation step 9 of 19: 'ConfigOLR'.
2022/12/27 01:09:27 CLSRSC-594: Executing installation step 10 of 19: 'ConfigCHMOS'.
2022/12/27 01:09:27 CLSRSC-594: Executing installation step 11 of 19: 'CreateOHASD'.
2022/12/27 01:09:46 CLSRSC-594: Executing installation step 12 of 19: 'ConfigOHASD'.
2022/12/27 01:09:46 CLSRSC-330: Adding Clusterware entries to file 'oracle-ohasd.service'
2022/12/27 01:10:34 CLSRSC-594: Executing installation step 13 of 19: 'InstallAFD'.
2022/12/27 01:10:34 CLSRSC-594: Executing installation step 14 of 19: 'InstallACFS'.
2022/12/27 01:10:46 CLSRSC-594: Executing installation step 15 of 19: 'InstallKA'.
2022/12/27 01:10:58 CLSRSC-4002: Successfully installed Oracle Autonomous Health Framework (AHF).
2022/12/27 01:10:59 CLSRSC-594: Executing installation step 16 of 19: 'InitConfig'.
2022/12/27 01:12:40 CLSRSC-482: Running command: '/u01/app/21.3/grid/bin/ocrconfig -upgrade grid oinstall'
CRS-4256: Updating the profile
Successful addition of voting disk 00802c6b64684fe2bf7b6931f06ac429.
Successfully replaced voting disk group with +OCR.
CRS-4256: Updating the profile
CRS-4266: Voting file(s) successfully replaced
## STATE File Universal Id File Name Disk group
-- ----- ----------------- --------- ---------
1. ONLINE 00802c6b64684fe2bf7b6931f06ac429 (/dev/oracleasm/disks/OCR) [OCR]
Located 1 voting disk(s).
2022/12/27 01:14:47 CLSRSC-594: Executing installation step 17 of 19: 'StartCluster'.
2022/12/27 01:16:14 CLSRSC-343: Successfully started Oracle Clusterware stack
2022/12/27 01:16:14 CLSRSC-594: Executing installation step 18 of 19: 'ConfigNode'.
2022/12/27 01:20:22 CLSRSC-594: Executing installation step 19 of 19: 'PostConfig'.
2022/12/27 01:21:14 CLSRSC-325: Configure Oracle Grid Infrastructure for a Cluster ... succeeded
[root@21cnode1 ~]#
21cnode2后执行:
[root@21cnode2 ~]# /u01/app/oraInventory/orainstRoot.sh
Changing permissions of /u01/app/oraInventory.
Adding read,write permissions for group.
Removing read,write,execute permissions for world.
Changing groupname of /u01/app/oraInventory to oinstall.
The execution of the script is complete.
[root@21cnode2 ~]# /u01/app/21.3/grid/root.sh
Performing root user operation.
The following environment variables are set as:
ORACLE_OWNER= grid
ORACLE_HOME= /u01/app/21.3/grid
Enter the full pathname of the local bin directory: [/usr/local/bin]:
Copying dbhome to /usr/local/bin ...
Copying oraenv to /usr/local/bin ...
Copying coraenv to /usr/local/bin ...
Creating /etc/oratab file...
Entries will be added to the /etc/oratab file as needed by
Database Configuration Assistant when a database is created
Finished running generic part of root script.
Now product-specific root actions will be performed.
Relinking oracle with rac_on option
Using configuration parameter file: /u01/app/21.3/grid/crs/install/crsconfig_params
2022-12-27 01:24:14: Got permissions of file /u01/app/grid/crsdata/21cnode2/crsconfig: 0775
2022-12-27 01:24:14: Got permissions of file /u01/app/grid/crsdata: 0775
2022-12-27 01:24:14: Got permissions of file /u01/app/grid/crsdata/21cnode2: 0775
The log of current session can be found at:
/u01/app/grid/crsdata/21cnode2/crsconfig/rootcrs_21cnode2_2022-12-27_01-24-14AM.log
2022/12/27 01:24:32 CLSRSC-594: Executing installation step 1 of 19: 'SetupTFA'.
2022/12/27 01:24:32 CLSRSC-594: Executing installation step 2 of 19: 'ValidateEnv'.
2022/12/27 01:24:32 CLSRSC-594: Executing installation step 3 of 19: 'CheckFirstNode'.
2022/12/27 01:24:35 CLSRSC-594: Executing installation step 4 of 19: 'GenSiteGUIDs'.
2022/12/27 01:24:35 CLSRSC-594: Executing installation step 5 of 19: 'SetupOSD'.
Redirecting to /bin/systemctl restart rsyslog.service
2022/12/27 01:24:36 CLSRSC-594: Executing installation step 6 of 19: 'CheckCRSConfig'.
2022/12/27 01:24:37 CLSRSC-594: Executing installation step 7 of 19: 'SetupLocalGPNP'.
2022/12/27 01:24:42 CLSRSC-594: Executing installation step 8 of 19: 'CreateRootCert'.
2022/12/27 01:24:42 CLSRSC-594: Executing installation step 9 of 19: 'ConfigOLR'.
2022/12/27 01:25:18 CLSRSC-594: Executing installation step 10 of 19: 'ConfigCHMOS'.
2022/12/27 01:25:19 CLSRSC-594: Executing installation step 11 of 19: 'CreateOHASD'.
2022/12/27 01:25:24 CLSRSC-594: Executing installation step 12 of 19: 'ConfigOHASD'.
2022/12/27 01:25:24 CLSRSC-330: Adding Clusterware entries to file 'oracle-ohasd.service'
2022/12/27 01:26:14 CLSRSC-594: Executing installation step 13 of 19: 'InstallAFD'.
2022/12/27 01:26:15 CLSRSC-594: Executing installation step 14 of 19: 'InstallACFS'.
2022/12/27 01:26:26 CLSRSC-594: Executing installation step 15 of 19: 'InstallKA'.
2022/12/27 01:26:34 CLSRSC-594: Executing installation step 16 of 19: 'InitConfig'.
2022/12/27 01:27:11 CLSRSC-594: Executing installation step 17 of 19: 'StartCluster'.
2022/12/27 01:28:32 CLSRSC-343: Successfully started Oracle Clusterware stack
2022/12/27 01:28:32 CLSRSC-594: Executing installation step 18 of 19: 'ConfigNode'.
2022/12/27 01:28:57 CLSRSC-594: Executing installation step 19 of 19: 'PostConfig'.
2022/12/27 01:29:08 CLSRSC-325: Configure Oracle Grid Infrastructure for a Cluster ... succeeded
[root@21cnode2 ~]# 2022/12/27 01:29:38 CLSRSC-4002: Successfully installed Oracle Autonomous Health Framework (AHF).
[root@21cnode2 ~]# 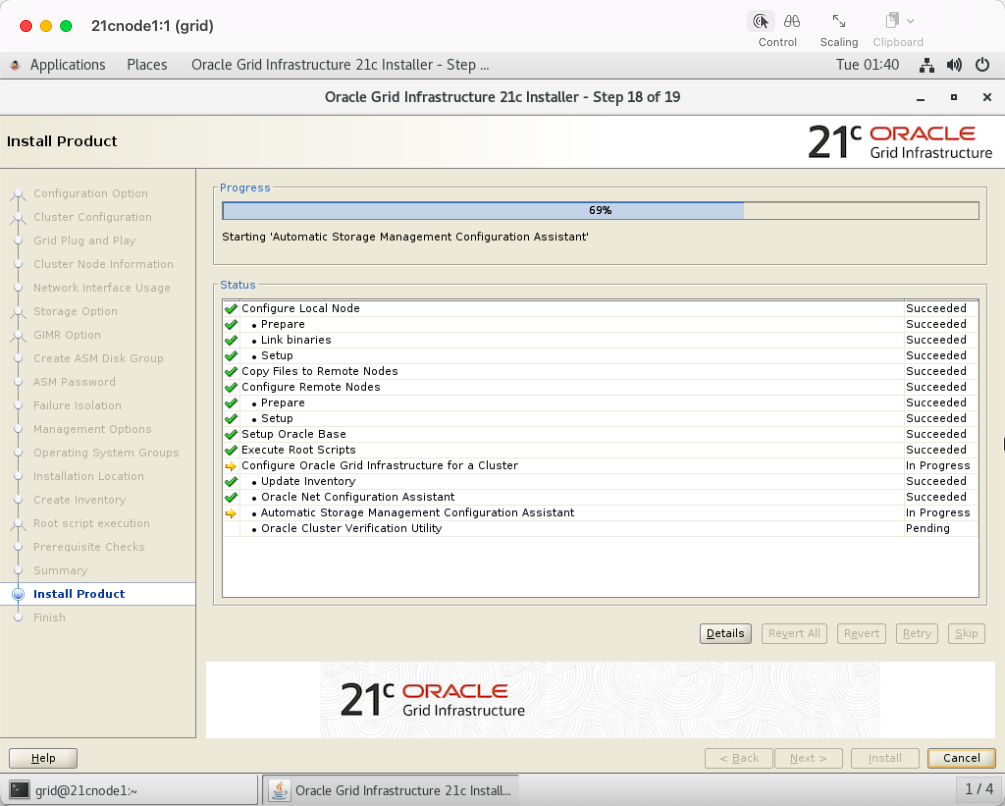
点击close
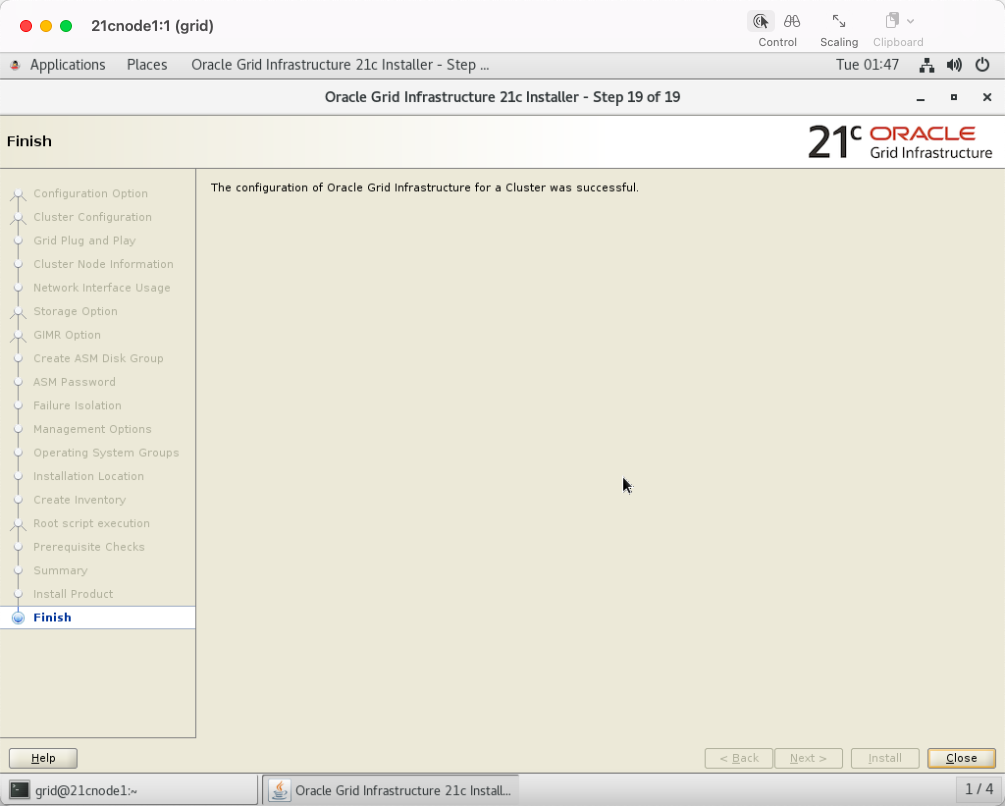
至此,完成双节点的grid clusterware安装配置。
验证cluster服务:
[root@21cnode1 ~]# /u01/app/21.3/grid/bin/crsctl check cluster -all
**************************************************************
21cnode1:
CRS-4537: Cluster Ready Services is online
CRS-4529: Cluster Synchronization Services is online
CRS-4533: Event Manager is online
**************************************************************
21cnode2:
CRS-4537: Cluster Ready Services is online
CRS-4529: Cluster Synchronization Services is online
CRS-4533: Event Manager is online
**************************************************************
[root@21cnode1 ~]#
检查cluster name:
[root@21cnode1 ~]# /u01/app/21.3/grid/bin/cemutlo -n cluster-21c [root@21cnode1 ~]# 或者: [root@21cnode1 ~]# /u01/app/21.3/grid/bin/olsnodes -C cluster-21c [root@21cnode1 ~]#
查看OCR信息:
[root@21cnode1 ~]# /u01/app/21.3/grid/bin/ocrcheck
Status of Oracle Cluster Registry is as follows :
Version : 4
Total space (kbytes) : 901284
Used space (kbytes) : 84956
Available space (kbytes) : 816328
ID : 1953663258
Device/File Name : +OCR
Device/File integrity check succeeded
Device/File not configured
Device/File not configured
Device/File not configured
Device/File not configured
Cluster registry integrity check succeeded
Logical corruption check succeeded
[root@21cnode1 ~]# 查看voting disk:
[root@21cnode1 ~]# /u01/app/21.3/grid/bin/crsctl query css votedisk ## STATE File Universal Id File Name Disk group -- ----- ----------------- --------- --------- 1. ONLINE 0a66e31a27064f92bfeebb215939b3db (/dev/oracleasm/disks/OCR) [OCR] Located 1 voting disk(s). [root@21cnode1 ~]#
检查集群各组件状态:
$GRID_HOME/bin/crsctl stat res -t $GRID_HOME/bin/crsctl check crs $GRID_HOME/bin/crsctl check cssd $GRID_HOME/bin/crsctl check crsd $GRID_HOME/bin/crsctl check evmd
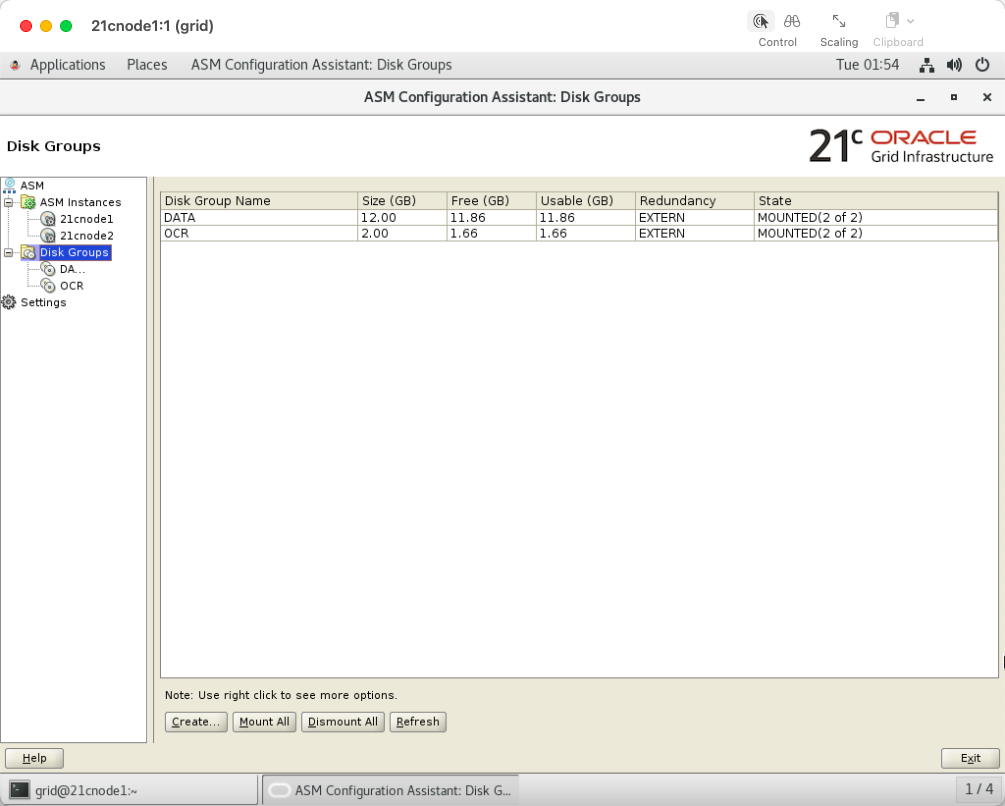
10 配置ASM磁盘组:DATA和FRA
10.1 grid用户登录图形界面,执行asmca:
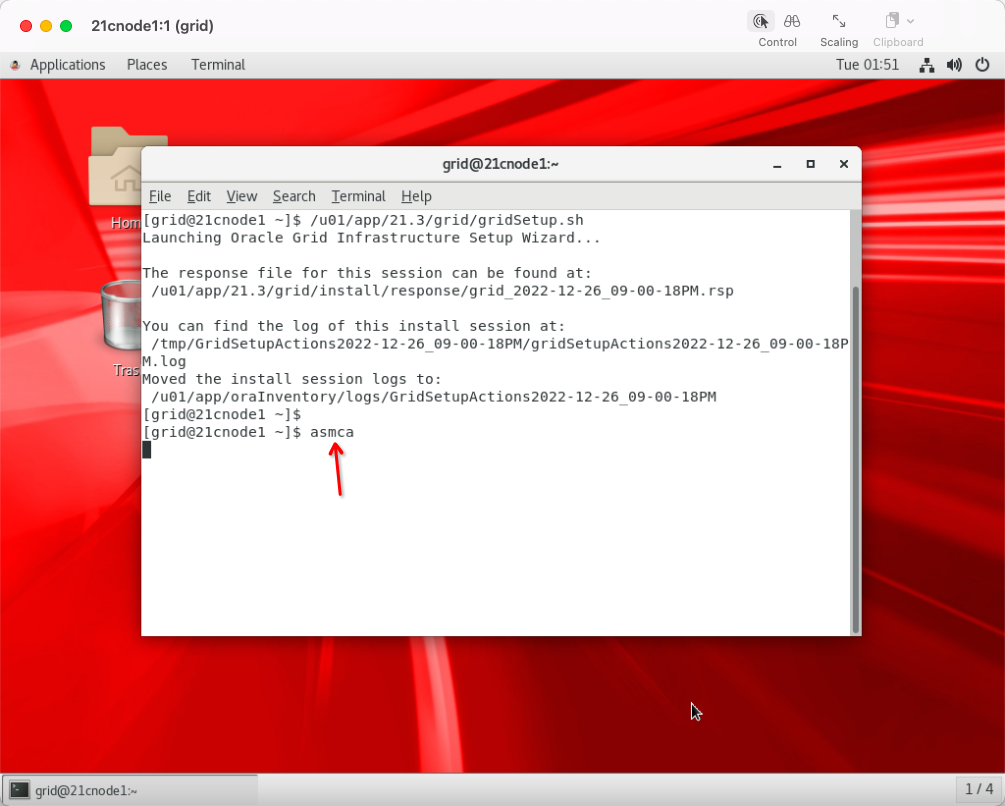
asmca欢迎页面:
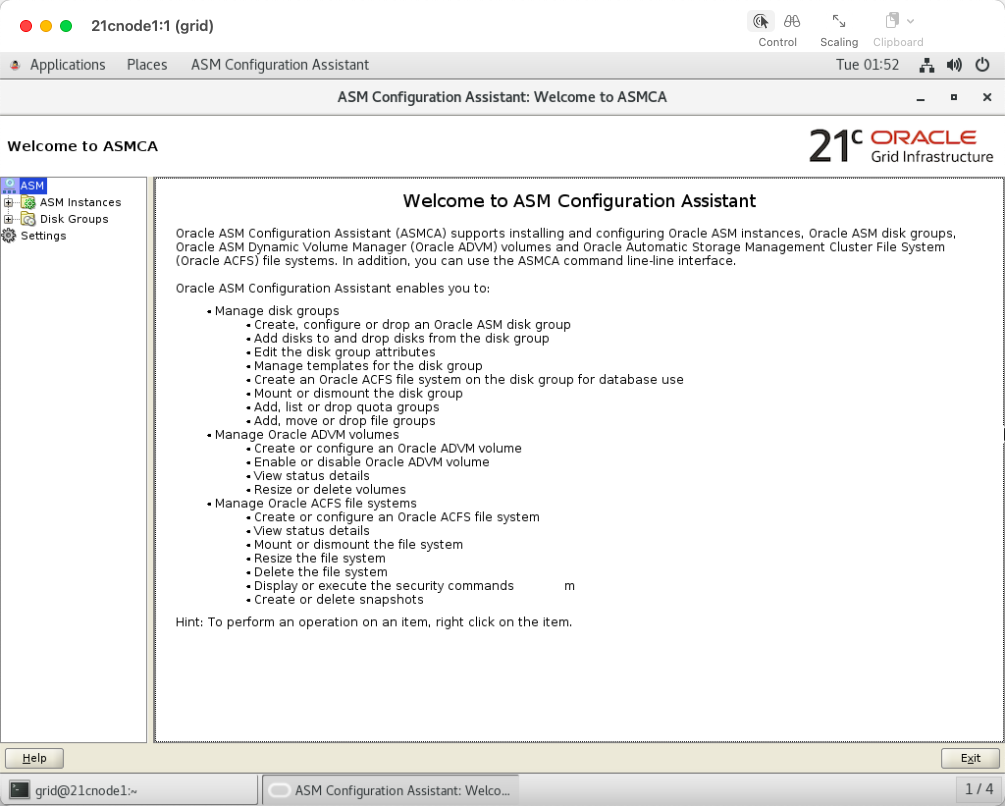
点击Disk groups:

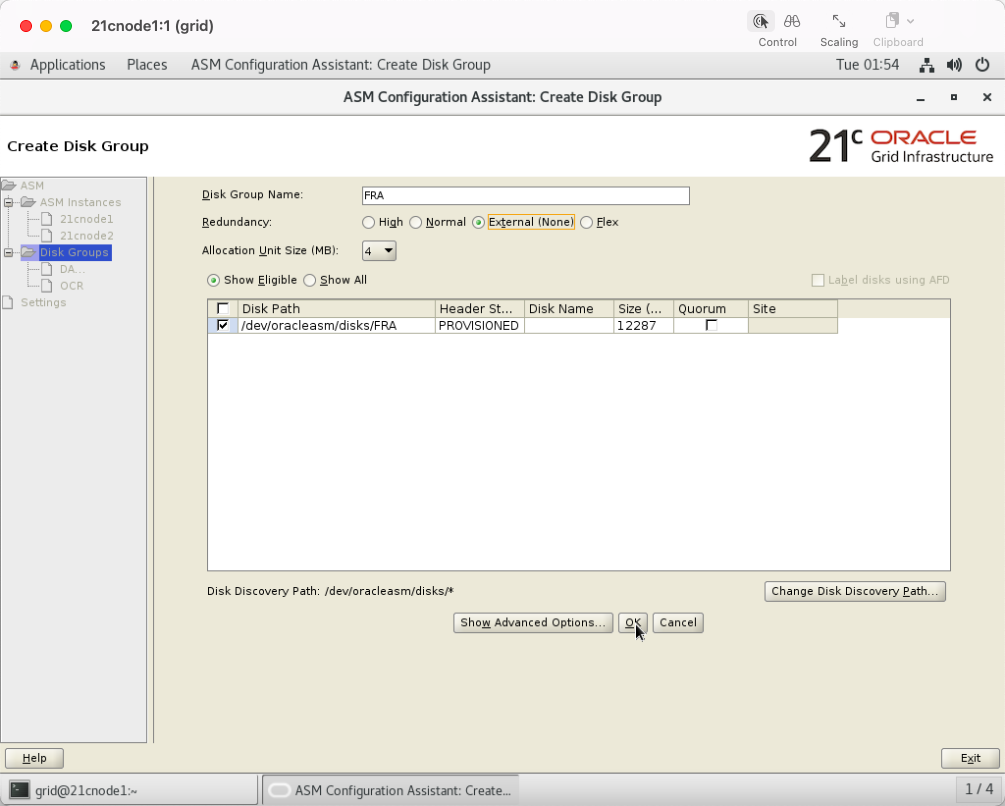
10.2 创建data磁盘组
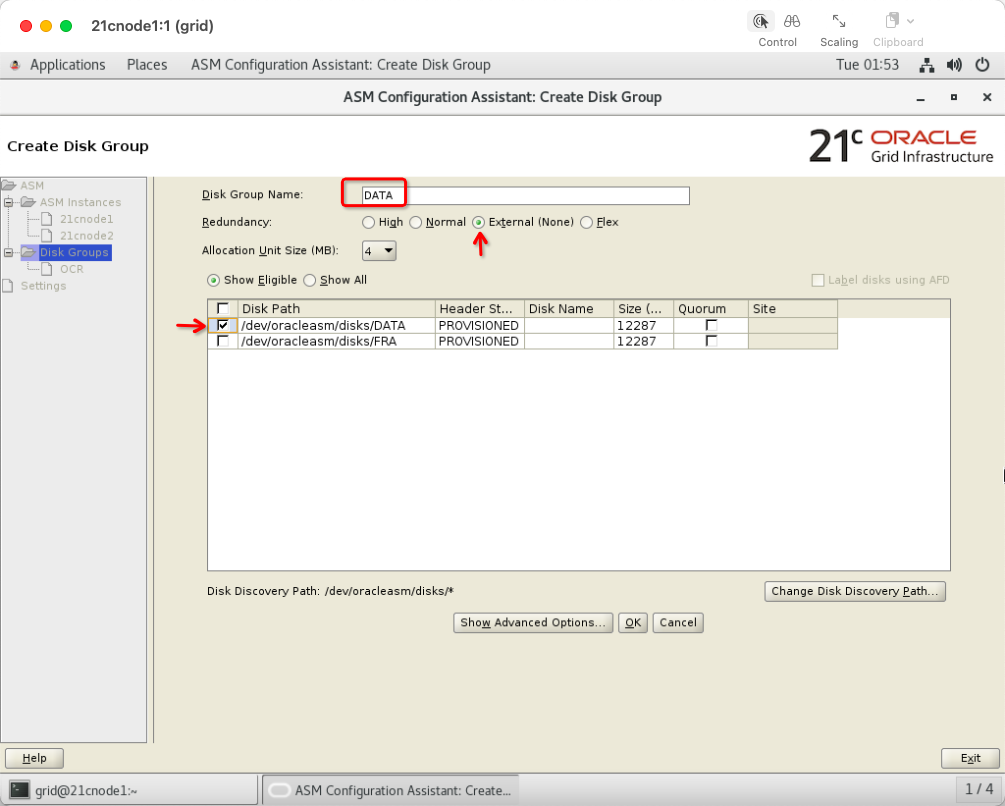
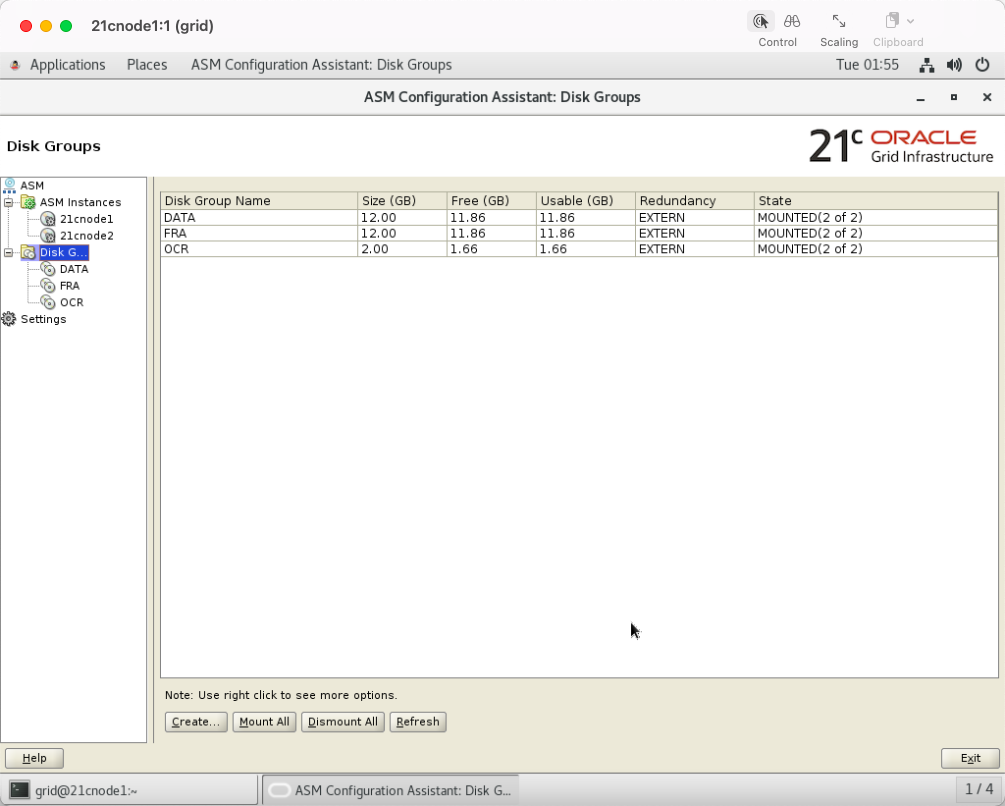
data磁盘组创建成功之后:
10.3 创建fra磁盘组
最终,创建完data和fra磁盘组之后的信息如下:
11 安装Oracle软件
11.1 上传Oracle软件到21cnode1
[root@centos-master OEL]# pwd
/root/OEL
[root@centos-master OEL]# ll
总用量 31711916
-rw-r--r-- 1 root root       3112 9月   2 13:55 12.wget.sh
-rw-r--r-- 1 root root       3116 9月   2 13:50 18.wget.sh
-rw-r--r-- 1 root root          0 9月   2 13:50 cliauth
-rw-r--r-- 1 root root          0 9月   2 14:10 cliauth.1
-rw-r--r-- 1 root root 3453696911 6月  24 2020 LINUX.X64_122010_db_home.zip
-rw-r--r-- 1 root root 2994687209 6月  24 2020 LINUX.X64_122010_grid_home.zip
-rw-r--r-- 1 root root 5382265496 7月  19 2018 LINUX.X64_180000_db_home.zip
-rw-r--r-- 1 root root 4564649047 7月  19 2018 LINUX.X64_180000_grid_home.zip
-rw-r--r-- 1 root root 3059705302 4月  24 2019 LINUX.X64_193000_db_home.zip
-rw-r--r-- 1 root root 2889184573 4月  24 2019 LINUX.X64_193000_grid_home.zip
-rw-r--r-- 1 root root 3109225519 8月  10 2021 LINUX.X64_213000_db_home.zip
-rw-r--r-- 1 root root 2422217613 8月  10 2021 LINUX.X64_213000_grid_home.zip
-rw-r--r-- 1 root root 4571791360 8月  26 08:41 V980739-01.iso
-rw-r--r-- 1 root root   15496464 9月   2 14:24 wgetlog-09-02-22-13:50.log
-rw-r--r-- 1 root root   10016155 9月   2 14:34 wgetlog-09-02-22-14:10.log
[root@centos-master OEL]# scp LINUX.X64_213000_db_home.zip oracle@172.16.11.211:/home/oracle/
oracle@172.16.11.211's password:
LINUX.X64_213000_db_home.zip                                                                                                                                                                100% 2965MB  14.5MB/s   03:24
[root@centos-master OEL]#
11.2 oracle用户解压数据库软件
[root@centos-master OEL]# ssh oracle@172.16.11.211
oracle@172.16.11.211's password:
Last login: Mon Dec 26 03:30:44 2022
[oracle@21cnode1 ~]$ ll
总用量 3036356
-rw-r--r-- 1 oracle oinstall 3109225519 12月 27 02:06 LINUX.X64_213000_db_home.zip
[oracle@21cnode1 ~]$ unzip -q -d /u01/app/oracle/product/21.3/ LINUX.X64_213000_db_home.zip
[oracle@21cnode1 ~]$
11.3 安装Oracle
oracle用户启动vnc server:
[oracle@21cnode1 ~]$ vncserver You will require a password to access your desktops. Password: Verify: Would you like to enter a view-only password (y/n)? n A view-only password is not used xauth: file /home/oracle/.Xauthority does not exist New '21cnode1:2 (oracle)' desktop is 21cnode1:2 Creating default startup script /home/oracle/.vnc/xstartup Creating default config /home/oracle/.vnc/config Starting applications specified in /home/oracle/.vnc/xstartup Log file is /home/oracle/.vnc/21cnode1:2.log [oracle@21cnode1 ~]$
Mac客户端通过screen sharing工具,以oracle用户连接21cnode1图形界面:


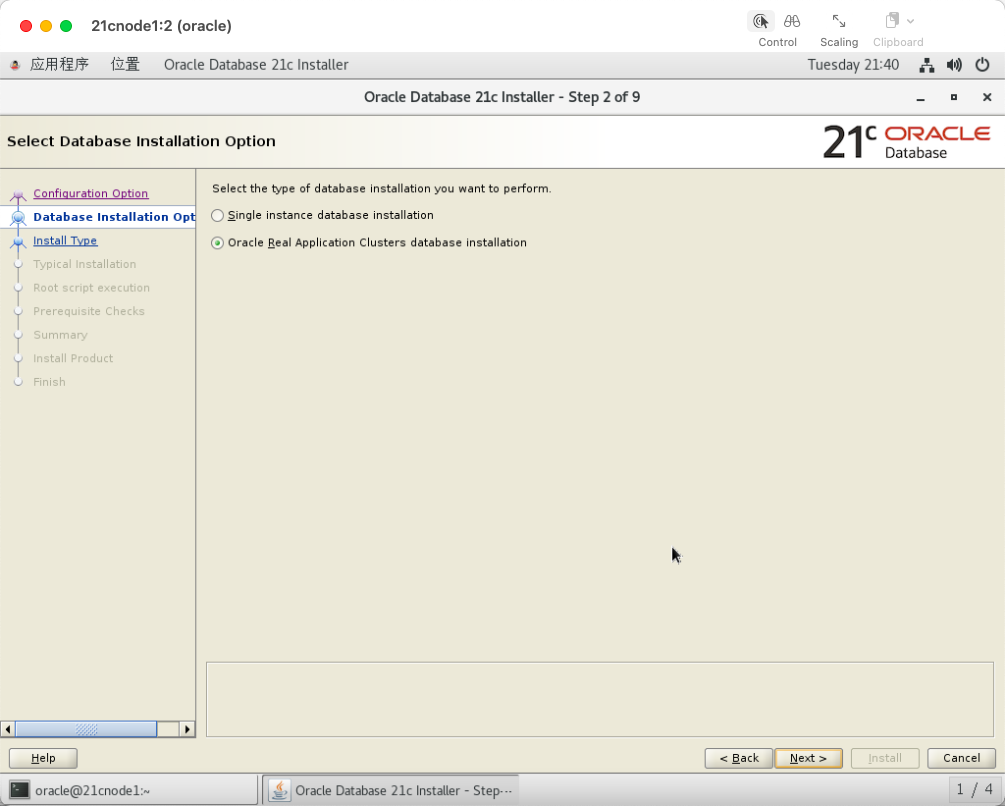
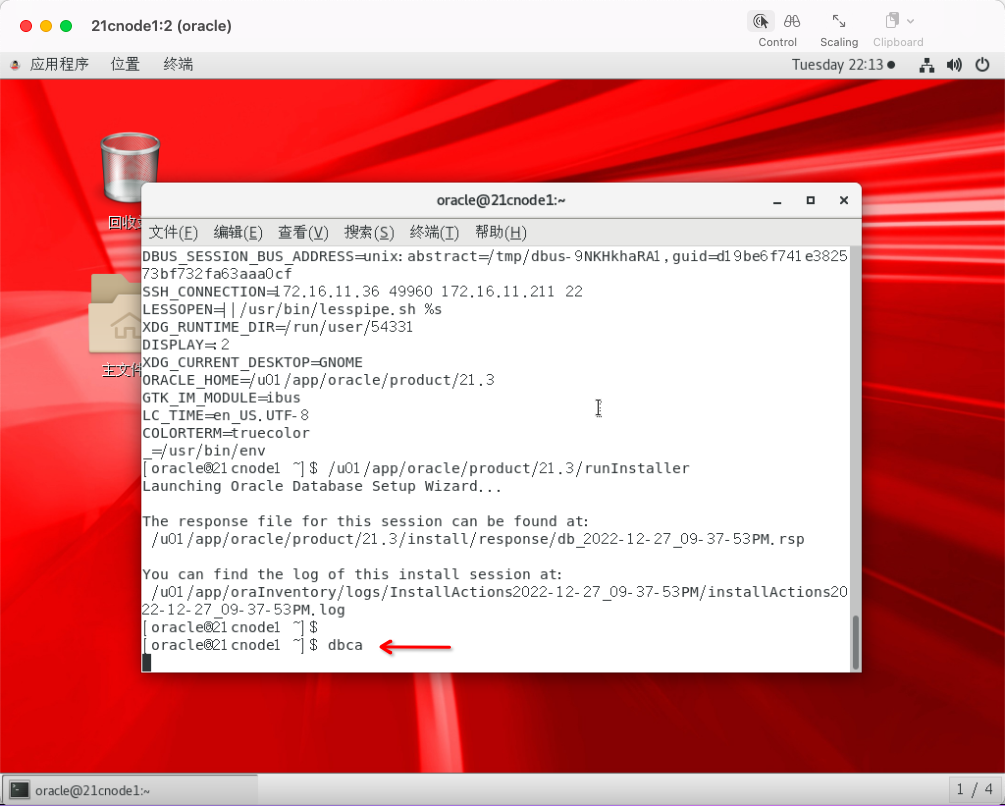
/u01/app/oracle/product/21.3/runInstaller 执行该命令,调起图形安装界面:

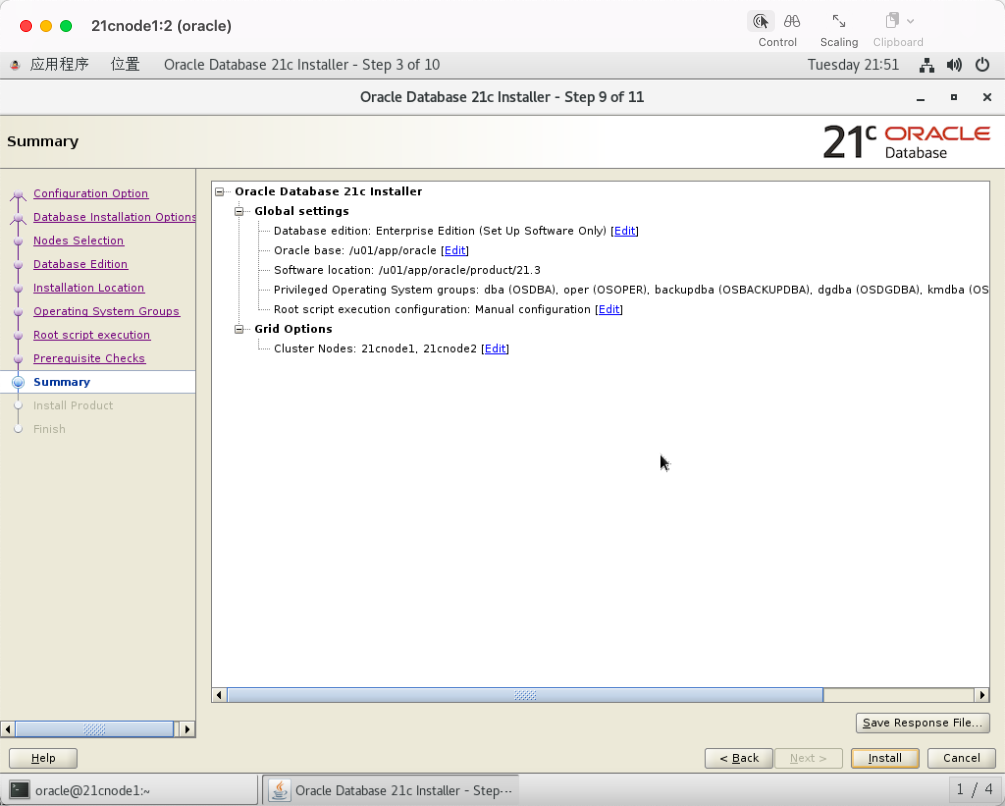
选择只安装软件:

选择安装RAC数据库选项:
选择双节点:
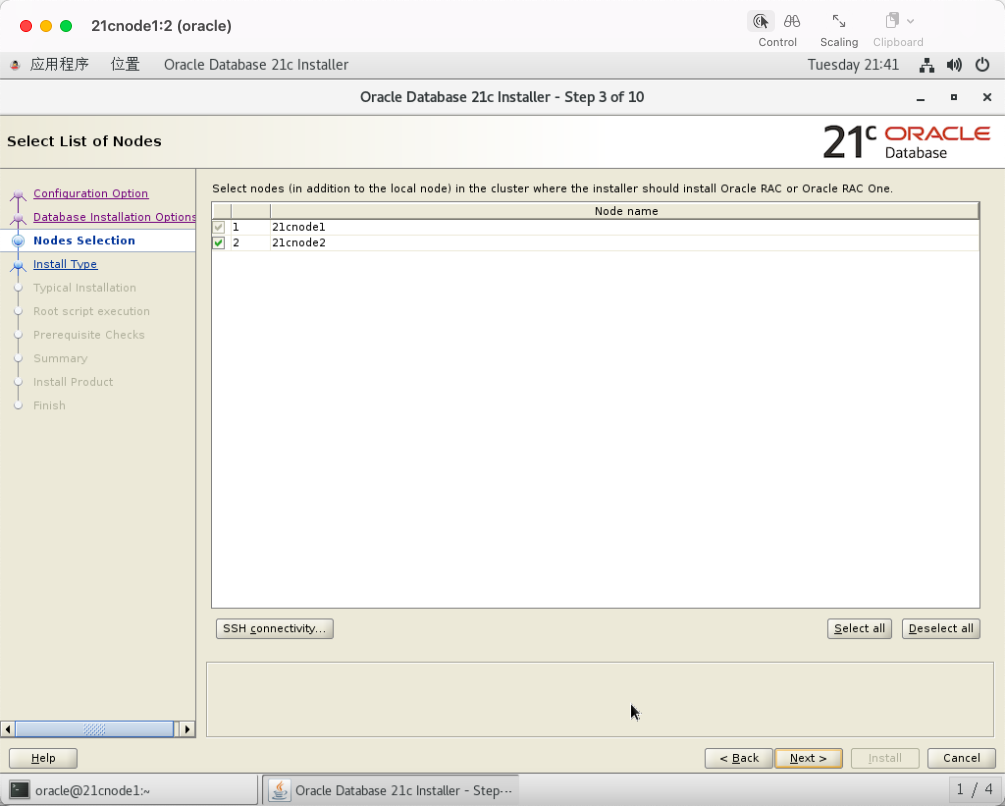
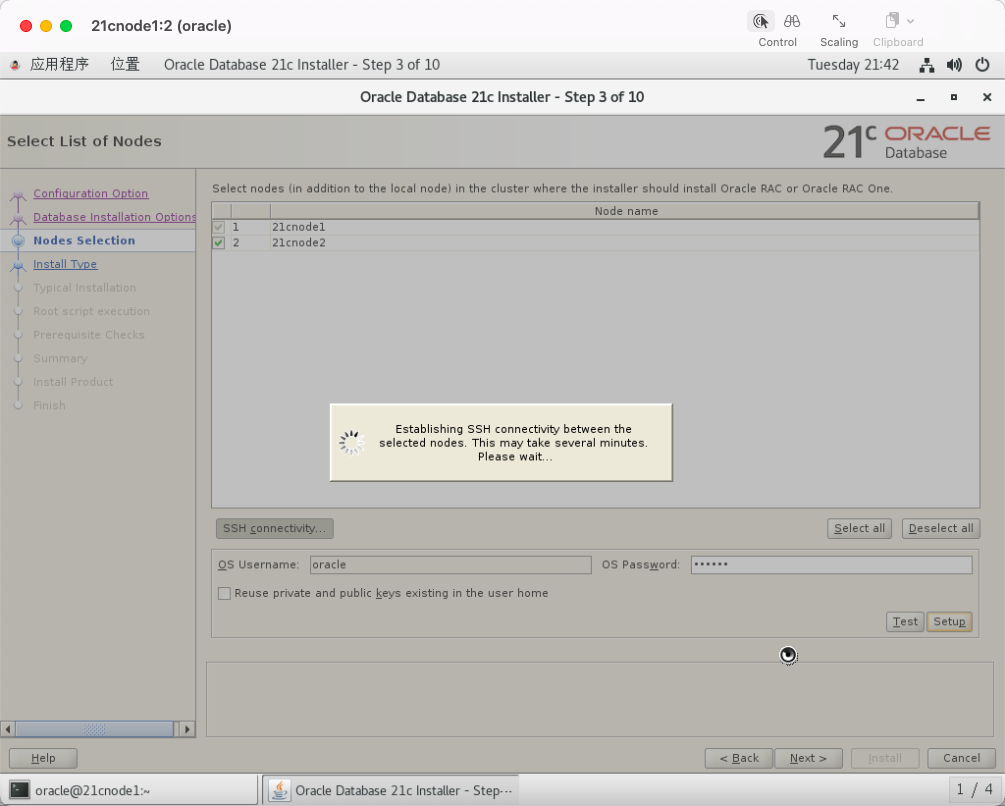
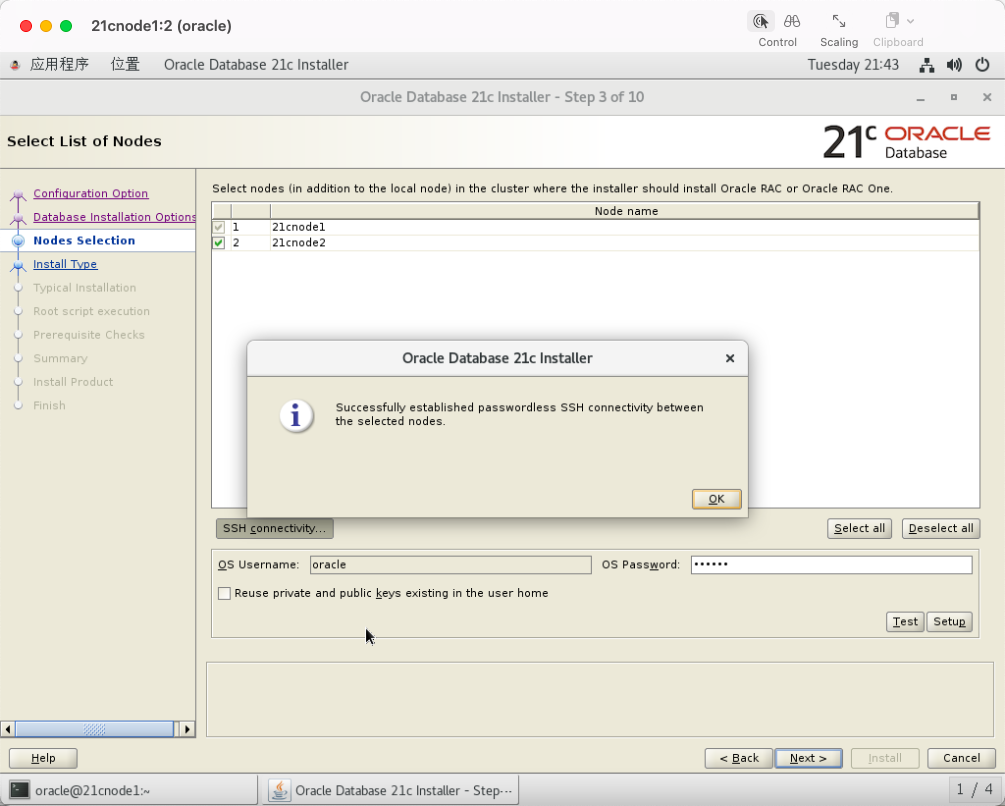
设置oracle用户的ssh对等性:
setup 对等性完成:
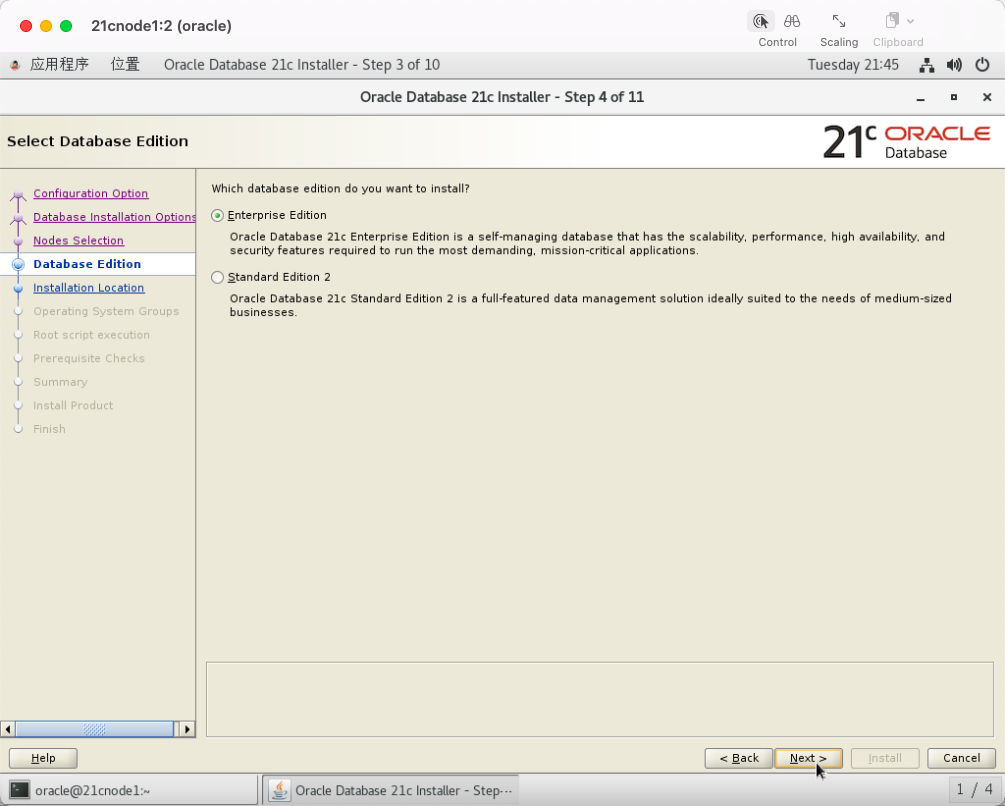
选择Enterprise Edition选项:
确认ORACLE_BASE路径:
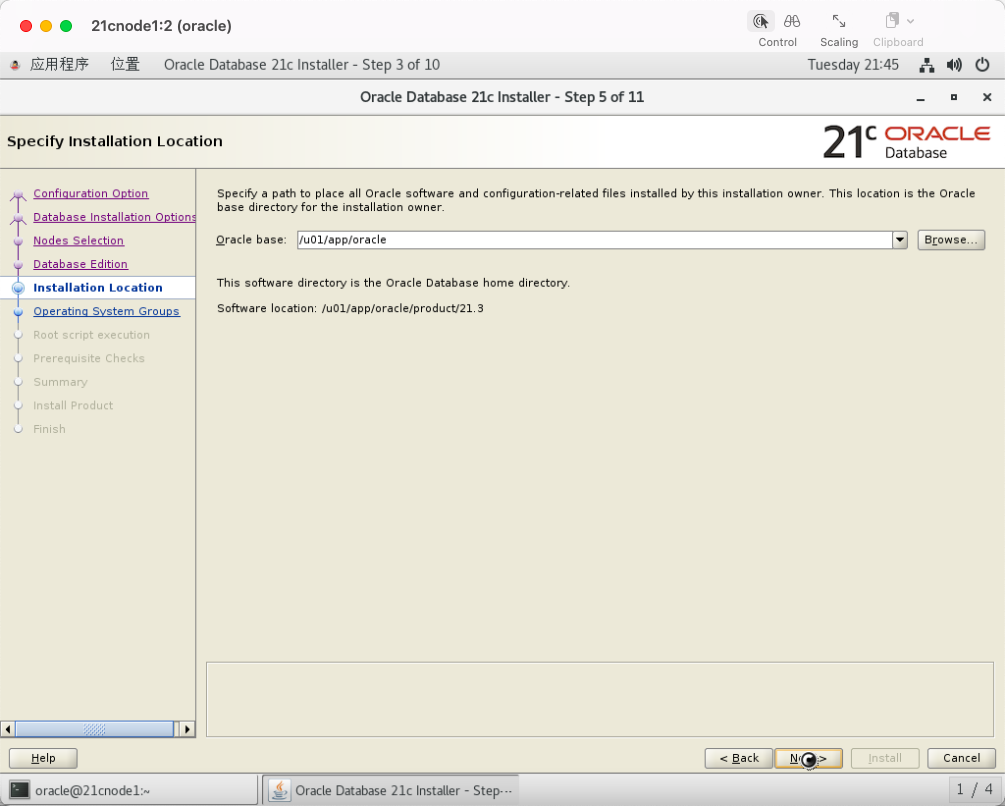
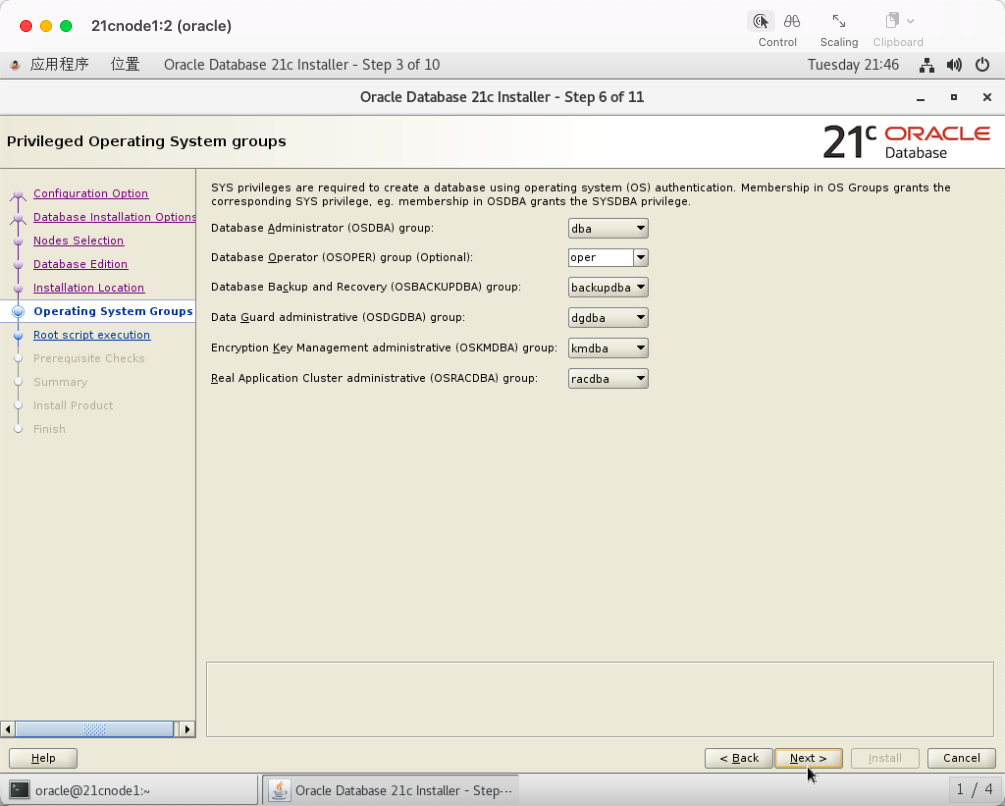
确认用户组信息:
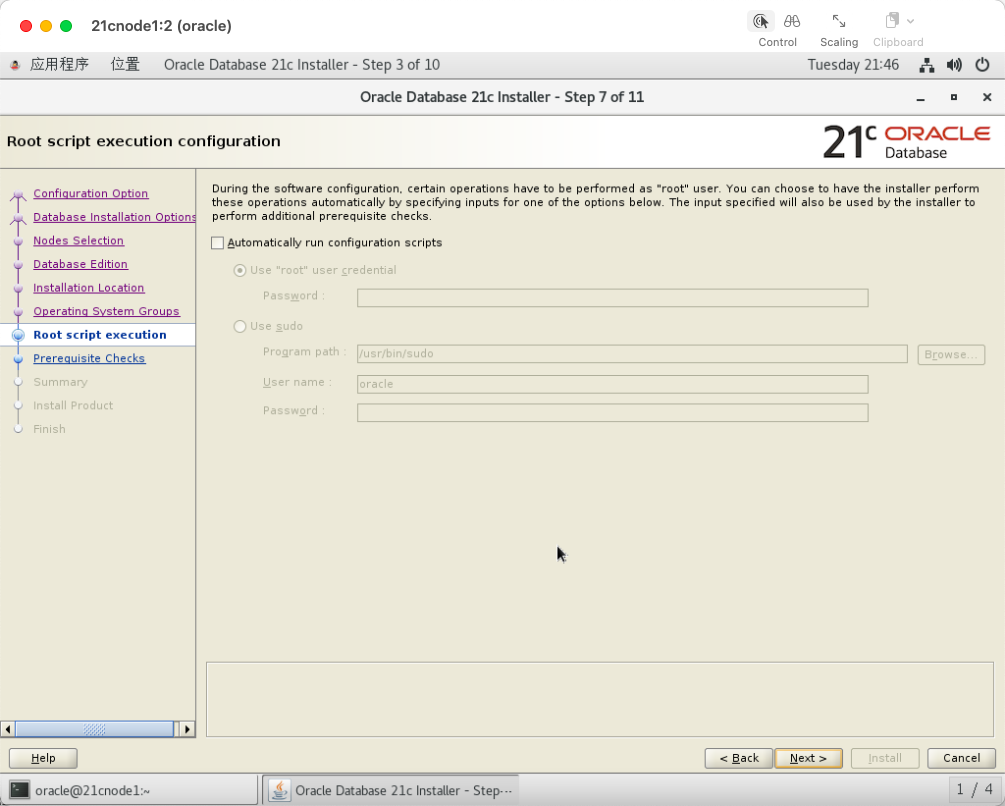
不执行其它配置脚本:
执行安装前校验:
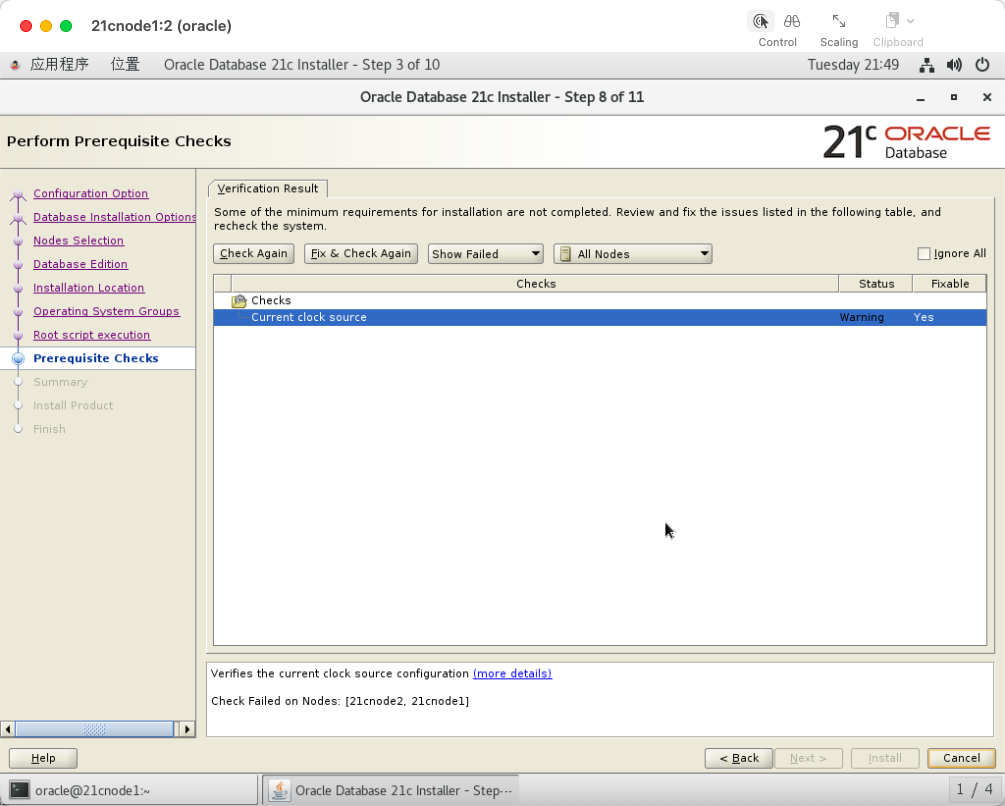
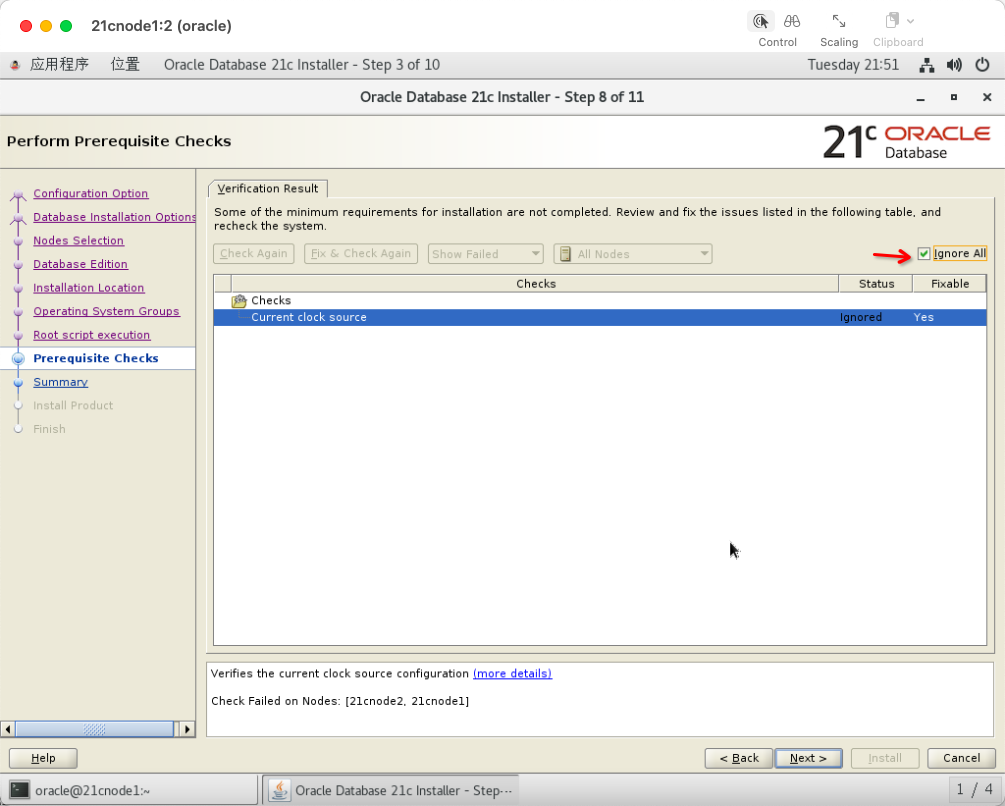
可以忽略该警告:
Setting Clock Source for VMs on Linux x86-64
安装过程中,根据提示执行脚本:
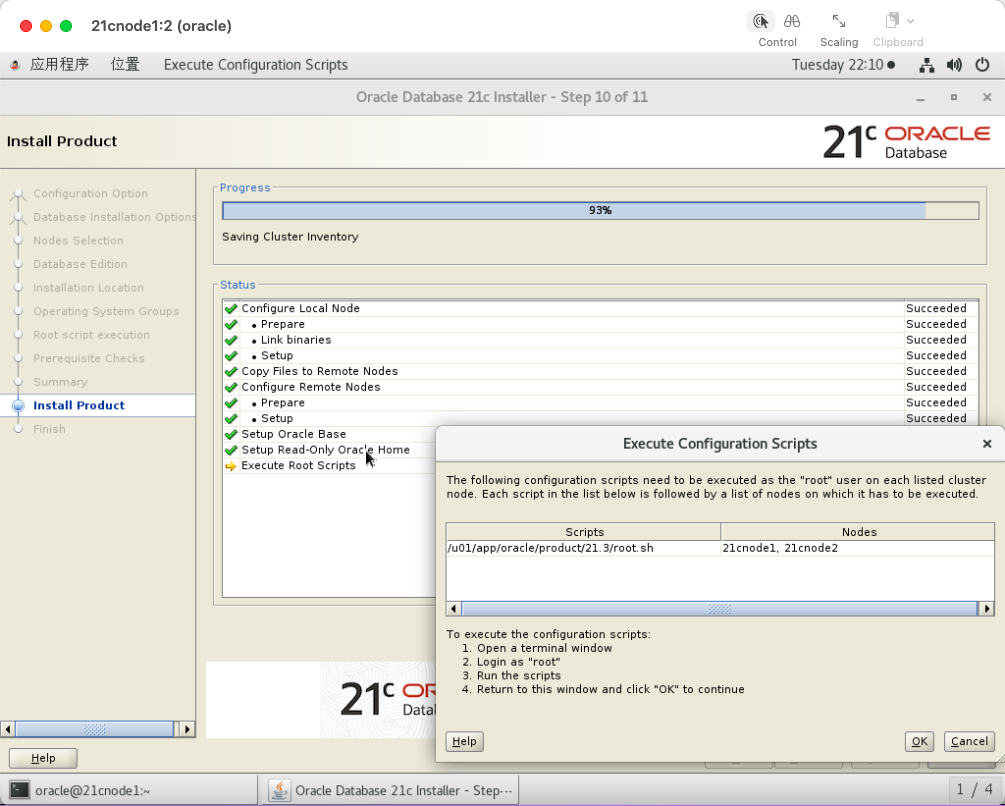
执行脚本
[root@21cnode1 ~]# /u01/app/oracle/product/21.3/root.sh
Performing root user operation.
The following environment variables are set as:
ORACLE_OWNER= oracle
ORACLE_HOME= /u01/app/oracle/product/21.3
Enter the full pathname of the local bin directory: [/usr/local/bin]:
The contents of "dbhome" have not changed. No need to overwrite.
The contents of "oraenv" have not changed. No need to overwrite.
The contents of "coraenv" have not changed. No need to overwrite.
Entries will be added to the /etc/oratab file as needed by
Database Configuration Assistant when a database is created
Finished running generic part of root script.
Now product-specific root actions will be performed.
[root@21cnode1 ~]#
[root@21cnode2 ~]# /u01/app/oracle/product/21.3/root.sh
Performing root user operation.
The following environment variables are set as:
ORACLE_OWNER= oracle
ORACLE_HOME= /u01/app/oracle/product/21.3
Enter the full pathname of the local bin directory: [/usr/local/bin]:
The contents of "dbhome" have not changed. No need to overwrite.
The contents of "oraenv" have not changed. No need to overwrite.
The contents of "coraenv" have not changed. No need to overwrite.
Entries will be added to the /etc/oratab file as needed by
Database Configuration Assistant when a database is created
Finished running generic part of root script.
Now product-specific root actions will be performed.
[root@21cnode2 ~]#
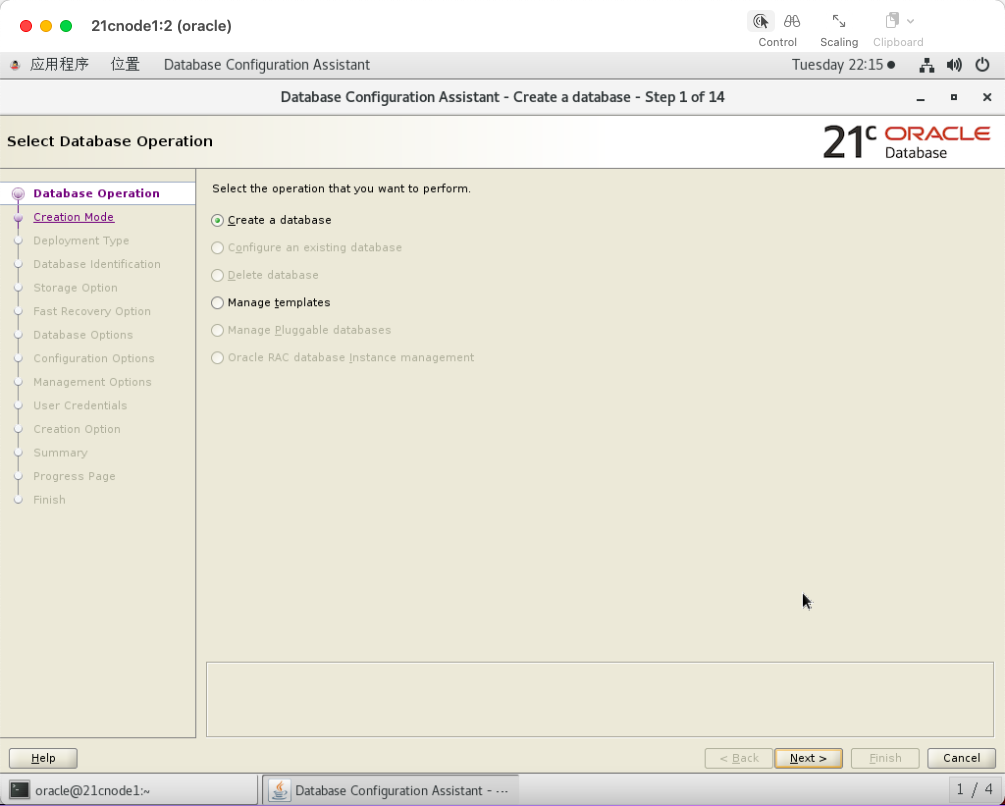
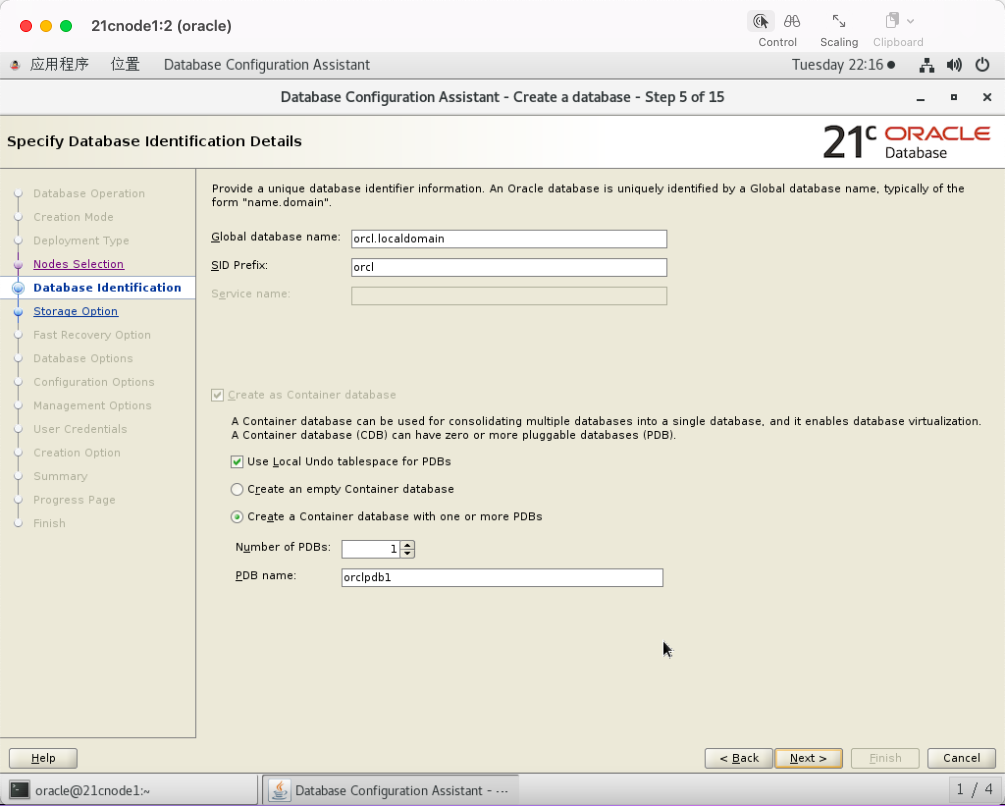
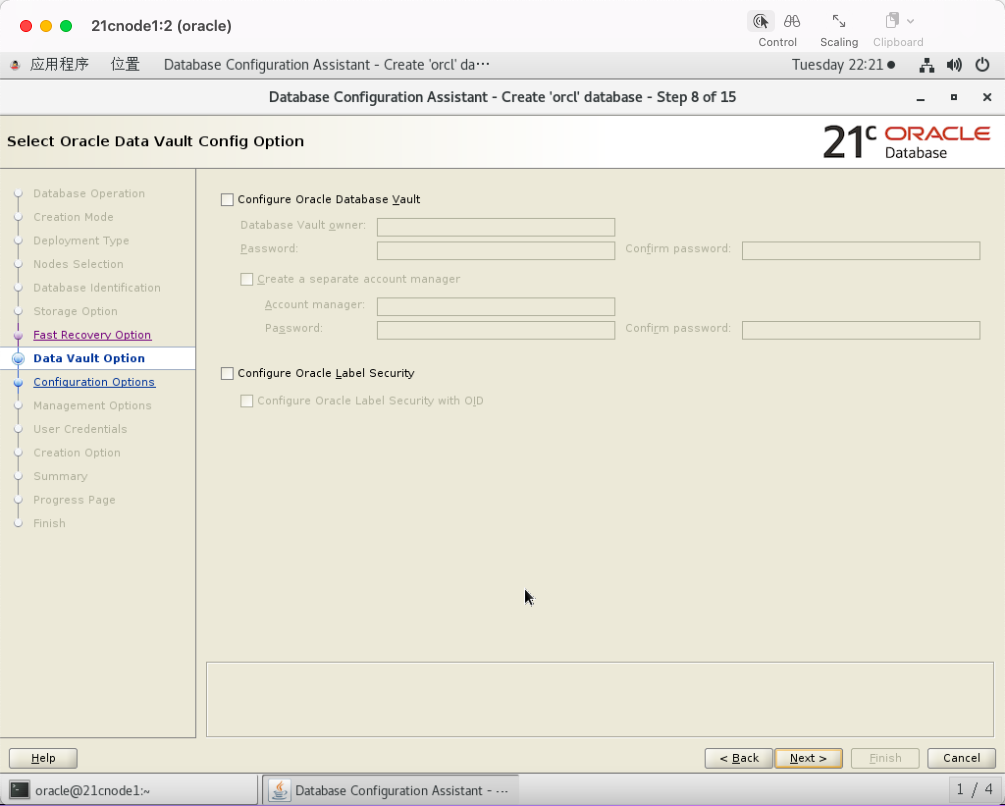
12 创建数据库
命令行执行dbca来创建数据库:
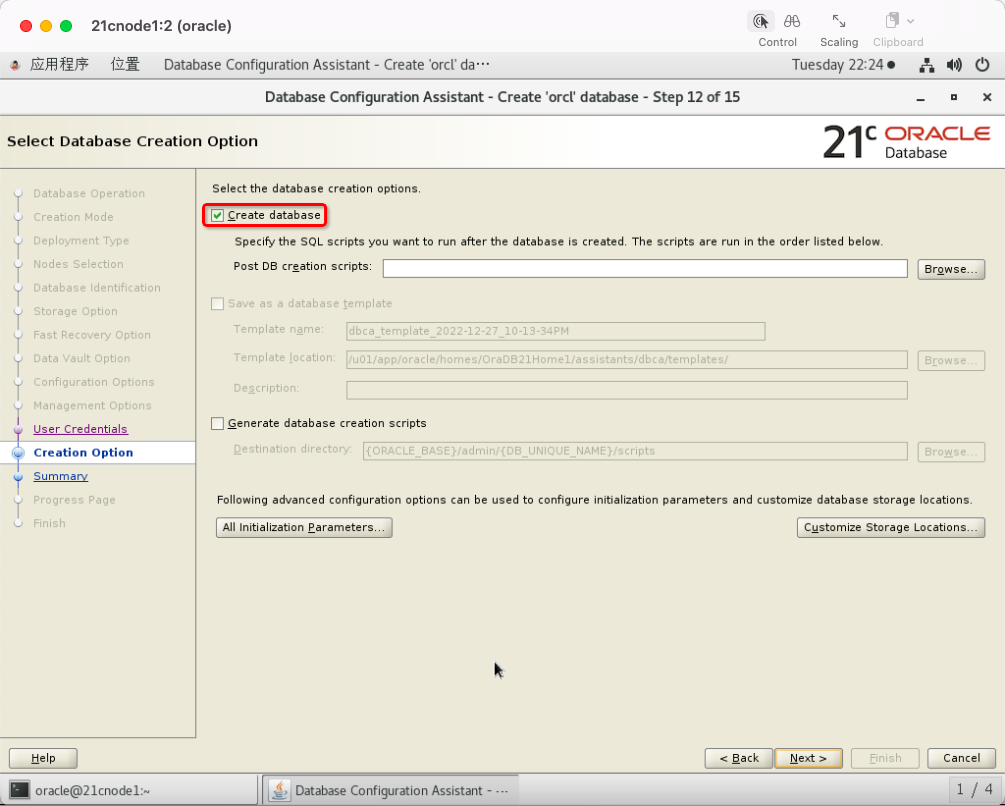
选择create database:
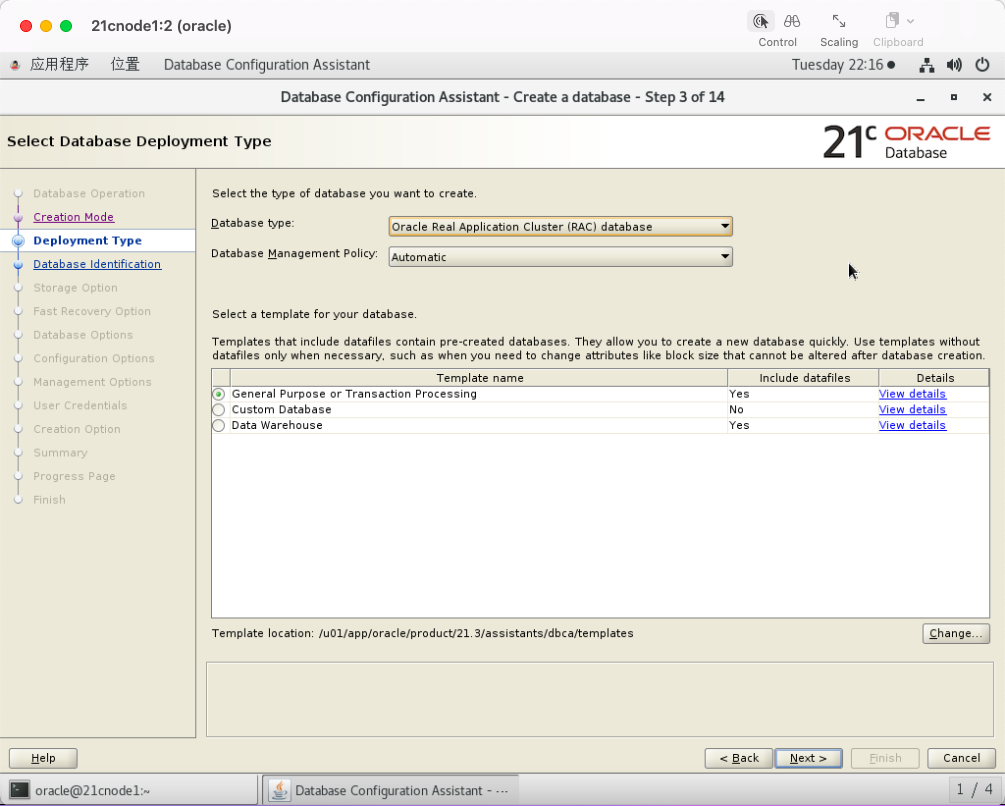
选择advanced configuration:

数据库类型选择RAC,通用事务处理型:
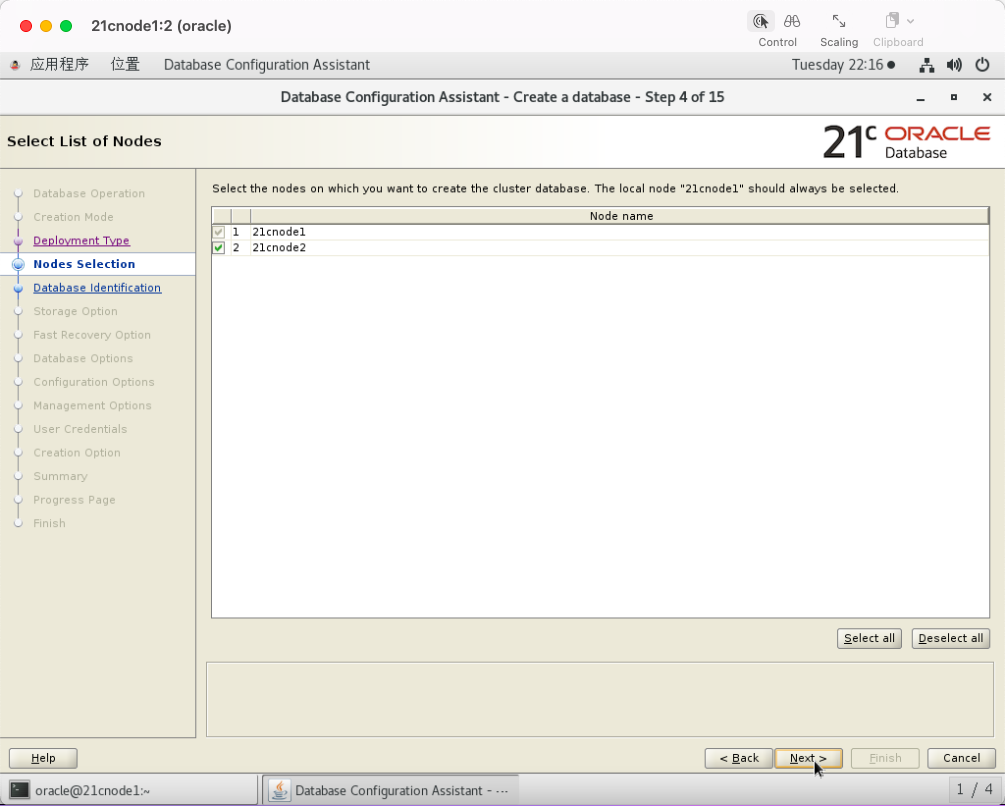
选择双节点:
默认,创建1个pdb.
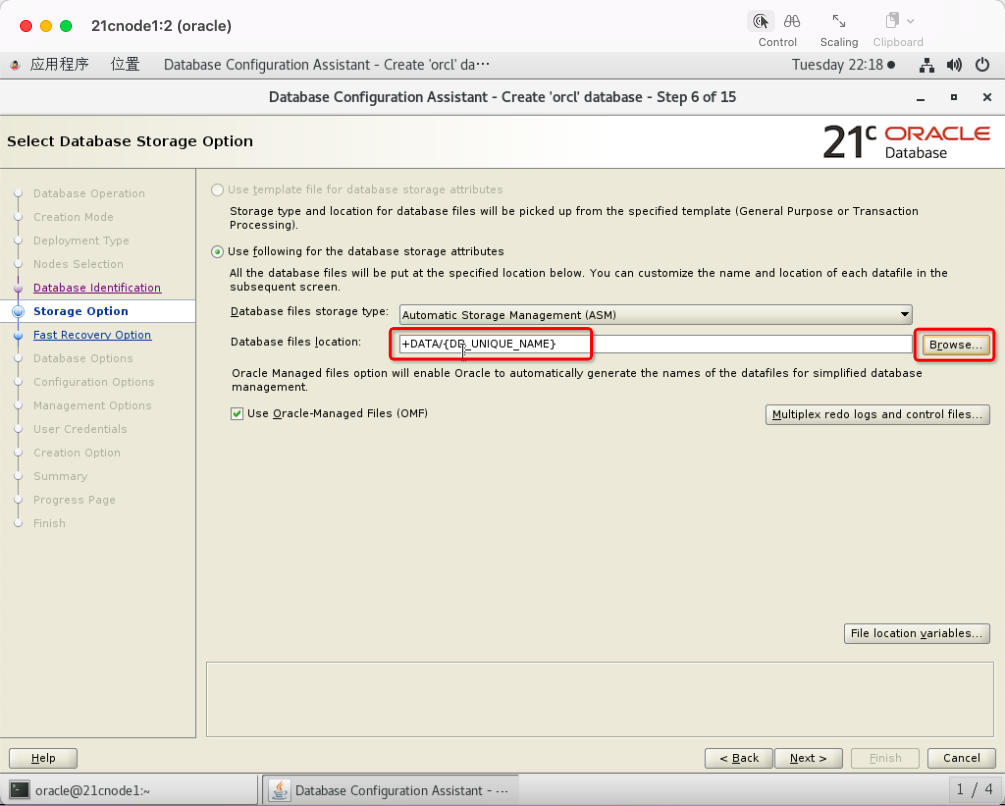
指定数据库存放路径,选择DATA磁盘组:
数据库FRA,指定存放到FRA磁盘组:
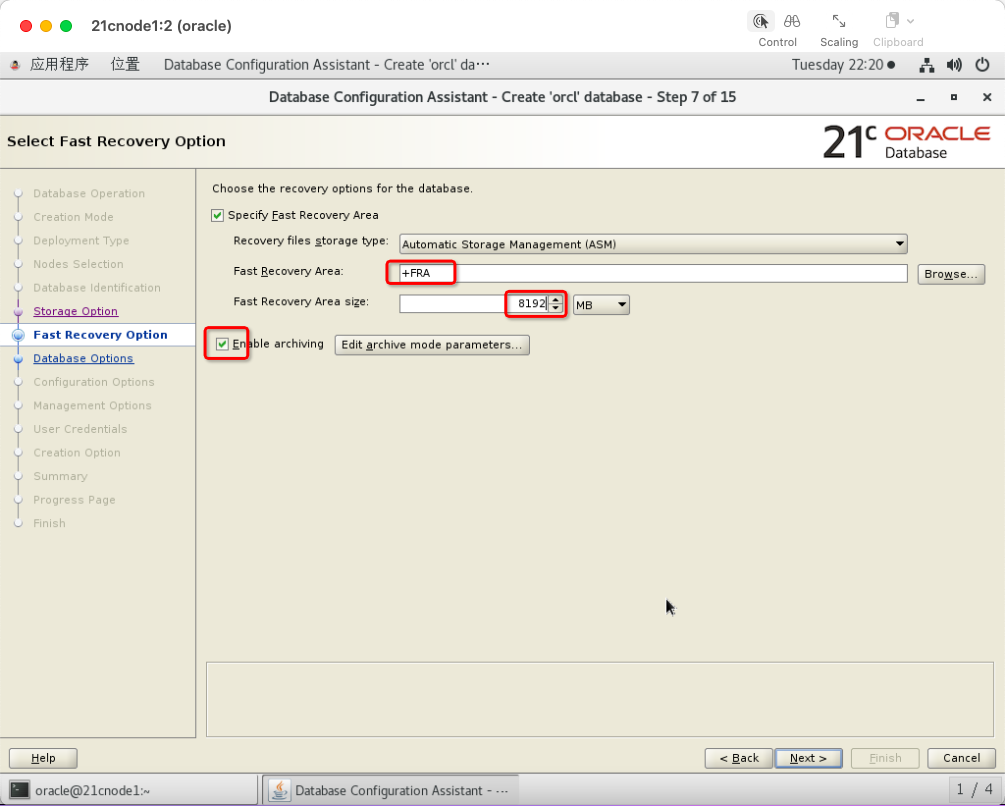
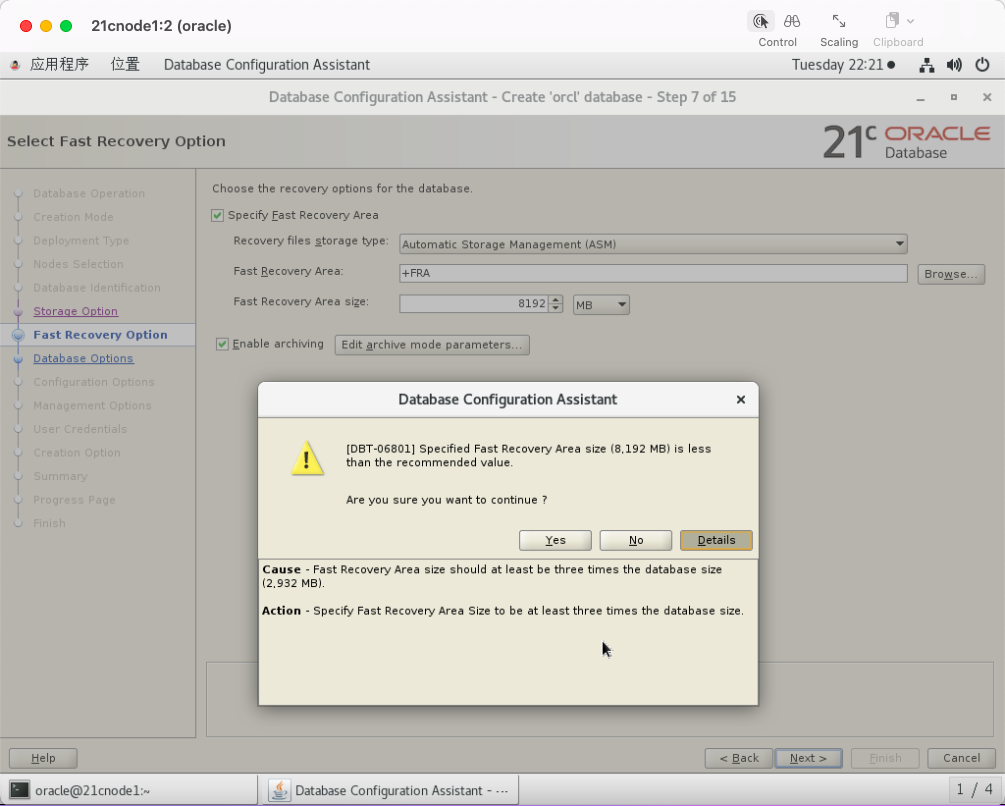
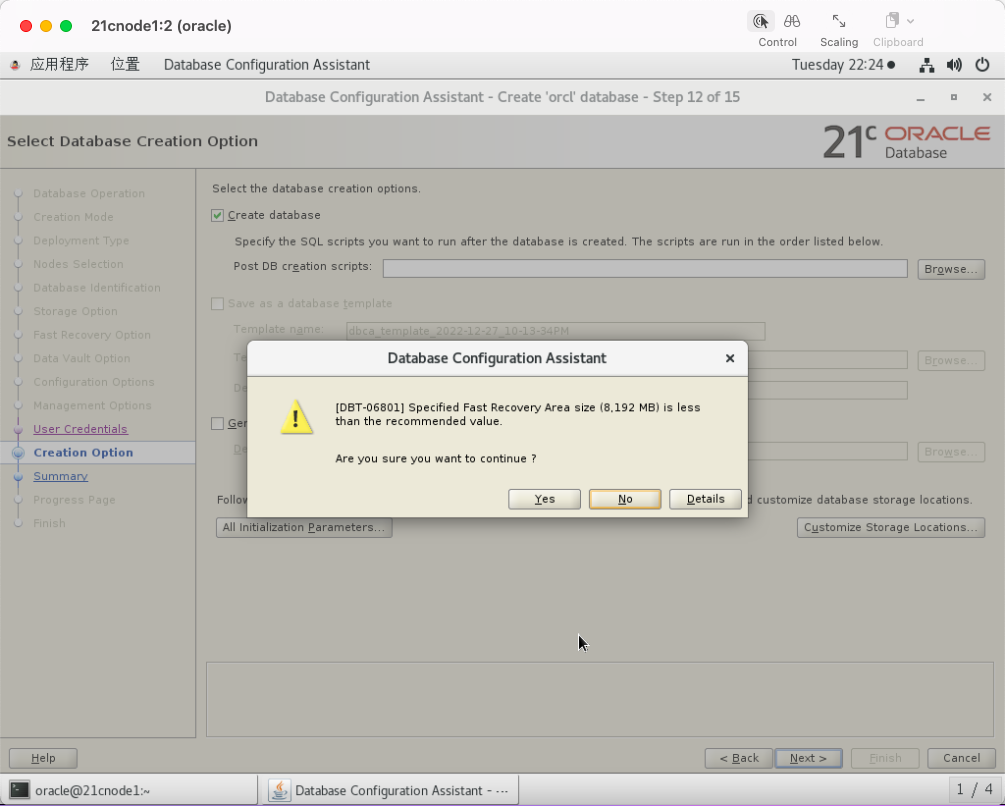
FRA大小指定为8192MB,忽略空间不够的告警。因为,我们的FRA磁盘组初始化时指定了12GB,规避该问题的话,可以在创建磁盘组时,使用更大的磁盘:
下一步;
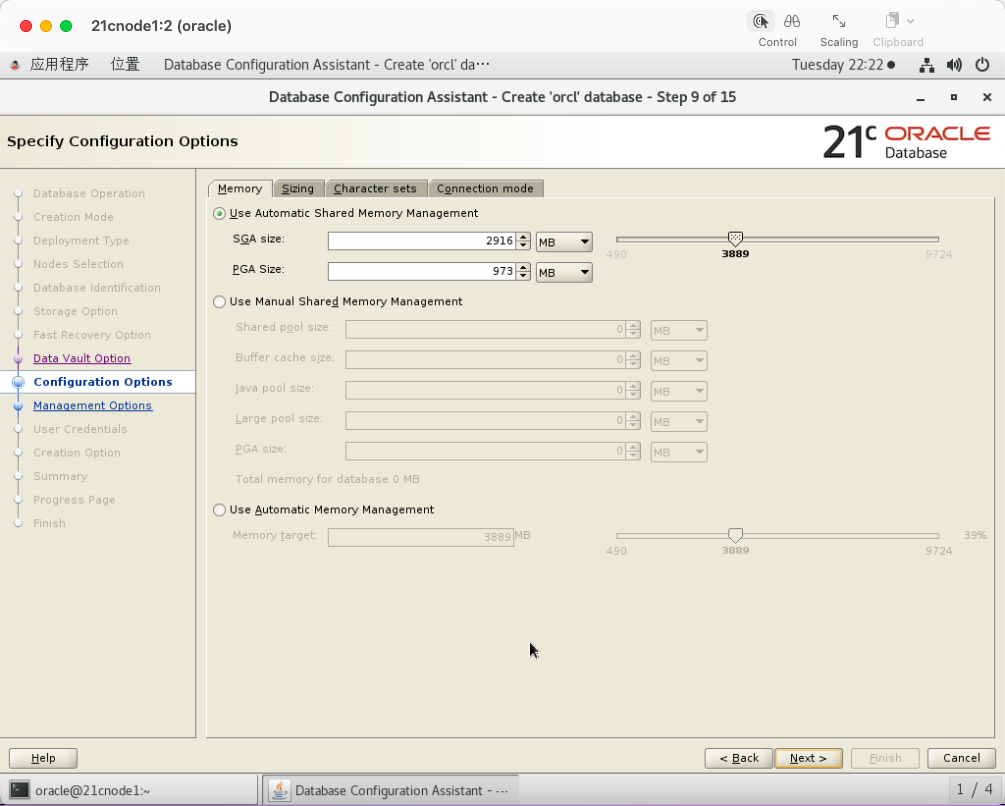
设置内存管理方式为ASMM:
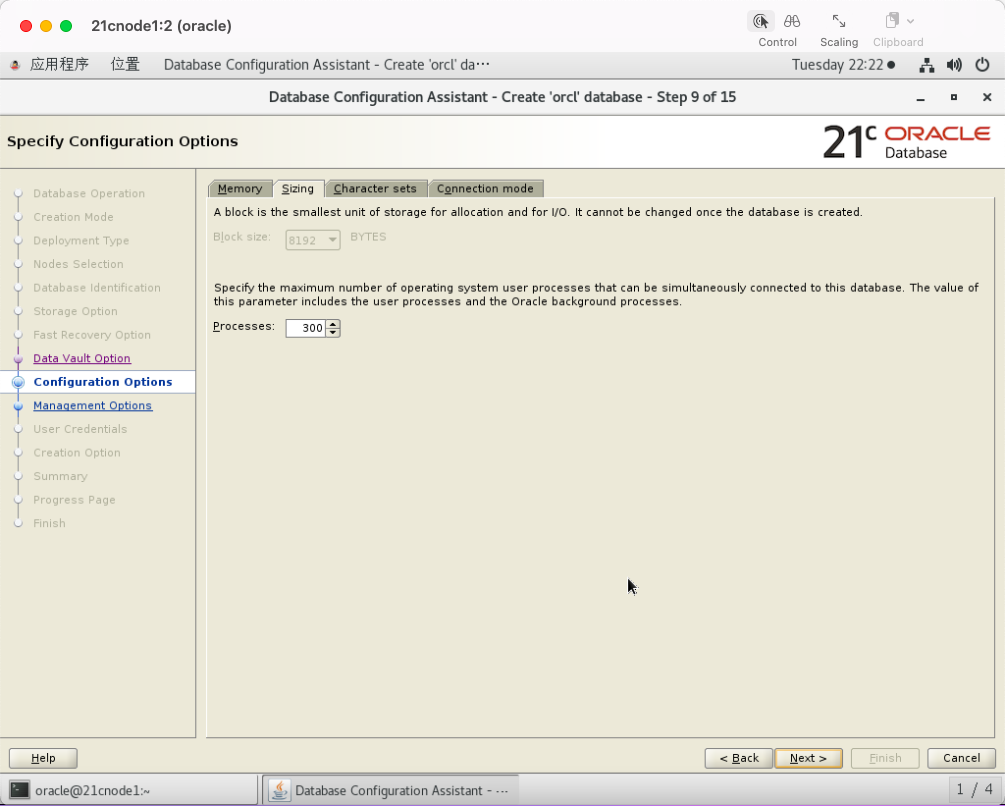
进程数初始化为300:
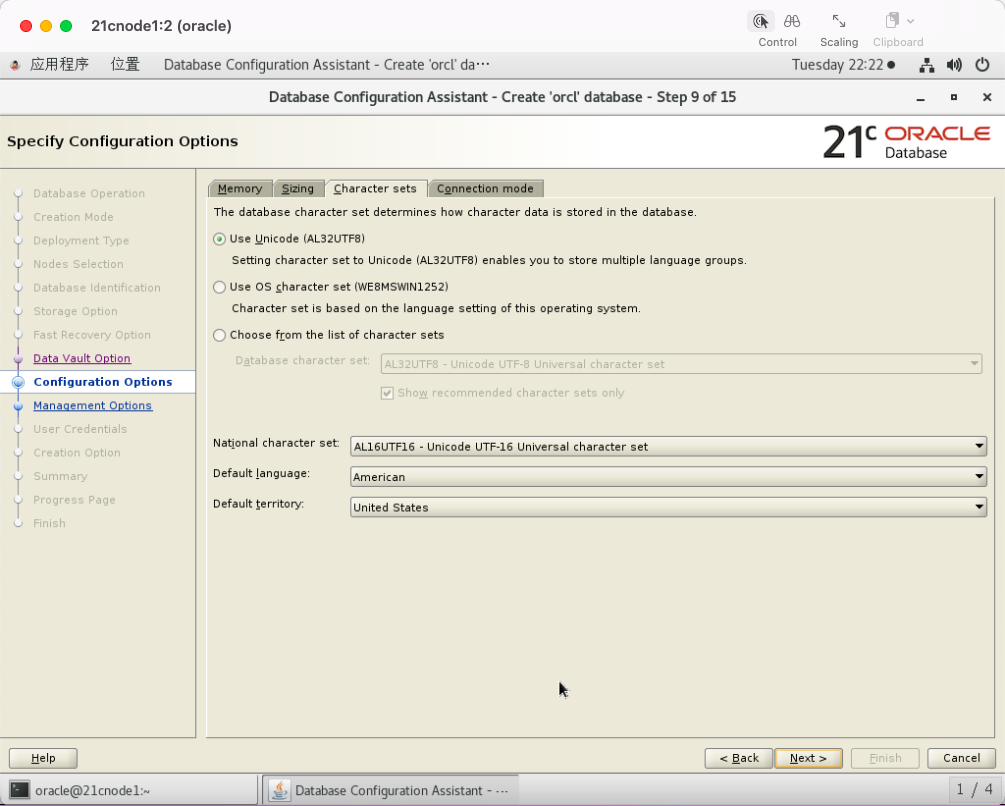
字符集为AL32UTF8:
数据库连接方式,使用默认的dedicated mode:
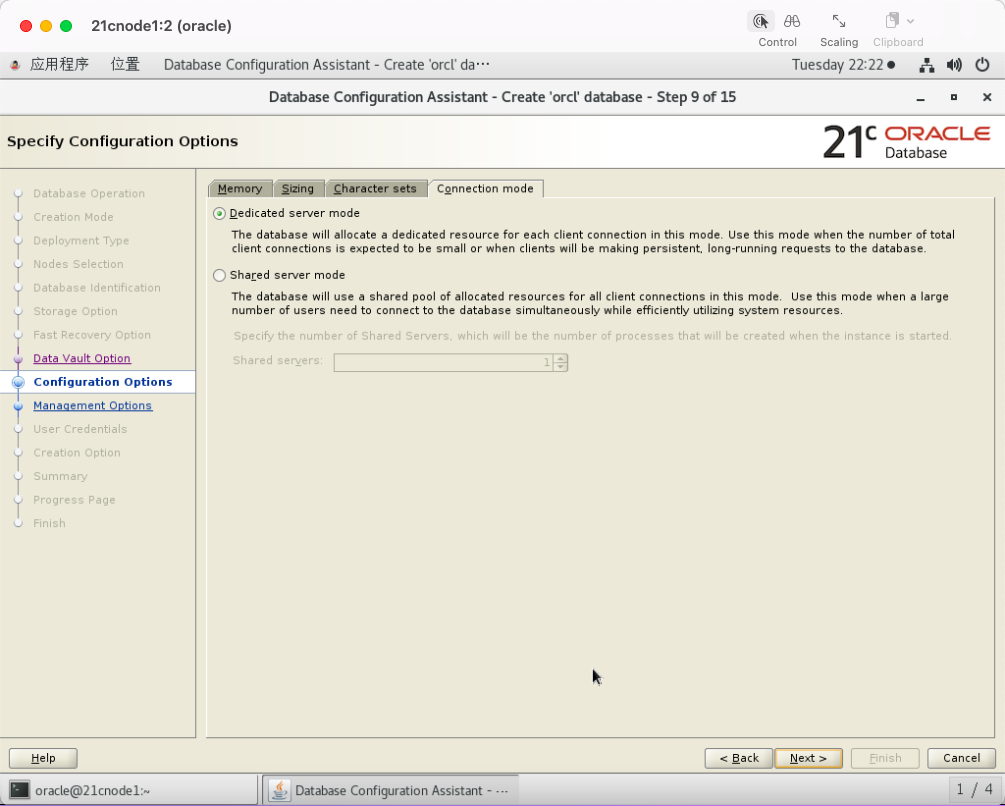
进入下一步:
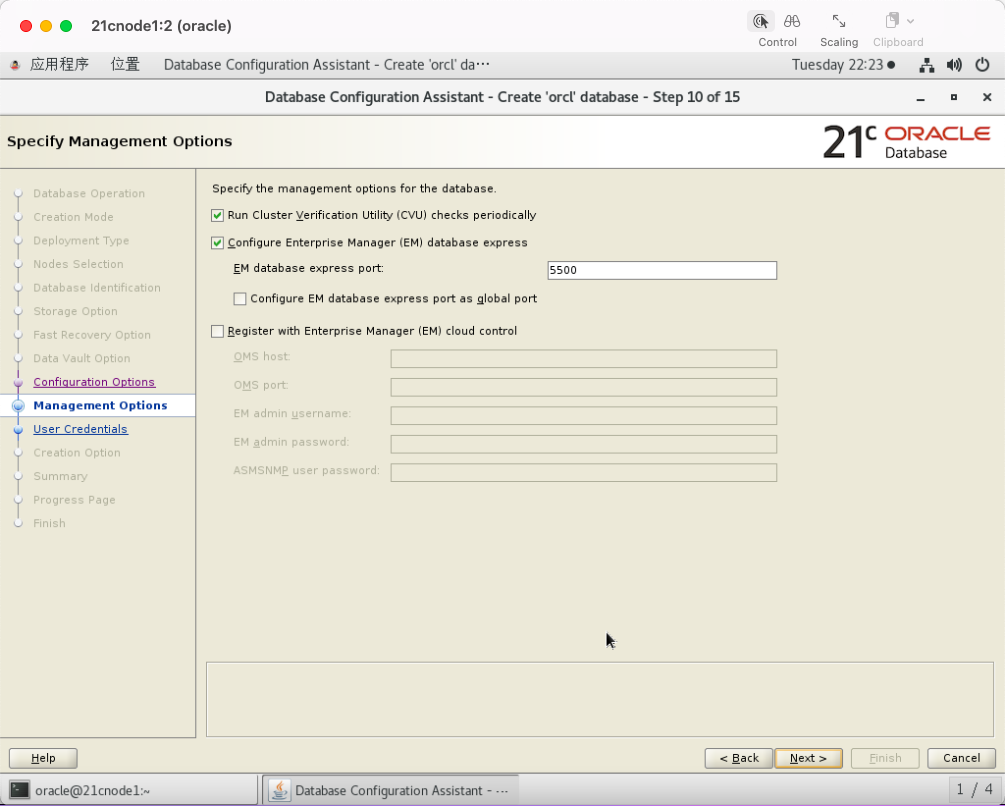
设置统一密码:Oracle168 符合要求的密码,
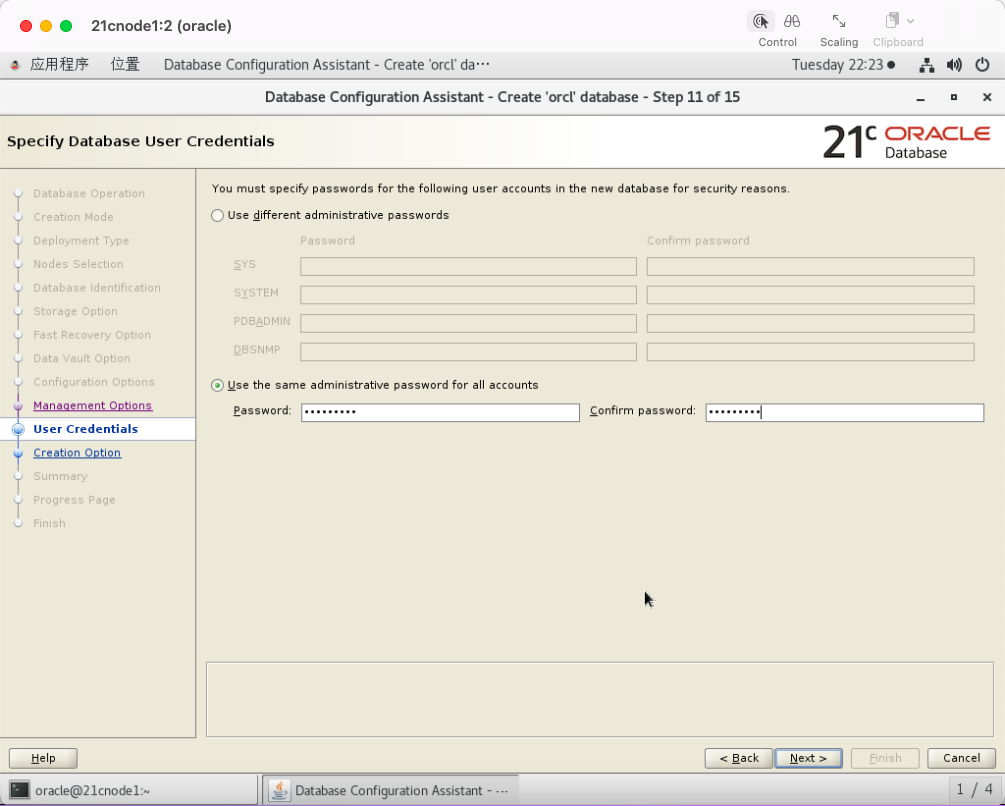
单击next,开始安装:
忽略FRA空间告警:
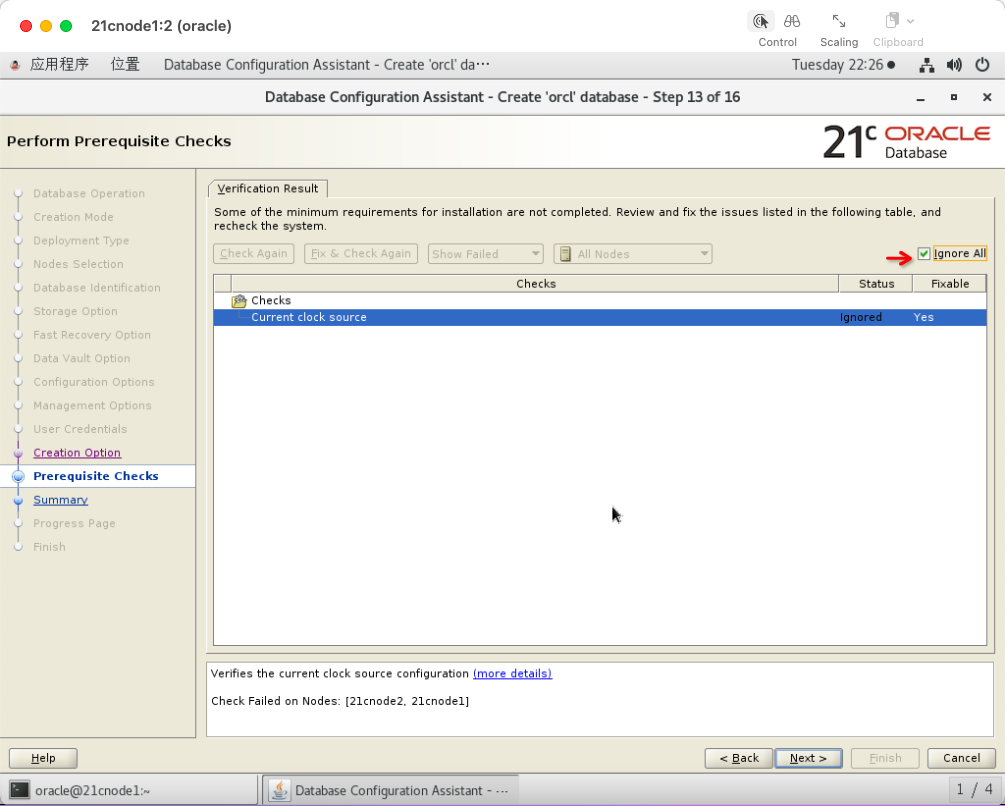
忽略current clock source告警:
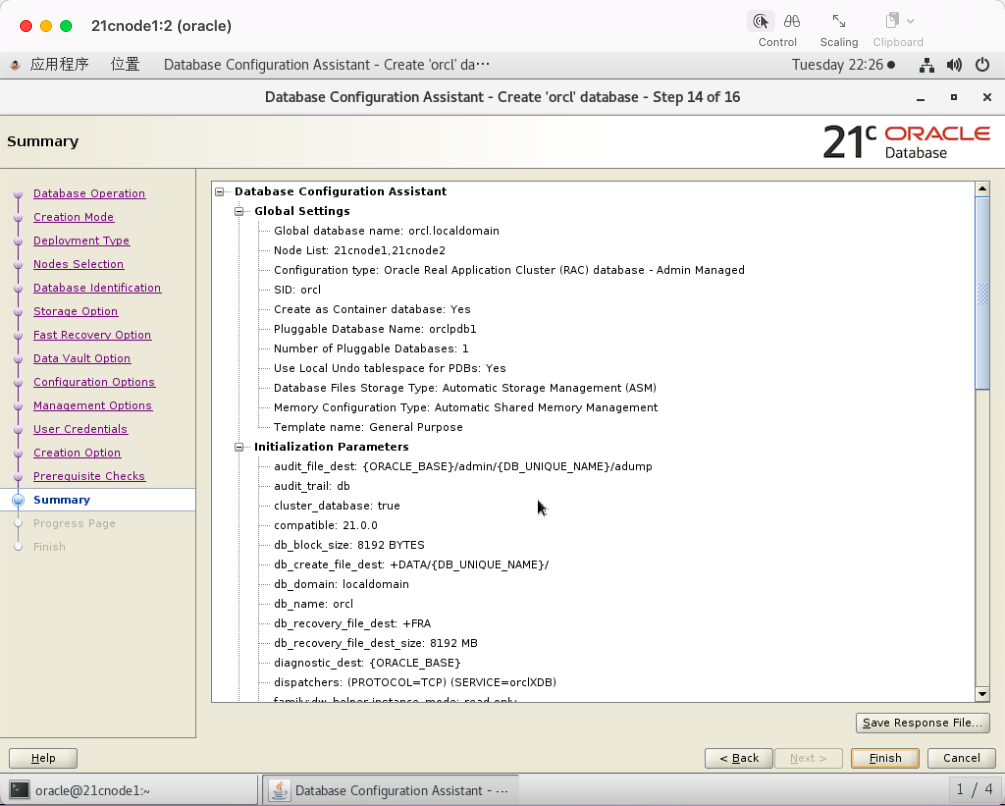
开始执行创建数据库:
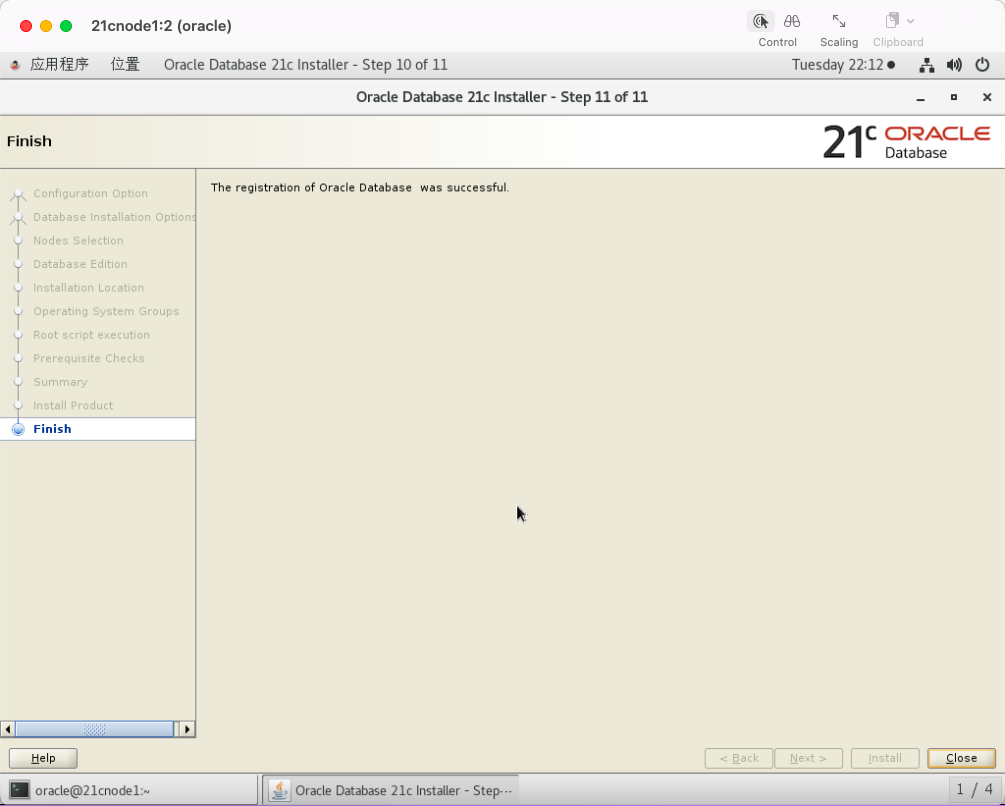
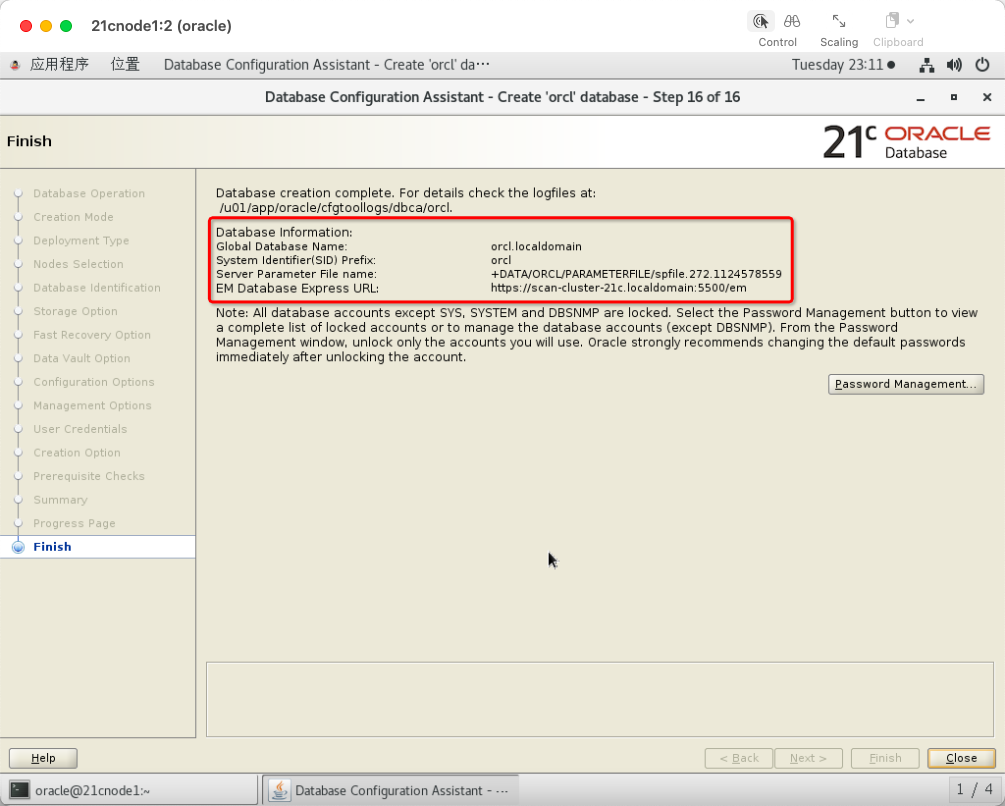
数据库创建完成:
13 测试访问21c RAC 数据库
把172.16.11.168上安装有Oracle 11g数据库的机器当作客户端,来访问该21C RAC数据库。
172.16.11.168修改DNS配置:
[root@master-node ~]# hostname -I 172.16.11.168 192.168.122.1 172.17.0.1 10.244.0.0 10.244.0.1 [root@master-node ~]# cat /etc/resolv.conf nameserver 172.16.11.36 nameserver 172.16.6.11 [root@master-node ~]# nslookup scan-cluster-21c.localdomain Server: 172.16.11.36 Address: 172.16.11.36#53 Name: scan-cluster-21c.localdomain Address: 172.16.11.242 Name: scan-cluster-21c.localdomain Address: 172.16.11.241 Name: scan-cluster-21c.localdomain Address: 172.16.11.244 Name: scan-cluster-21c.localdomain Address: 172.16.11.243 [root@master-node ~]#
172.16.11.168配置Oracle的tnsnames.ora文件,添加下述Oracle网络访问服务名:
[root@master-node ~]# su - oracle
上一次登录:三 12月 28 12:15:52 CST 2022pts/3 上
master-node-> tail /u01/app/oracle/product/11.2.0/db_1/network/admin/tnsnames.ora
21c =
(DESCRIPTION =
(ADDRESS = (PROTOCOL = TCP)(HOST = scan-cluster-21c.localdomain)(PORT = 1521))
(CONNECT_DATA =
(SERVER = DEDICATED)
(SERVICE_NAME = orcl.localdomain)
)
)
master-node-> tnsping 21c
TNS Ping Utility for Linux: Version 11.2.0.1.0 - Production on 28-DEC-2022 12:22:35
Copyright (c) 1997, 2009, Oracle. All rights reserved.
Used parameter files:
/u01/app/oracle/product/11.2.0/db_1/network/admin/sqlnet.ora
Used TNSNAMES adapter to resolve the alias
Attempting to contact (DESCRIPTION = (ADDRESS = (PROTOCOL = TCP)(HOST = scan-cluster-21c.localdomain)(PORT = 1521)) (CONNECT_DATA = (SERVER = DEDICATED) (SERVICE_NAME = orcl.localdomain)))
OK (10 msec)
master-node-> 访问数据库,抛出ORA-28040错误,客户端版本低的问题导致。
master-node-> sqlplus sys@21c as sysdba SQL*Plus: Release 11.2.0.1.0 Production on Wed Dec 28 12:27:03 2022 Copyright (c) 1982, 2009, Oracle. All rights reserved. Enter password: ERROR: ORA-28040: No matching authentication protocol
换另外一个有Oracle 18C环境的机器作为客户端来访问这个21C RAC数据库:
[root@oracle-18 ~]# hostname -I
172.16.17.41 192.168.122.1
[root@oracle-18 ~]# cat /etc/resolv.conf
# Generated by NetworkManager
search localdomain
nameserver 172.16.11.36
nameserver 172.16.6.11
[root@oracle-18 ~]# nslookup scan-cluster-21c.localdomain
Server: 172.16.11.36
Address: 172.16.11.36#53
Name: scan-cluster-21c.localdomain
Address: 172.16.11.241
Name: scan-cluster-21c.localdomain
Address: 172.16.11.242
Name: scan-cluster-21c.localdomain
Address: 172.16.11.244
Name: scan-cluster-21c.localdomain
Address: 172.16.11.243
[root@oracle-18 ~]# su - oracle
上一次登录:三 12月 28 12:28:59 CST 2022pts/0 上
[oracle@oracle-18 ~]$ tail /u01/app/oracle/product/18.0.0/dbhome_1/network/admin/tnsnames.ora
21c =
(DESCRIPTION =
(ADDRESS = (PROTOCOL = TCP)(HOST = scan-cluster-21c.localdomain)(PORT = 1521))
(CONNECT_DATA =
(SERVER = DEDICATED)
(SERVICE_NAME = orcl.localdomain)
)
)
[oracle@oracle-18 ~]$ tnsping 21c
TNS Ping Utility for Linux: Version 18.0.0.0.0 - Production on 28-DEC-2022 12:30:16
Copyright (c) 1997, 2018, Oracle. All rights reserved.
Used parameter files:
Used TNSNAMES adapter to resolve the alias
Attempting to contact (DESCRIPTION = (ADDRESS = (PROTOCOL = TCP)(HOST = scan-cluster-21c.localdomain)(PORT = 1521)) (CONNECT_DATA = (SERVER = DEDICATED) (SERVICE_NAME = orcl.localdomain)))
OK (20 msec)
[oracle@oracle-18 ~]$ sqlplus sys@21c as sysdba
SQL*Plus: Release 18.0.0.0.0 - Production on Wed Dec 28 12:30:30 2022
Version 18.3.0.0.0
Copyright (c) 1982, 2018, Oracle. All rights reserved.
Enter password:
Connected to:
Oracle Database 21c Enterprise Edition Release 21.0.0.0.0 - Production
Version 21.3.0.0.0
SQL> select INSTANCE_NAME,HOST_NAME,STARTUP_TIME from gv$instance;
INSTANCE_NAME HOST_NAME STARTUP_TIME
---------------- ---------------------------------------------------------------- -------------------
orcl1 21cnode1 2022/12/27 23:01:38
orcl2 21cnode2 2022/12/27 23:01:44
SQL> 五 参考链接
参考:
https://dbakerber.wordpress.com/2019/07/31/oracle-software-installation-bugs/
卸载:
一条评论
Pingback: