step by step install Oracle 19c RAC database
负一 写在前面
本文档记录如何一步一步安装配置双节点Oracle 19C RAC数据库环境,其中的绝大多数操作步骤与流程,和如何一步一步安装配置双节点Oracle 21C RAC数据库环境几乎一样,大同小异。除了19c服务器的IP规划配置、主机名、使用数据库集群软件、数据库软件、DNS配置的scan name、和scan IP地址等与21C RAC略有不同之外,其它操作步骤几乎是安装配置21C RAC数据库的重复劳动。因此,在本文档中,如果是类似于安装配置21C RAC数据库的操作将被忽略,不再单独详细记录和说明。如果需要查看此部分文档内容的地方,请参考:一步一步安装配置双节点Oracle 21C RAC数据库环境的相对应文档部分。
零 前置条件
1 硬件设备条件
1.1物理机环境
2台服务器:每台机器内存至少6GB以上;
共享存储:每台机器都可以正常访问该存储设备;
网络设备:每台服务器至少双网卡;连接私网的网络设备最好(必须)经由交换机连接,不要直连;
建议有足够多的内存,存储够大、硬件够power的机器。
成本高,不太容易实现,尤其是需要一套共享存储设备,可以给多台机器同时访问。
1.2 虚拟机环境
成本较低,相对好实现,通过虚拟机技术可以完成。
主机内存至少16GB以上,磁盘100GB可用空间;
2 软件技能条件
对Oracle数据库有基本的了解和使用经验,如体系架构和运行原理。掌握常用的Unix、Linux操作系统基础知识和管理维护经验,比如管理存储设备,网络配置,DNS配置,安装配置软件等。
一背景说明
本文档用于记录,如何利用Oracle虚拟机软件virtualBox技术,来一步一步安装配置双节点Oracle 19C RAC数据库环境。
二环境介绍
0 技术栈
CentOS 7.9+VirtualBox+Oracle Enterprise Linux 7.6+Oracle 19C
1 host
一台物理机:24核CPU,64GB内存服务器,运行CentOS 7.9系统。在这个机器上安装Oracle的virtual box虚拟机软件。
[root@centos-master ~]# uname -rm
3.10.0-1160.76.1.el7.x86_64 x86_64
[root@centos-master ~]# cat /etc/redhat-release
CentOS Linux release 7.9.2009 (Core)
[root@centos-master ~]# free -m
              total        used        free      shared  buff/cache   available
Mem:          64380       31018         548        3347       32814       29534
Swap:             0           0           0
[root@centos-master ~]#
2 virturalBox
5.0版本
[root@centos-master ~]# virtualbox --help Oracle VM VirtualBox Manager 5.0.40 (C) 2005-2017 Oracle Corporation All rights reserved. Usage: --startvm <vmname|UUID> start a VM by specifying its UUID or name --separate start a separate VM process --normal keep normal (windowed) mode during startup --fullscreen switch to fullscreen mode during startup ...

3 guestOS
Oracle Enterprise Linux 7.6
[root@19cnode1 ~]# uname -rm
4.14.35-1818.3.3.el7uek.x86_64 x86_64
[root@19cnode1 ~]# cat /etc/oracle-release
Oracle Linux Server release 7.6
[root@19cnode1 ~]# cat /etc/redhat-release
Red Hat Enterprise Linux Server release 7.6 (Maipo)
[root@19cnode1 ~]#
4 Oracle software
grid clusterware: LINUX.X64_193000_grid_home.zip
Oracle database: LINUX.X64_193000_db_home.zip
下载地址:https://www.oracle.com/database/technologies/oracle-database-software-downloads.html#19c
5 ip规划
规划
| node | public ip | private ip | virtual ip |
|---|---|---|---|
| 19cnode1.localdomain | 172.16.11.230 | 10.10.10.230 | 172.16.11.232 |
| 19cnode2.localdomain | 172.16.11.231 | 10.10.10.231 | 172.16.11.233 |
scan IP: 172.16.11.234,172.16.11.235,172.16.11.236
三 总体思路
1 在CentOS 7.9物理机上安装Oracle VirtualBox虚拟机软件
2 通过virtual box创建1台模板虚拟机template
3 配置template虚拟机
4 通过template虚拟机clone 2台虚拟机:19cnode1、19cnode2
5 配置共享存储
6 配置2台虚拟机
7 创建ASM磁盘
8 配置DNS服务器,解析SCAN IP
9 安装grid集群软件
10 安装Oracle软件
11 DBCA创建并测试RAC数据库
四 动手实战
1 安装Oracle VirtualBox虚拟机软件
具体操作略。
2 通过virtual box创建1台模板虚拟机template
创建模板虚拟机的具体步骤,可以参考前面的step by step install Oracle 21c RAC database对应的章节,这里不再赘述。
3 配置template虚拟机
配置template虚拟机的步骤,可以参考前面的step by step install Oracle 21c RAC database对应的章节,这里不再赘述。
4 根据模板虚拟机克隆2台虚拟机
具体克隆步骤,可以参考前面的 step by step install Oracle 21c RAC database 里相关的章节部分,这里不再详述。
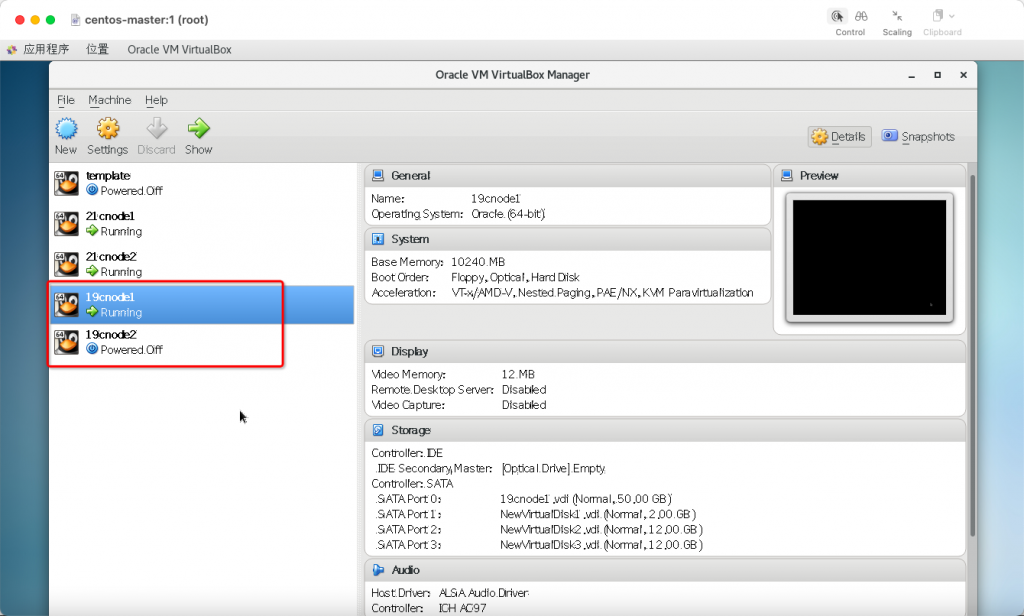
克隆之后的虚拟机如下(虚拟机列表里的21cnode1和21cnode2是前面创建21c RAC 数据库的双节点):
5 配置共享存储
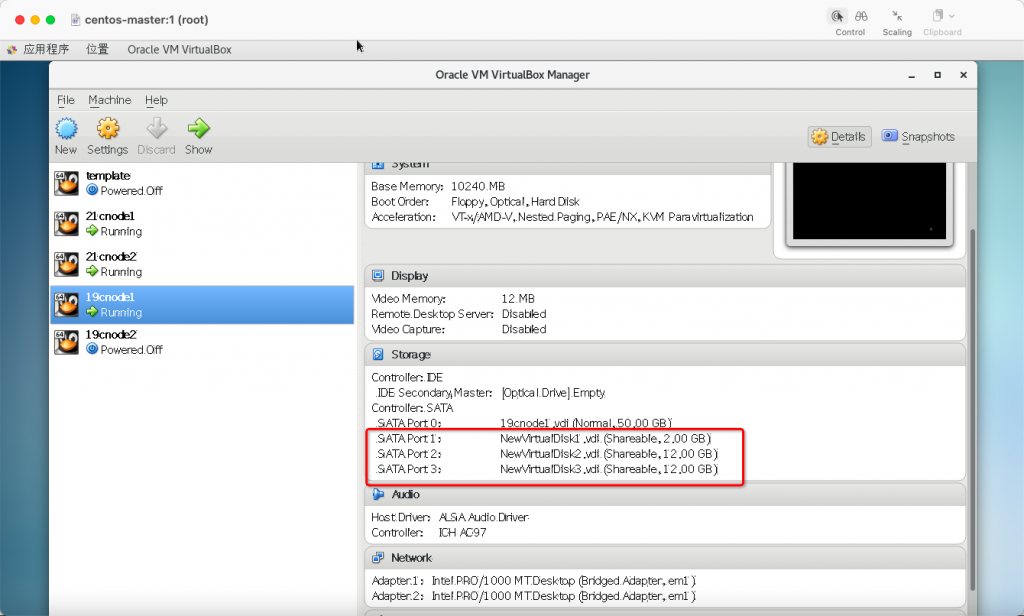
5.1 19cnode1添加共享磁盘
点击虚拟机设置,选择storage,分别添加3块磁盘。
ocr: 2GB,用于存储grid clusterware的OCR;
data: 12GB,用于存储数据库;
fra:12GB,用于存储Oracle闪回恢复区和备份文件。
存储路径,放在单独建立的用于共享磁盘存储的路径,/ssd/oracle_rac/19c_shared_disks
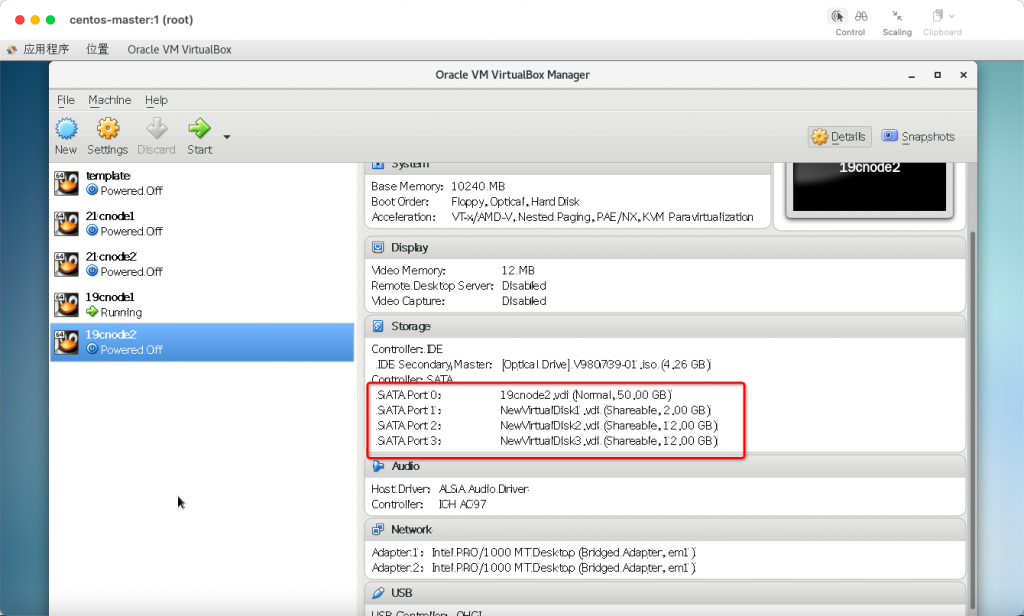
5.2 19cnode2添加共享磁盘
具体配置共享存储的步骤,可以参考前面的step by step install Oracle 21c RAC database对应的章节,这里不再赘述。添加之后的虚拟机属性如下:
19cnode2节点存储属性如下:
6 配置2台服务器
6.1 需要配置的内容
修改IP地址
修改主机名
停防火墙
停SELINUX
NTP客户端
安装ksh
禁用avahi-daemon进程
设置NOZEROCONF
设置hosts
创建用户、组、路径、设置权限
设置操作系统内核参数
设置grid/oracle用户的操作系统limits参数
6.2 19cnode1配置
启动第一台机器,ssh连接到172.16.11.110这个IP地址,执行下列脚本:
#0修改IP地址,hostname,停防火墙,SELINUX sed -i $'s/IPADDR="172.16.11.110"/IPADDR="172.16.11.230"/g' /etc/sysconfig/network-scripts/ifcfg-enp0s3 sed -i $'s/IPADDR=10.10.10.10/IPADDR=10.10.10.230/g' /etc/sysconfig/network-scripts/ifcfg-enp0s8 hostnamectl set-hostname 19cnode1 # 1停防火墙 sed -i 's/SELINUX=enforcing/SELINUX=disabled/g' /etc/selinux/config systemctl stop firewalld systemctl disable firewalld # 2停NTP客户端 systemctl stop chronyd.service systemctl disable chronyd.service mv /etc/chrony.conf /etc/chrony.conf.bak #3 install ksh yum install ksh -y #4 禁用avahi-daemon进程 systemctl status avahi-daemon systemctl stop avahi-daemon systemctl disable avahi-daemon #5 修改/etc/sysconfig/network,添加NOZEROCONF=yes cat <<EOF>> /etc/sysconfig/network NOZEROCONF=yes EOF #6 设置hosts cat <<EOF>> /etc/hosts #public #public 172.16.11.230 19cnode1.localdomain 19cnode1 172.16.11.231 19cnode2.localdomain 19cnode2 #vip 172.16.11.232 19cnode1-vip.localdomain 19cnode1-vip 172.16.11.233 19cnode2-vip.localdomain 19cnode2-vip #private 10.10.10.230 19cnode1-priv.localdomain 19cnode1-priv 10.10.10.231 19cnode2-priv.localdomain 19cnode2-priv EOF # 7 创建用户、组、路径、设置权限 groupadd -g 54331 oinstall groupadd -g 54332 dba groupadd -g 54333 oper groupadd -g 54334 backupdba groupadd -g 54335 dgdba groupadd -g 54336 kmdba groupadd -g 54337 asmdba groupadd -g 54338 asmoper groupadd -g 54339 asmadmin groupadd -g 54340 racdba useradd -m -u 54332 -g oinstall -G dba,asmadmin,asmdba,asmoper -d /home/grid -s /bin/bash grid echo "grid" | passwd --stdin grid useradd -m -u 54331 -g oinstall -G dba,oper,backupdba,dgdba,kmdba,asmdba,asmadmin,racdba -d /home/oracle -s /bin/bash oracle echo "oracle" | passwd --stdin oracle mkdir -p /u01/app/grid mkdir -p /u01/app/19.3/grid mkdir -p /u01/app/oracle mkdir -p /u01/app/oracle/product/19.3 chmod -R 775 /u01 chown -R grid:oinstall /u01/app chown -R oracle:oinstall /u01/app/oracle #8 /home/grid/.bash_profie cat <<EOF>> /home/grid/.bash_profile export ORACLE_SID=+ASM1 export ORACLE_BASE=/u01/app/grid export ORACLE_HOME=/u01/app/19.3/grid export PATH=\$ORACLE_HOME/bin:\$ORACLE_HOME/OPatch:\$PATH umask 22 EOF #9 /home/oracle/.bash_profie cat <<EOF>> /home/oracle/.bash_profile export ORACLE_SID=orcl1 export ORACLE_BASE=/u01/app/oracle export ORACLE_HOME=\$ORACLE_BASE/product/19.3 export PATH=\$ORACLE_HOME/bin:\$ORACLE_HOME/OPatch:\$PATH umask 22 EOF #10 --------2个nodes分别执行下述------------------------------------------ cat <<EOF >> /etc/sysctl.d/98-oracle.conf fs.file-max = 6815744 kernel.sem = 250 32000 100 128 kernel.shmmni = 4096 kernel.shmall = 1073741824 kernel.shmmax = 4398046511104 kernel.panic_on_oops = 1 net.core.rmem_default = 262144 net.core.rmem_max = 4194304 net.core.wmem_default = 262144 net.core.wmem_max = 1048576 net.ipv4.conf.all.rp_filter = 2 net.ipv4.conf.default.rp_filter = 2 fs.aio-max-nr = 1048576 net.ipv4.ip_local_port_range = 9000 65500 EOF #11使之生效 /sbin/sysctl -p /etc/sysctl.d/98-oracle.conf #12 --------/etc/security/limits.d/oracle-database-server-19c-preinstall.conf---------------------------------- cat <<EOF>> /etc/security/limits.d/oracle-database-server-19c-preinstall.conf oracle soft nofile 1024 oracle hard nofile 65536 oracle soft nproc 16384 oracle hard nproc 16384 oracle soft stack 10240 oracle hard stack 32768 oracle hard memlock 134217728 oracle soft memlock 134217728 grid soft nofile 1024 grid hard nofile 65536 grid soft nproc 16384 grid hard nproc 16384 grid soft stack 10240 grid hard stack 32768 grid hard memlock 134217728 grid soft memlock 134217728 EOF
6.3 19cnode2配置
#0修改IP地址,hostname,停防火墙,SELINUX sed -i $'s/IPADDR="172.16.11.110"/IPADDR="172.16.11.231"/g' /etc/sysconfig/network-scripts/ifcfg-enp0s3 sed -i $'s/IPADDR=10.10.10.10/IPADDR=10.10.10.231/g' /etc/sysconfig/network-scripts/ifcfg-enp0s8 hostnamectl set-hostname 19cnode2 # 1停防火墙 sed -i 's/SELINUX=enforcing/SELINUX=disabled/g' /etc/selinux/config systemctl stop firewalld systemctl disable firewalld # 2停NTP客户端 systemctl stop chronyd.service systemctl disable chronyd.service mv /etc/chrony.conf /etc/chrony.conf.bak #3 install ksh yum install ksh -y #4 禁用avahi-daemon进程 systemctl status avahi-daemon systemctl stop avahi-daemon systemctl disable avahi-daemon #5 修改/etc/sysconfig/network,添加NOZEROCONF=yes cat <<EOF>> /etc/sysconfig/network NOZEROCONF=yes EOF #6 设置hosts cat <<EOF>> /etc/hosts #public #public 172.16.11.230 19cnode1.localdomain 19cnode1 172.16.11.231 19cnode2.localdomain 19cnode2 #vip 172.16.11.232 19cnode1-vip.localdomain 19cnode1-vip 172.16.11.233 19cnode2-vip.localdomain 19cnode2-vip #private 10.10.10.230 19cnode1-priv.localdomain 19cnode1-priv 10.10.10.231 19cnode2-priv.localdomain 19cnode2-priv EOF # 7 创建用户、组、路径、设置权限 groupadd -g 54331 oinstall groupadd -g 54332 dba groupadd -g 54333 oper groupadd -g 54334 backupdba groupadd -g 54335 dgdba groupadd -g 54336 kmdba groupadd -g 54337 asmdba groupadd -g 54338 asmoper groupadd -g 54339 asmadmin groupadd -g 54340 racdba useradd -m -u 54332 -g oinstall -G dba,asmadmin,asmdba,asmoper -d /home/grid -s /bin/bash grid echo "grid" | passwd --stdin grid useradd -m -u 54331 -g oinstall -G dba,oper,backupdba,dgdba,kmdba,asmdba,asmadmin,racdba -d /home/oracle -s /bin/bash oracle echo "oracle" | passwd --stdin oracle mkdir -p /u01/app/grid mkdir -p /u01/app/19.3/grid mkdir -p /u01/app/oracle mkdir -p /u01/app/oracle/product/19.3 chmod -R 775 /u01 chown -R grid:oinstall /u01/app chown -R oracle:oinstall /u01/app/oracle #8 /home/grid/.bash_profie cat <<EOF>> /home/grid/.bash_profile export ORACLE_SID=+ASM2 export ORACLE_BASE=/u01/app/grid export ORACLE_HOME=/u01/app/19.3/grid export PATH=\$ORACLE_HOME/bin:\$ORACLE_HOME/OPatch:\$PATH umask 22 EOF #9 /home/oracle/.bash_profie cat <<EOF>> /home/oracle/.bash_profile export ORACLE_SID=orcl2 export ORACLE_BASE=/u01/app/oracle export ORACLE_HOME=\$ORACLE_BASE/product/19.3 export PATH=\$ORACLE_HOME/bin:\$ORACLE_HOME/OPatch:\$PATH umask 22 EOF #10 --------2个nodes分别执行下述------------------------------------------ cat <<EOF >> /etc/sysctl.d/98-oracle.conf fs.file-max = 6815744 kernel.sem = 250 32000 100 128 kernel.shmmni = 4096 kernel.shmall = 1073741824 kernel.shmmax = 4398046511104 kernel.panic_on_oops = 1 net.core.rmem_default = 262144 net.core.rmem_max = 4194304 net.core.wmem_default = 262144 net.core.wmem_max = 1048576 net.ipv4.conf.all.rp_filter = 2 net.ipv4.conf.default.rp_filter = 2 fs.aio-max-nr = 1048576 net.ipv4.ip_local_port_range = 9000 65500 EOF #11使之生效 /sbin/sysctl -p /etc/sysctl.d/98-oracle.conf #12 --------/etc/security/limits.d/oracle-database-server-19c-preinstall.conf---------------------------------- cat <<EOF>> /etc/security/limits.d/oracle-database-server-19c-preinstall.conf oracle soft nofile 1024 oracle hard nofile 65536 oracle soft nproc 16384 oracle hard nproc 16384 oracle soft stack 10240 oracle hard stack 32768 oracle hard memlock 134217728 oracle soft memlock 134217728 grid soft nofile 1024 grid hard nofile 65536 grid soft nproc 16384 grid hard nproc 16384 grid soft stack 10240 grid hard stack 32768 grid hard memlock 134217728 grid soft memlock 134217728 EOF
6.4 配置参考地址
7 配置ASM磁盘
具体配置可以参考step by step install Oracle 21c RAC database对应配置ASM磁盘章节部分,具体不再赘述。
这里,仅仅给出创建ASM磁盘的主要步骤
#格式化磁盘
[root@19cnode1 ~]# fdisk /dev/sdb
欢迎使用 fdisk (util-linux 2.23.2)。
更改将停留在内存中,直到您决定将更改写入磁盘。
使用写入命令前请三思。
Device does not contain a recognized partition table
使用磁盘标识符 0xe13db629 创建新的 DOS 磁盘标签。
命令(输入 m 获取帮助):n
Partition type:
p primary (0 primary, 0 extended, 4 free)
e extended
Select (default p): p
分区号 (1-4,默认 1):1
起始 扇区 (2048-2097151,默认为 2048):
将使用默认值 2048
Last 扇区, +扇区 or +size{K,M,G} (2048-2097151,默认为 2097151):
将使用默认值 2097151
分区 1 已设置为 Linux 类型,大小设为 1023 MiB
命令(输入 m 获取帮助):w
The partition table has been altered!
Calling ioctl() to re-read partition table.
正在同步磁盘。
[root@19cnode1 ~]# fdisk /dev/sdc
欢迎使用 fdisk (util-linux 2.23.2)。
更改将停留在内存中,直到您决定将更改写入磁盘。
使用写入命令前请三思。
Device does not contain a recognized partition table
使用磁盘标识符 0xb2d012c1 创建新的 DOS 磁盘标签。
命令(输入 m 获取帮助):n
Partition type:
p primary (0 primary, 0 extended, 4 free)
e extended
Select (default p): p
分区号 (1-4,默认 1):1
起始 扇区 (2048-25165823,默认为 2048):
将使用默认值 2048
Last 扇区, +扇区 or +size{K,M,G} (2048-25165823,默认为 25165823):
将使用默认值 25165823
分区 1 已设置为 Linux 类型,大小设为 12 GiB
命令(输入 m 获取帮助):w
The partition table has been altered!
Calling ioctl() to re-read partition table.
正在同步磁盘。
[root@19cnode1 ~]# fdisk /dev/sdd
欢迎使用 fdisk (util-linux 2.23.2)。
更改将停留在内存中,直到您决定将更改写入磁盘。
使用写入命令前请三思。
Device does not contain a recognized partition table
使用磁盘标识符 0x8f300286 创建新的 DOS 磁盘标签。
命令(输入 m 获取帮助):n
Partition type:
p primary (0 primary, 0 extended, 4 free)
e extended
Select (default p): p
分区号 (1-4,默认 1):1
起始 扇区 (2048-25165823,默认为 2048):
将使用默认值 2048
Last 扇区, +扇区 or +size{K,M,G} (2048-25165823,默认为 25165823):
将使用默认值 25165823
分区 1 已设置为 Linux 类型,大小设为 12 GiB
命令(输入 m 获取帮助):w
The partition table has been altered!
Calling ioctl() to re-read partition table.
正在同步磁盘。
[root@19cnode1 ~]#
[root@19cnode1 ~]# lsblk
NAME MAJ:MIN RM SIZE RO TYPE MOUNTPOINT
sdd 8:48 0 12G 0 disk
└─sdd1 8:49 0 12G 0 part
sdb 8:16 0 1G 0 disk
└─sdb1 8:17 0 1023M 0 part
sr0 11:0 1 1024M 0 rom
sdc 8:32 0 12G 0 disk
└─sdc1 8:33 0 12G 0 part
sda 8:0 0 50G 0 disk
├─sda2 8:2 0 48G 0 part
│ ├─ol-swap 252:1 0 10G 0 lvm [SWAP]
│ └─ol-root 252:0 0 38G 0 lvm /
└─sda1 8:1 0 2G 0 part /boot
[root@19cnode1 ~]#
#node2
[root@19cnode2 ~]# lsblk
NAME MAJ:MIN RM SIZE RO TYPE MOUNTPOINT
sdd 8:48 0 12G 0 disk
sdb 8:16 0 1G 0 disk
sr0 11:0 1 1024M 0 rom
sdc 8:32 0 12G 0 disk
sda 8:0 0 50G 0 disk
├─sda2 8:2 0 48G 0 part
│ ├─ol-swap 252:1 0 10G 0 lvm [SWAP]
│ └─ol-root 252:0 0 38G 0 lvm /
└─sda1 8:1 0 2G 0 part /boot
[root@19cnode2 ~]# partprobe
[root@19cnode2 ~]# lsblk
NAME MAJ:MIN RM SIZE RO TYPE MOUNTPOINT
sdd 8:48 0 12G 0 disk
└─sdd1 8:49 0 12G 0 part
sdb 8:16 0 1G 0 disk
└─sdb1 8:17 0 1023M 0 part
sr0 11:0 1 1024M 0 rom
sdc 8:32 0 12G 0 disk
└─sdc1 8:33 0 12G 0 part
sda 8:0 0 50G 0 disk
├─sda2 8:2 0 48G 0 part
│ ├─ol-swap 252:1 0 10G 0 lvm [SWAP]
│ └─ol-root 252:0 0 38G 0 lvm /
└─sda1 8:1 0 2G 0 part /boot
[root@19cnode2 ~]#
# 启动oracleasm服务,双节点
[root@19cnode1 ~]# oracleasm configure -i
Configuring the Oracle ASM library driver.
This will configure the on-boot properties of the Oracle ASM library
driver. The following questions will determine whether the driver is
loaded on boot and what permissions it will have. The current values
will be shown in brackets ('[]'). Hitting <ENTER> without typing an
answer will keep that current value. Ctrl-C will abort.
Default user to own the driver interface []: grid
Default group to own the driver interface []: asmadmin
Start Oracle ASM library driver on boot (y/n) [n]: y
Scan for Oracle ASM disks on boot (y/n) [y]: y
Writing Oracle ASM library driver configuration: done
[root@19cnode1 ~]#
# 建ASM磁盘,node1
[root@19cnode1 ~]# oracleasm createdisk VOL1 /dev/sdb1
Writing disk header: done
Instantiating disk: done
[root@19cnode1 ~]# oracleasm createdisk VOL2 /dev/sdc1
Writing disk header: done
Instantiating disk: done
[root@19cnode1 ~]# oracleasm createdisk VOL3 /dev/sdd1
Writing disk header: done
Instantiating disk: done
[root@19cnode1 ~]# oracleasm listdisks
VOL1
VOL2
VOL3
[root@19cnode1 ~]# oracleasm status
Checking if ASM is loaded: yes
Checking if /dev/oracleasm is mounted: yes
[root@19cnode1 ~]#
# node2 发现磁盘
[root@19cnode2 ~]# oracleasm listdisks
[root@19cnode2 ~]# oracleasm scandisks
Reloading disk partitions: done
Cleaning any stale ASM disks...
Scanning system for ASM disks...
Instantiating disk "VOL2"
Instantiating disk "VOL1"
Instantiating disk "VOL3"
[root@19cnode2 ~]# oracleasm listdisks
VOL1
VOL2
VOL3
[root@19cnode2 ~]# 8 安装配置验证DNS服务器
我们在前面安装配置21C RAC数据库教程里,已经安装并且配置好了DNS服务器。我们在此基础上,添加解析Oracle 19C RAC数据库的配置文件即可。
8.1 修改/etc/named/named.conf.local配置文件
在该配置文件中添加19C RAC的配置文件,/etc/named/zones/db.scan-cluster-19c.localdomain
[root@centos-master named]# pwd
/etc/named
[root@centos-master named]# ll
total 8
-rw-r--r-- 1 root root 390 Jan 9 17:18 named.conf.local
drwxr-xr-x 2 root root 4096 Jan 9 17:21 zones
[root@centos-master named]# cat named.conf.local
zone "scan-cluster-21c.localdomain" {
type master;
file "/etc/named/zones/db.scan-cluster-21c.localdomain"; # zone file path
};
zone "scan-cluster-19c.localdomain" {
type master;
file "/etc/named/zones/db.scan-cluster-19c.localdomain"; # zone file path
};
zone "16.172.in-addr.arpa" {
type master;
file "/etc/named/zones/db.172.16"; # 172.16.0.0/16 subnet
};
[root@centos-master named]#
8.2 创建并编辑正向解析文件/etc/named/zones/db.scan-cluster-19c.localdomain
[root@centos-master zones]# pwd
/etc/named/zones
[root@centos-master zones]# ll
total 12
-rw-r--r-- 1 root root 1134 Jan 9 17:21 db.172.16
-rw-r--r-- 1 root root 789 Jan 9 17:19 db.scan-cluster-19c.localdomain
-rw-r--r-- 1 root root 850 Jan 8 22:28 db.scan-cluster-21c.localdomain
[root@centos-master zones]# cat db.scan-cluster-19c.localdomain
$TTL 604800
@ IN SOA scan-cluster-19c.localdomain root.localdomain. (
3 ; Serial
604800 ; Refresh
86400 ; Retry
2419200 ; Expire
604800 ) ; Negative Cache TTL
;
; name servers - NS records
IN NS scan-cluster-19c.localdomain.
; name servers - A records
scan-cluster-19c.localdomain. IN A 172.16.11.234
scan-cluster-19c.localdomain. IN A 172.16.11.235
scan-cluster-19c.localdomain. IN A 172.16.11.236
; 10.128.0.0/16 - A records
;host1.nyc3.example.com. IN A 10.128.100.101
;host2.nyc3.example.com. IN A 10.128.200.102
[root@centos-master zones]# 📢📢📢:这里为图省事儿,就没有配置反向解析配置文件。
8.3 重启DNS服务并验证
[root@19cnode1 ~]# nslookup scan-cluster-19c.localdomain Server: 172.16.11.36 Address: 172.16.11.36#53 Name: scan-cluster-19c.localdomain Address: 172.16.11.235 Name: scan-cluster-19c.localdomain Address: 172.16.11.236 Name: scan-cluster-19c.localdomain Address: 172.16.11.234 [root@oracle-18 ~]#
这次,说明DNS服务器配置正常,我们的双节点可以通过配置的172.16.11.36 DNS服务器,来正常将SCAN name 为scan-cluster-19c.localdomain解析到既定的IP地址:172.16.11.234,172.16.11.235和172.16.11.236上。
9 安装配置Oracle 19c grid集群件
具体配置可以参考step by step install Oracle 21c RAC database对应安装配置grid集群件章节部分,具体不再赘述。需要注意的是,我这里的截图部分,是更早之前(2022年9月份)的一次安装截图,其中我的共享磁盘创建了4块,ASM磁盘组依然是3个,把其中的2块共享磁盘,创建成1个OCRDG磁盘组。
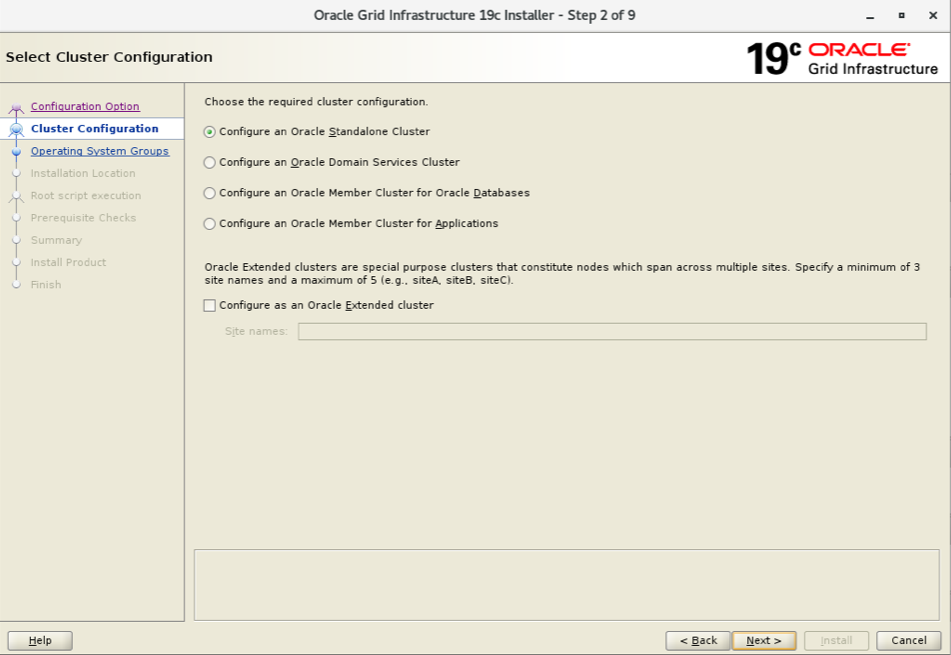
进入图形界面安装:
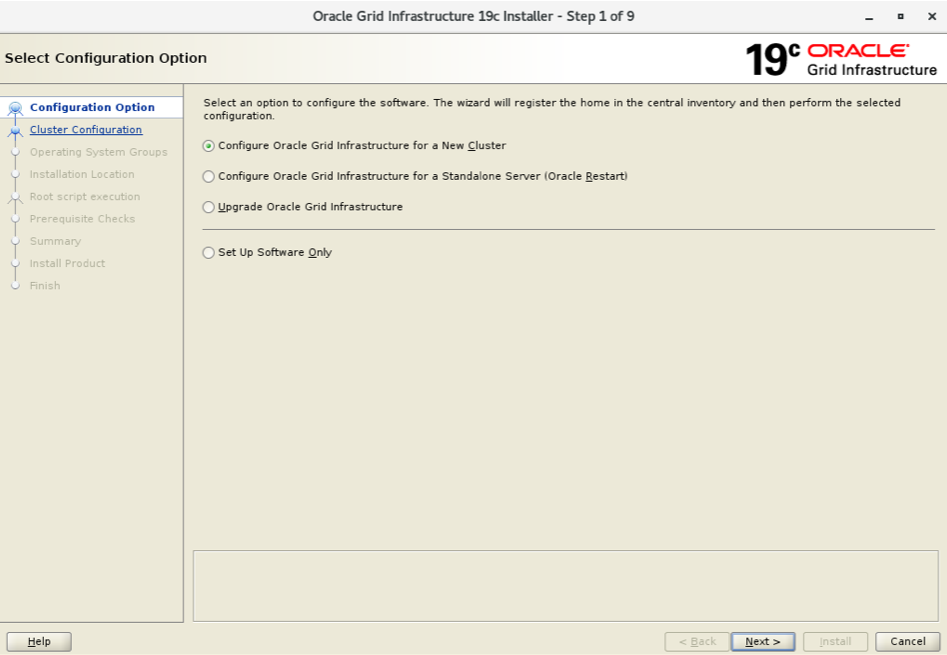
选择第1项:
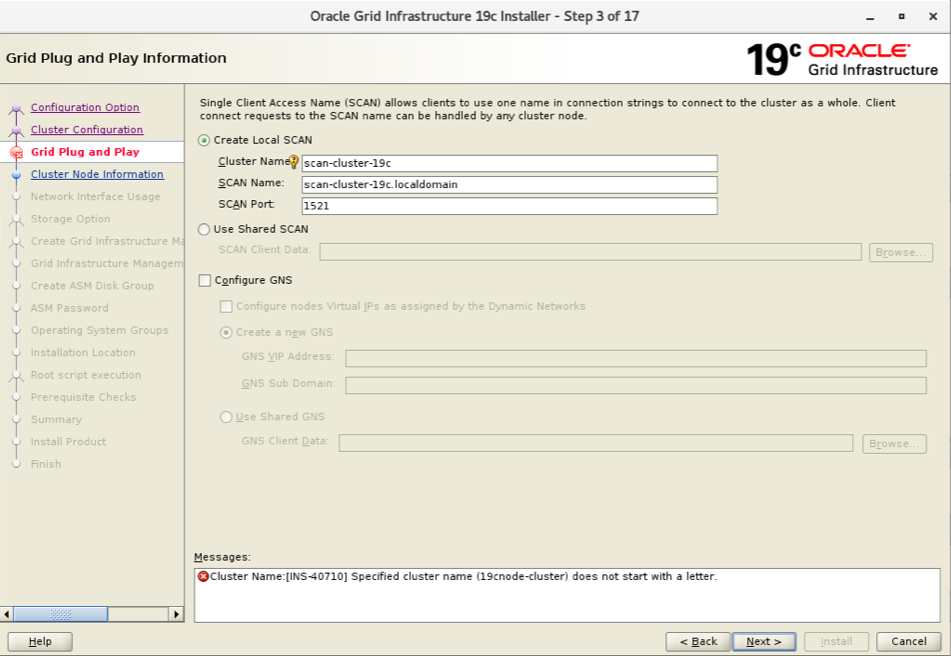
输入前面创建的scan name: scan-cluster-19c.localdomain
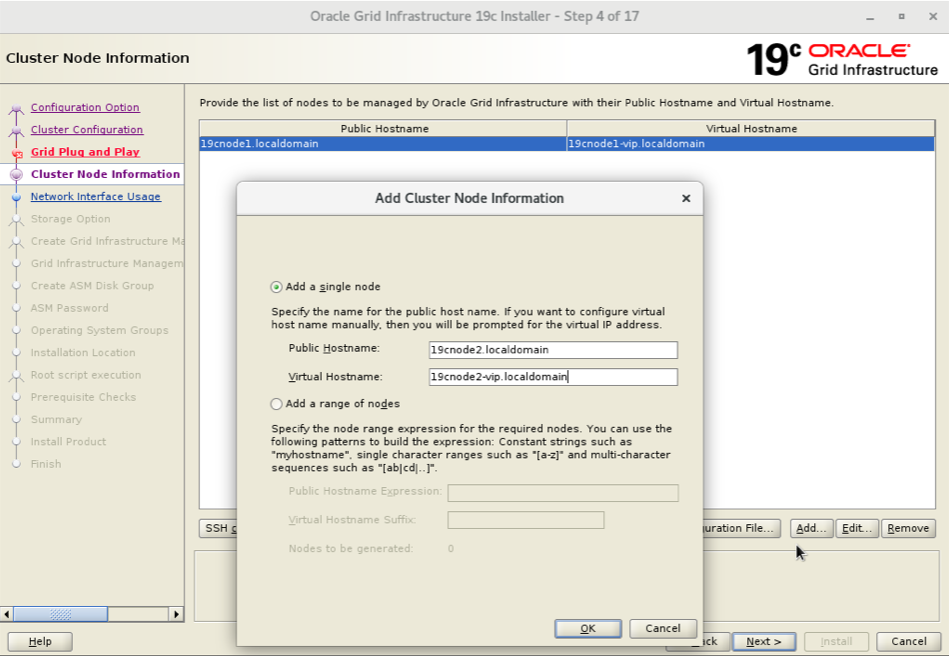
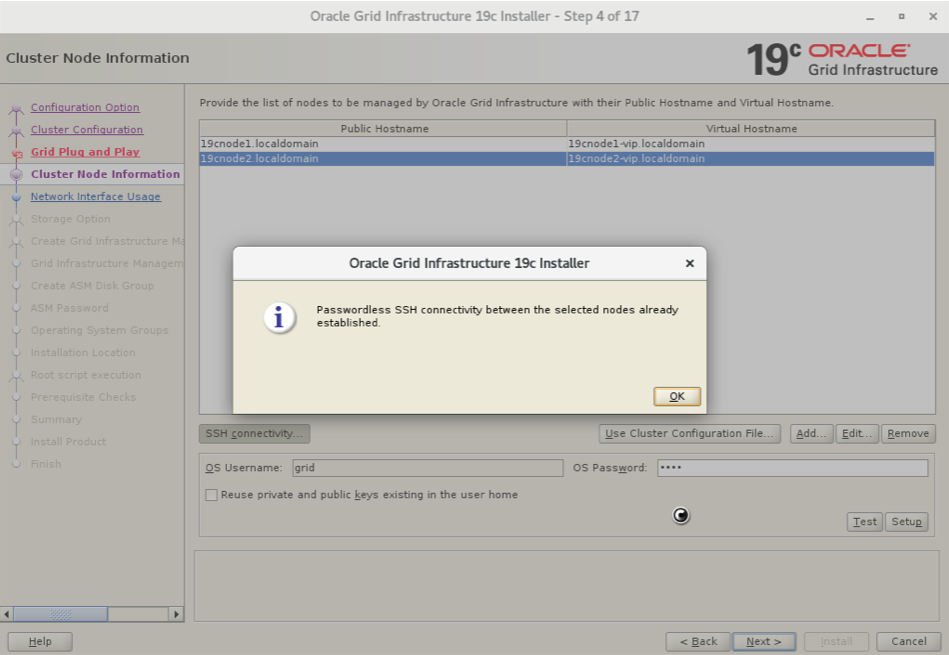
添加第2个节点:
设置SSH对等性:
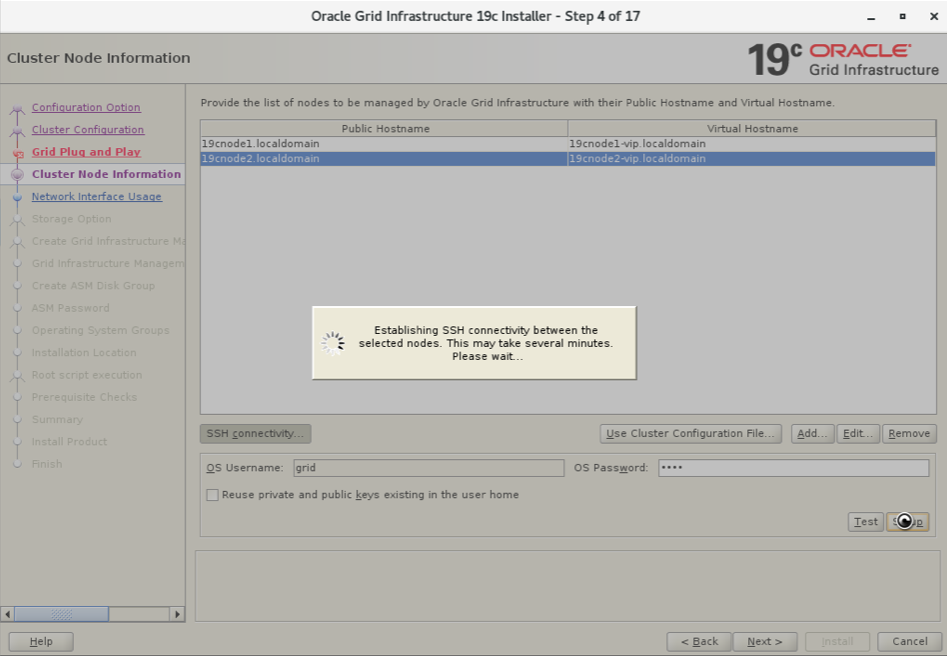
验证ssh:
选择私有网络:
注意,private网络选择,要用ASM & Private,而不能单独使用Private。否则,后续步骤,通过ASM来存放OCR和voting disk时会报错。
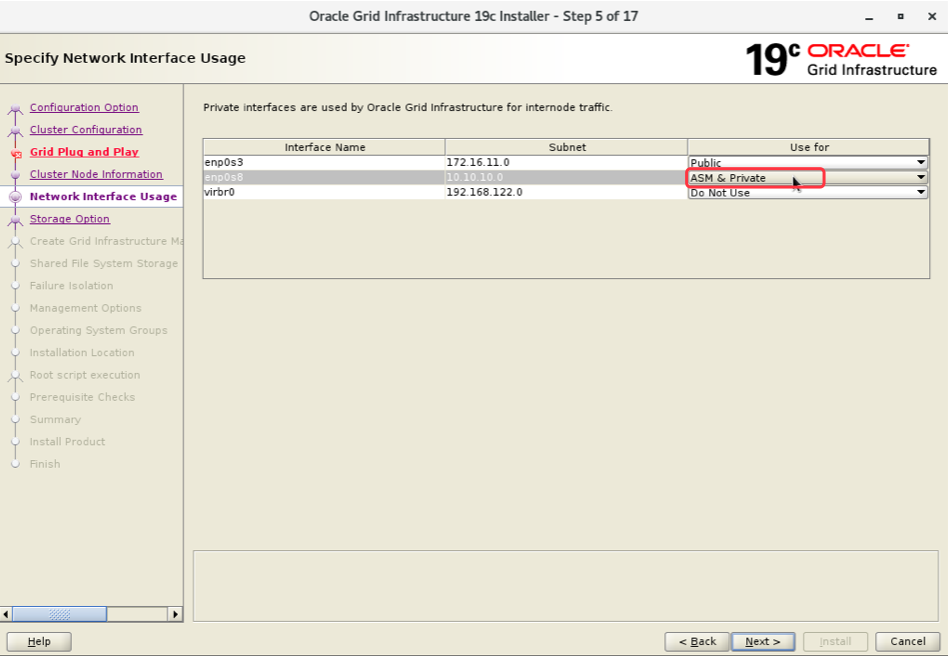
不能直接单独选择下述的Private。

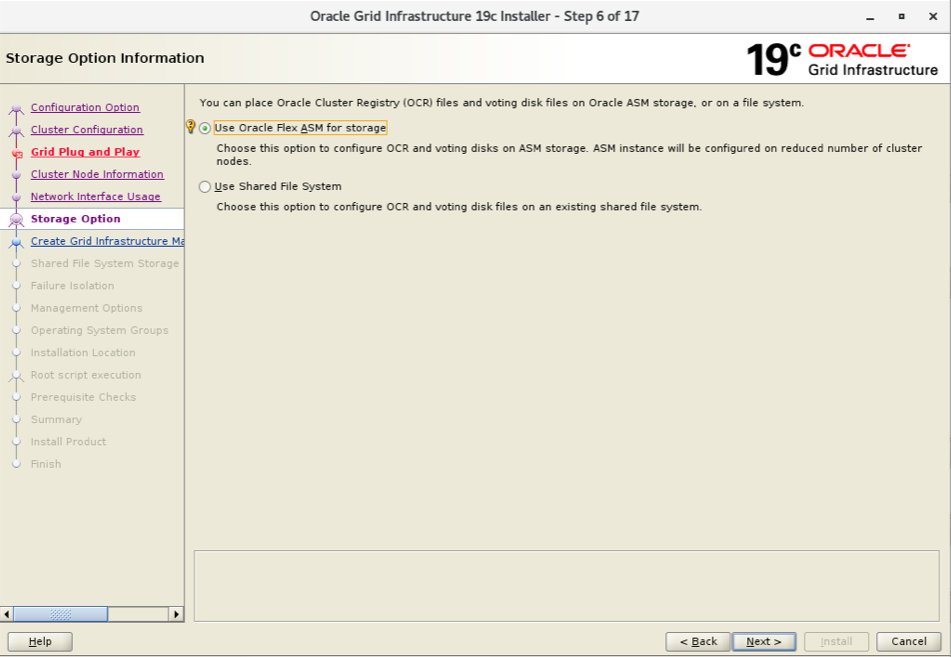
使用ASM存储:
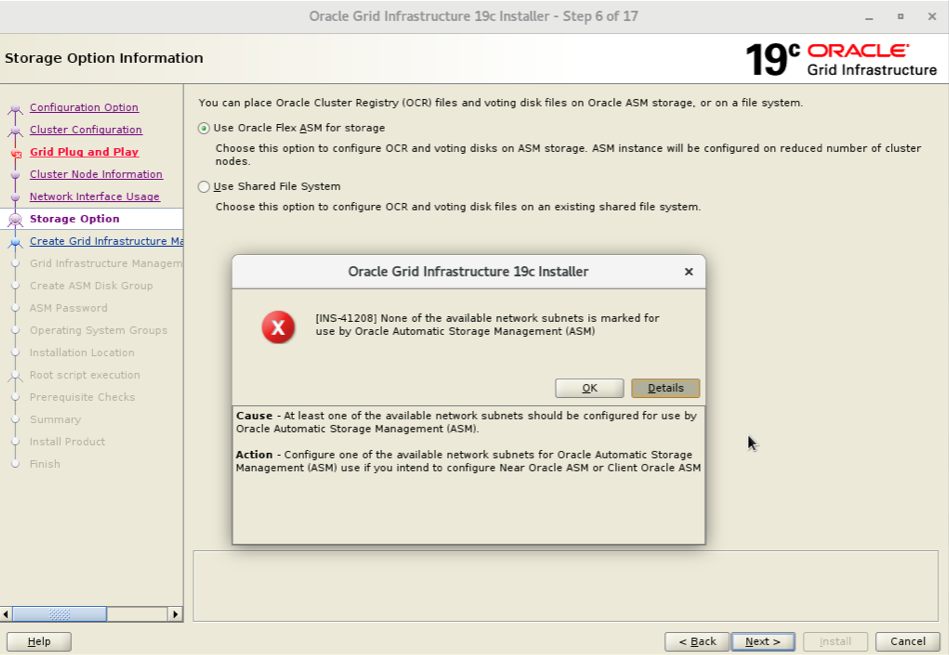
上面的步骤中,如果单独选择了private的话,此时会报下述错误:
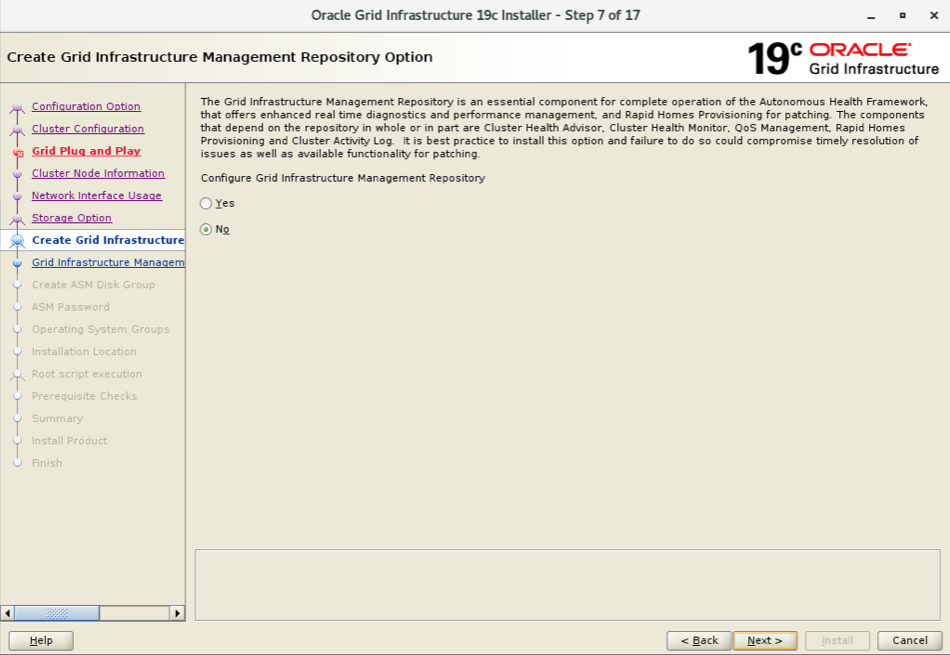
不使用GIMP:Grid Infrastructure Management Repository
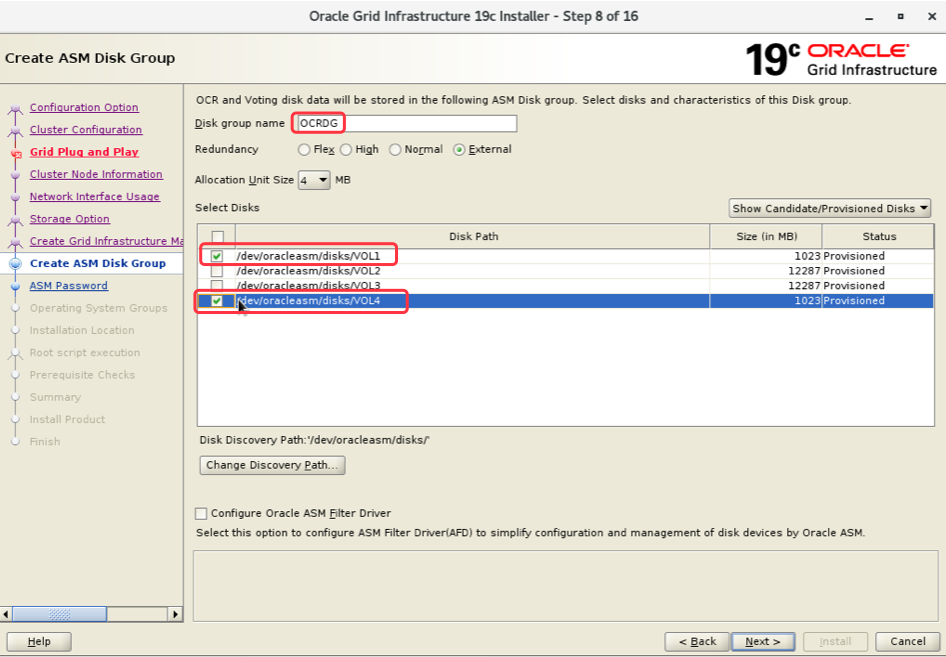
创建OCRDG磁盘组,选择第1个和第4个磁盘,组成1个磁盘组:
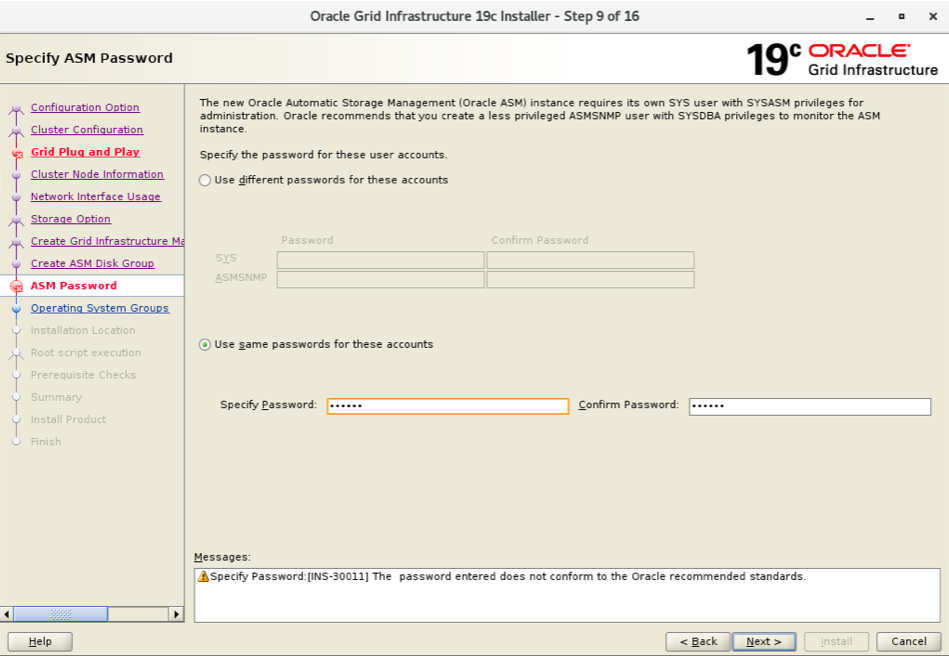
设置ASM实例口令:
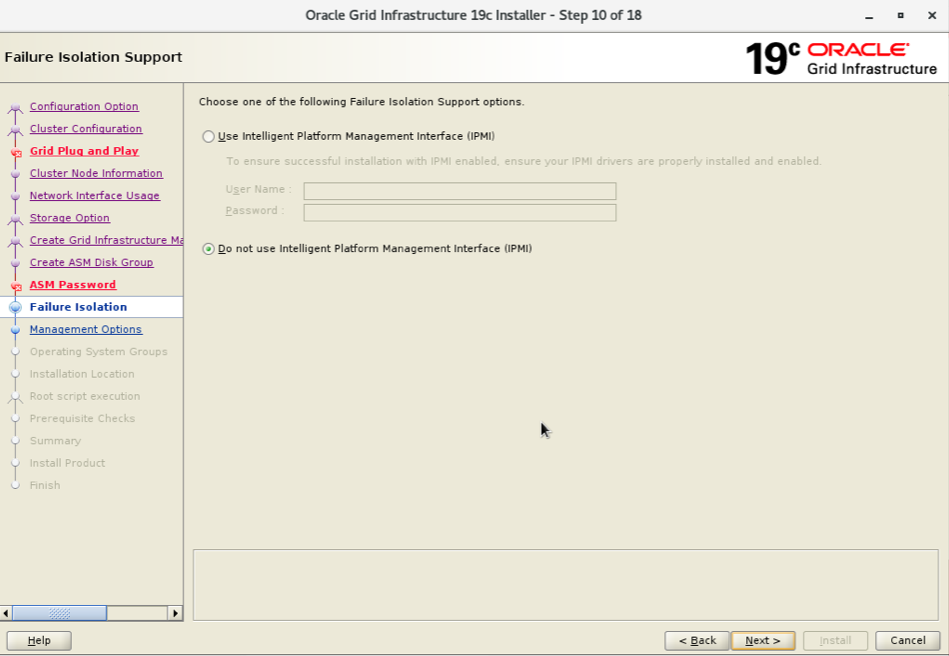
不使用IPMI:
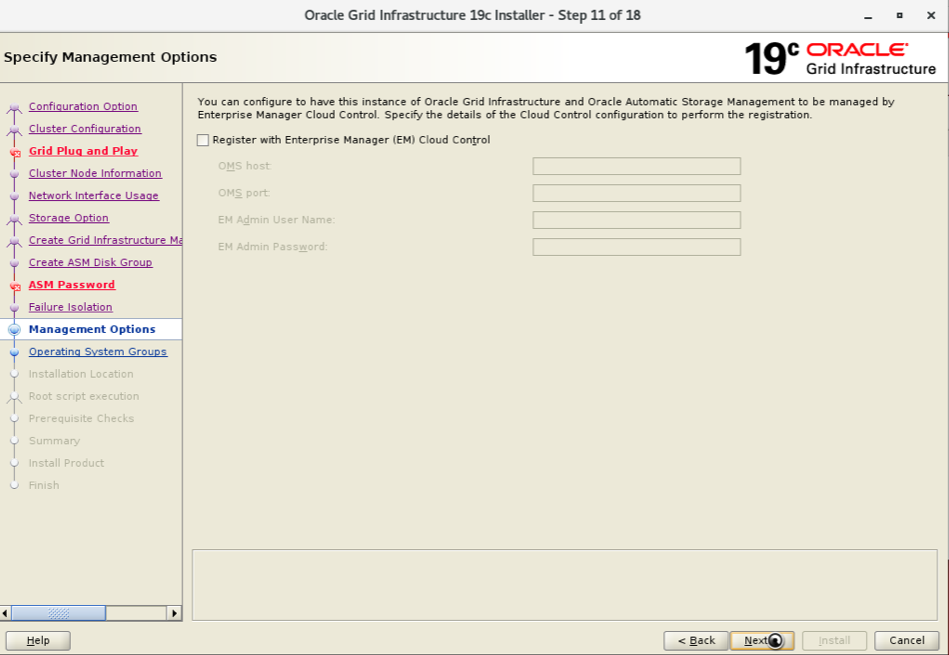
跳过EM:
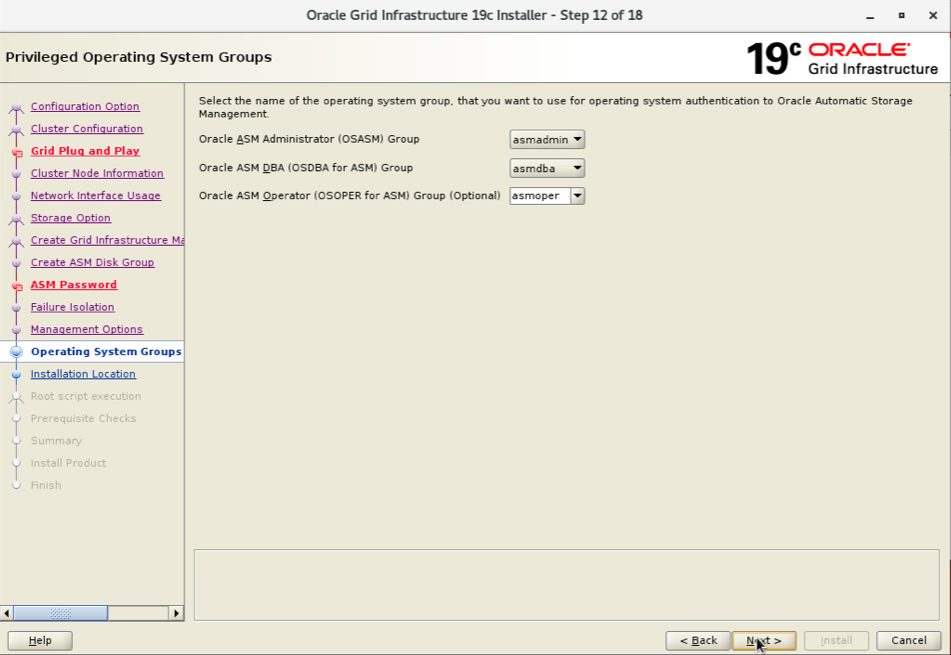
选择对应的用户组:
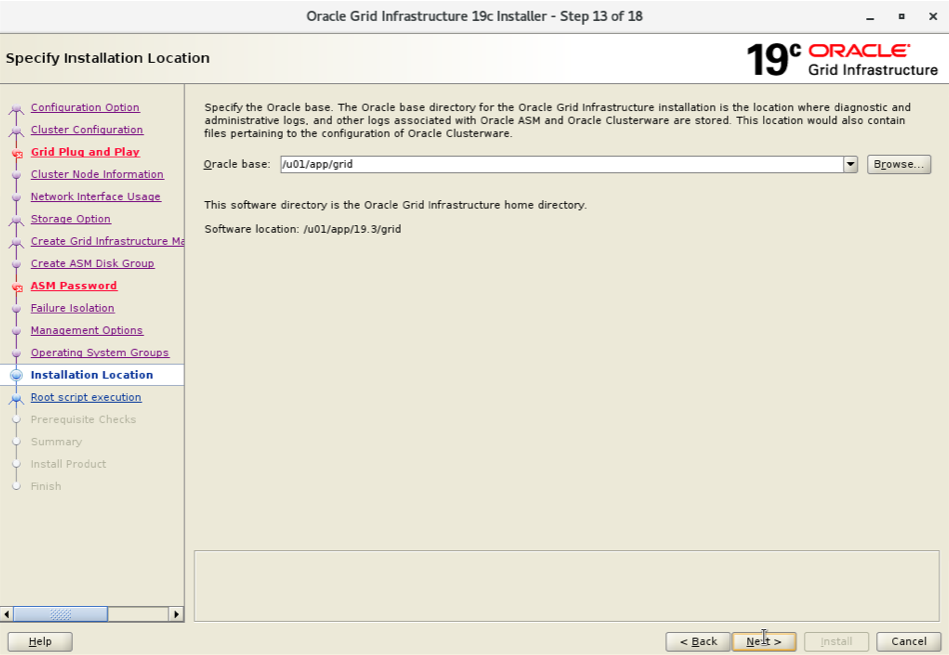
设置ORACLE_BASE:
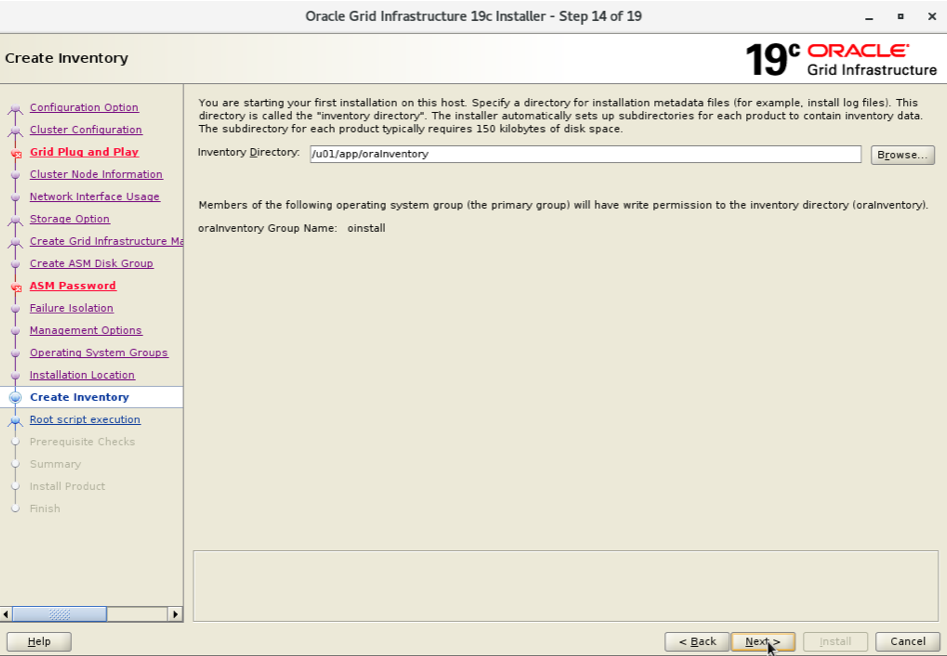
指定Oracle inventory路径:
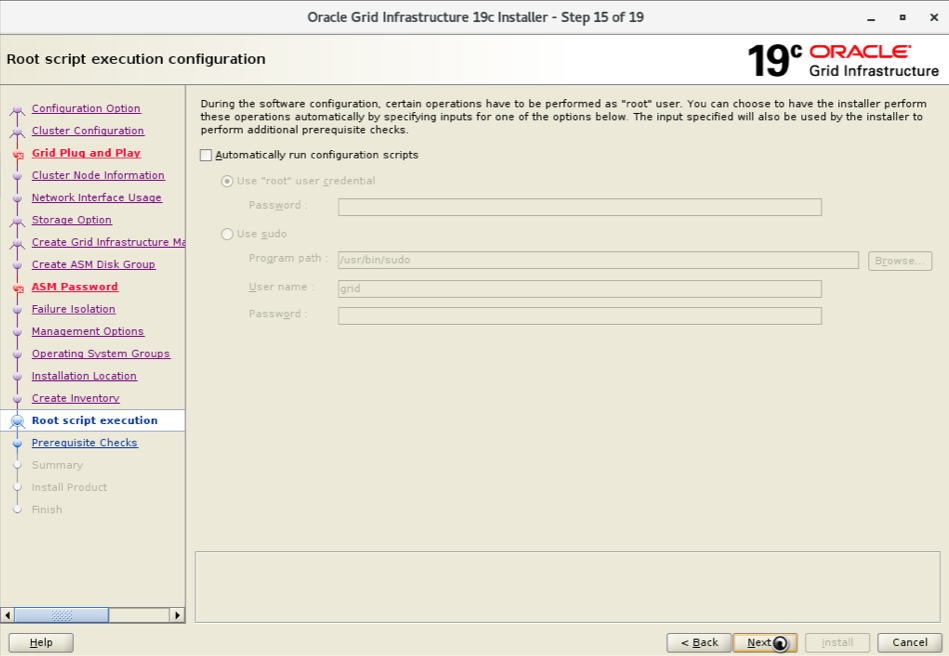
跳过指定自动执行脚本:
执行安装前检查:
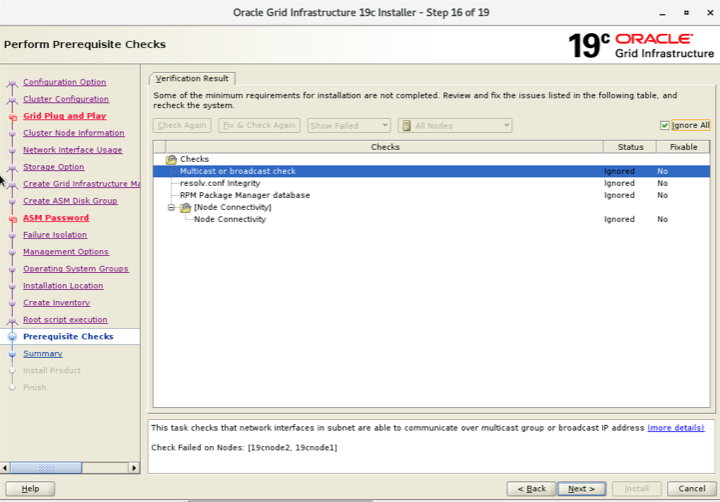
根据提示,安装缺失的软件包。
执行安装:
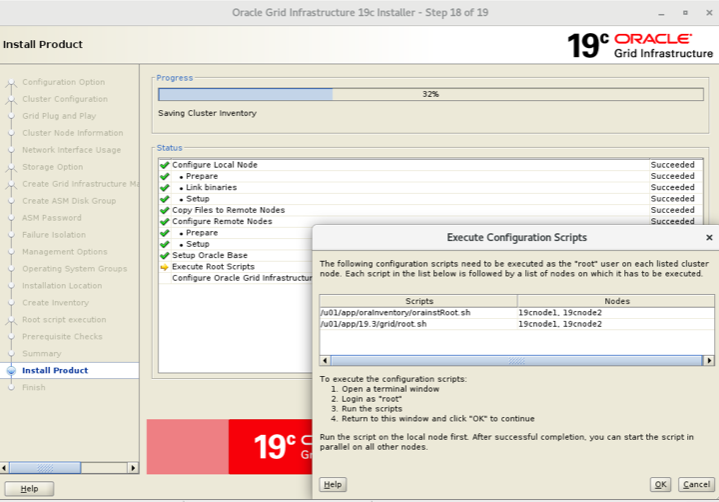
根据提示,到对应的节点上执行脚本:
[root@19cnode1 ~]# /u01/app/19.3/grid/root.sh
Performing root user operation.
The following environment variables are set as:
ORACLE_OWNER= grid
ORACLE_HOME= /u01/app/19.3/grid
Enter the full pathname of the local bin directory: [/usr/local/bin]:
The contents of "dbhome" have not changed. No need to overwrite.
The contents of "oraenv" have not changed. No need to overwrite.
The contents of "coraenv" have not changed. No need to overwrite.
Creating /etc/oratab file...
Entries will be added to the /etc/oratab file as needed by
Database Configuration Assistant when a database is created
Finished running generic part of root script.
Now product-specific root actions will be performed.
Relinking oracle with rac_on option
Using configuration parameter file: /u01/app/19.3/grid/crs/install/crsconfig_params
The log of current session can be found at:
/u01/app/grid/crsdata/19cnode1/crsconfig/rootcrs_19cnode1_2022-09-09_10-24-21PM.log
2022/09/09 22:24:46 CLSRSC-594: Executing installation step 1 of 19: 'SetupTFA'.
2022/09/09 22:24:46 CLSRSC-594: Executing installation step 2 of 19: 'ValidateEnv'.
2022/09/09 22:24:46 CLSRSC-363: User ignored prerequisites during installation
2022/09/09 22:24:46 CLSRSC-594: Executing installation step 3 of 19: 'CheckFirstNode'.
2022/09/09 22:24:50 CLSRSC-594: Executing installation step 4 of 19: 'GenSiteGUIDs'.
2022/09/09 22:24:52 CLSRSC-594: Executing installation step 5 of 19: 'SetupOSD'.
2022/09/09 22:24:52 CLSRSC-594: Executing installation step 6 of 19: 'CheckCRSConfig'.
2022/09/09 22:24:53 CLSRSC-594: Executing installation step 7 of 19: 'SetupLocalGPNP'.
2022/09/09 22:26:09 CLSRSC-594: Executing installation step 8 of 19: 'CreateRootCert'.
2022/09/09 22:26:34 CLSRSC-594: Executing installation step 9 of 19: 'ConfigOLR'.
2022/09/09 22:26:50 CLSRSC-4002: Successfully installed Oracle Trace File Analyzer (TFA) Collector.
2022/09/09 22:27:05 CLSRSC-594: Executing installation step 10 of 19: 'ConfigCHMOS'.
2022/09/09 22:27:05 CLSRSC-594: Executing installation step 11 of 19: 'CreateOHASD'.
2022/09/09 22:27:15 CLSRSC-594: Executing installation step 12 of 19: 'ConfigOHASD'.
2022/09/09 22:27:15 CLSRSC-330: Adding Clusterware entries to file 'oracle-ohasd.service'
2022/09/09 22:27:50 CLSRSC-594: Executing installation step 13 of 19: 'InstallAFD'.
2022/09/09 22:28:00 CLSRSC-594: Executing installation step 14 of 19: 'InstallACFS'.
2022/09/09 22:28:11 CLSRSC-594: Executing installation step 15 of 19: 'InstallKA'.
2022/09/09 22:28:21 CLSRSC-594: Executing installation step 16 of 19: 'InitConfig'.
已成功创建并启动 ASM。
[DBT-30001] 已成功创建磁盘组。有关详细信息, 请查看 /u01/app/grid/cfgtoollogs/asmca/asmca-220909下午102919.log。
2022/09/09 22:30:41 CLSRSC-482: Running command: '/u01/app/19.3/grid/bin/ocrconfig -upgrade grid oinstall'
CRS-4256: Updating the profile
Successful addition of voting disk 3ded43708ff04f61bff1433cd2ff0b91.
Successfully replaced voting disk group with +OCRDG.
CRS-4256: Updating the profile
CRS-4266: Voting file(s) successfully replaced
## STATE File Universal Id File Name Disk group
-- ----- ----------------- --------- ---------
1. ONLINE 3ded43708ff04f61bff1433cd2ff0b91 (/dev/oracleasm/disks/VOL1) [OCRDG]
Located 1 voting disk(s).
2022/09/09 22:33:27 CLSRSC-594: Executing installation step 17 of 19: 'StartCluster'.
2022/09/09 22:35:34 CLSRSC-343: Successfully started Oracle Clusterware stack
2022/09/09 22:35:34 CLSRSC-594: Executing installation step 18 of 19: 'ConfigNode'.
2022/09/09 22:39:24 CLSRSC-594: Executing installation step 19 of 19: 'PostConfig'.
2022/09/09 22:40:30 CLSRSC-325: Configure Oracle Grid Infrastructure for a Cluster ... succeeded
[root@19cnode1 ~]#
#到节点2上执行脚本
[root@19cnode2 ~]# /u01/app/19.3/grid/root.sh
Performing root user operation.
The following environment variables are set as:
ORACLE_OWNER= grid
ORACLE_HOME= /u01/app/19.3/grid
Enter the full pathname of the local bin directory: [/usr/local/bin]:
The contents of "dbhome" have not changed. No need to overwrite.
The contents of "oraenv" have not changed. No need to overwrite.
The contents of "coraenv" have not changed. No need to overwrite.
Creating /etc/oratab file...
Entries will be added to the /etc/oratab file as needed by
Database Configuration Assistant when a database is created
Finished running generic part of root script.
Now product-specific root actions will be performed.
Relinking oracle with rac_on option
Using configuration parameter file: /u01/app/19.3/grid/crs/install/crsconfig_params
The log of current session can be found at:
/u01/app/grid/crsdata/19cnode2/crsconfig/rootcrs_19cnode2_2022-09-09_10-42-10PM.log
2022/09/09 22:42:21 CLSRSC-594: Executing installation step 1 of 19: 'SetupTFA'.
2022/09/09 22:42:21 CLSRSC-594: Executing installation step 2 of 19: 'ValidateEnv'.
2022/09/09 22:42:21 CLSRSC-363: User ignored prerequisites during installation
2022/09/09 22:42:21 CLSRSC-594: Executing installation step 3 of 19: 'CheckFirstNode'.
2022/09/09 22:42:25 CLSRSC-594: Executing installation step 4 of 19: 'GenSiteGUIDs'.
2022/09/09 22:42:25 CLSRSC-594: Executing installation step 5 of 19: 'SetupOSD'.
2022/09/09 22:42:25 CLSRSC-594: Executing installation step 6 of 19: 'CheckCRSConfig'.
2022/09/09 22:42:27 CLSRSC-594: Executing installation step 7 of 19: 'SetupLocalGPNP'.
2022/09/09 22:42:31 CLSRSC-594: Executing installation step 8 of 19: 'CreateRootCert'.
2022/09/09 22:42:31 CLSRSC-594: Executing installation step 9 of 19: 'ConfigOLR'.
2022/09/09 22:42:53 CLSRSC-594: Executing installation step 10 of 19: 'ConfigCHMOS'.
2022/09/09 22:42:54 CLSRSC-594: Executing installation step 11 of 19: 'CreateOHASD'.
2022/09/09 22:43:02 CLSRSC-594: Executing installation step 12 of 19: 'ConfigOHASD'.
2022/09/09 22:43:02 CLSRSC-330: Adding Clusterware entries to file 'oracle-ohasd.service'
2022/09/09 22:43:36 CLSRSC-4002: Successfully installed Oracle Trace File Analyzer (TFA) Collector.
2022/09/09 22:43:49 CLSRSC-594: Executing installation step 13 of 19: 'InstallAFD'.
2022/09/09 22:43:52 CLSRSC-594: Executing installation step 14 of 19: 'InstallACFS'.
2022/09/09 22:43:55 CLSRSC-594: Executing installation step 15 of 19: 'InstallKA'.
2022/09/09 22:43:57 CLSRSC-594: Executing installation step 16 of 19: 'InitConfig'.
2022/09/09 22:44:12 CLSRSC-594: Executing installation step 17 of 19: 'StartCluster'.
2022/09/09 22:45:35 CLSRSC-343: Successfully started Oracle Clusterware stack
2022/09/09 22:45:36 CLSRSC-594: Executing installation step 18 of 19: 'ConfigNode'.
2022/09/09 22:46:33 CLSRSC-594: Executing installation step 19 of 19: 'PostConfig'.
2022/09/09 22:47:01 CLSRSC-325: Configure Oracle Grid Infrastructure for a Cluster ... succeeded
[root@19cnode2 ~]# 最后,完成安装。
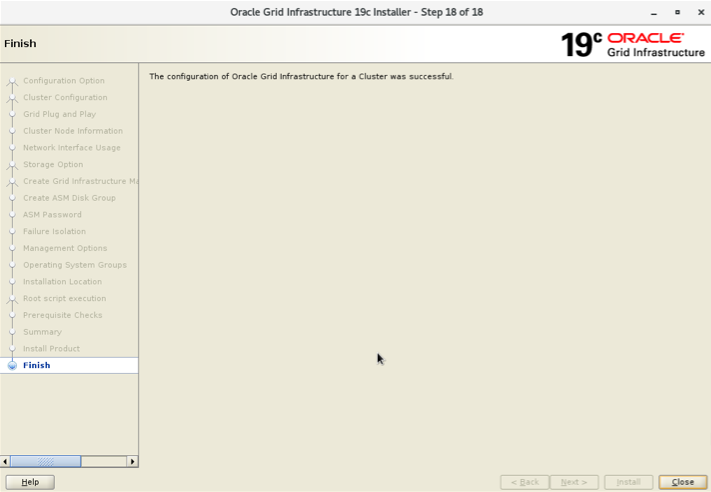
至此,Oracle 19C RAC的集群件grid clusterware已经安装完成。
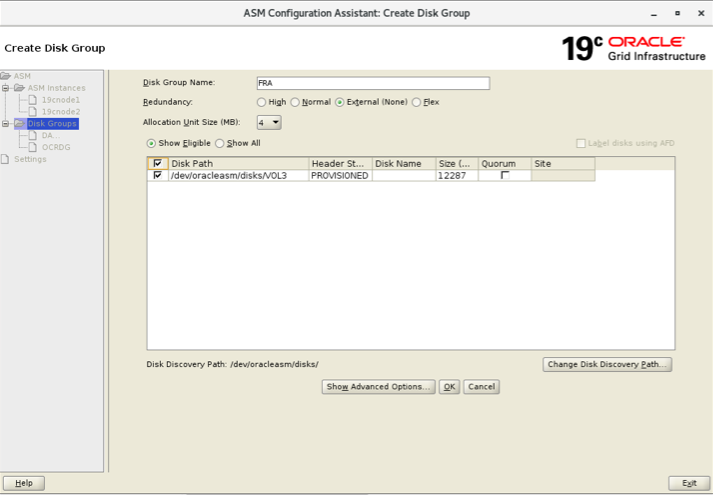
10 配置ASM磁盘组:DATA和FRA
具体详细步骤可以参考一步一步安装配置双节点Oracle 21C RAC数据库。
grid用户登录图形界面,执行asmca,进入图形界面,分别创建DATA和FRA磁盘组:
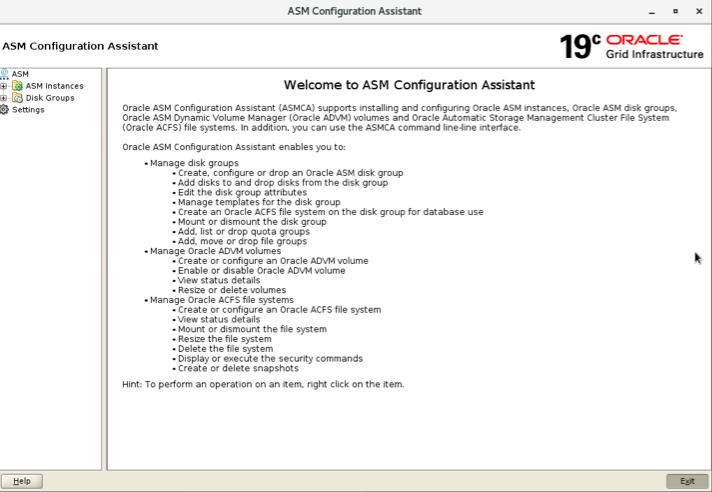
选择disk groups:
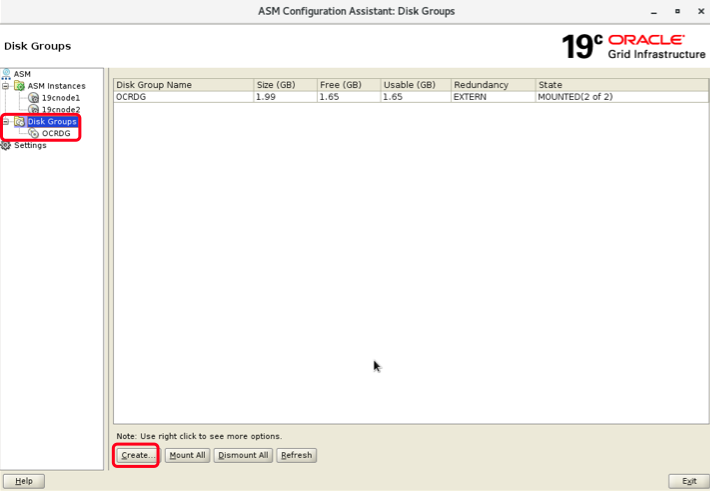
创建data磁盘组:
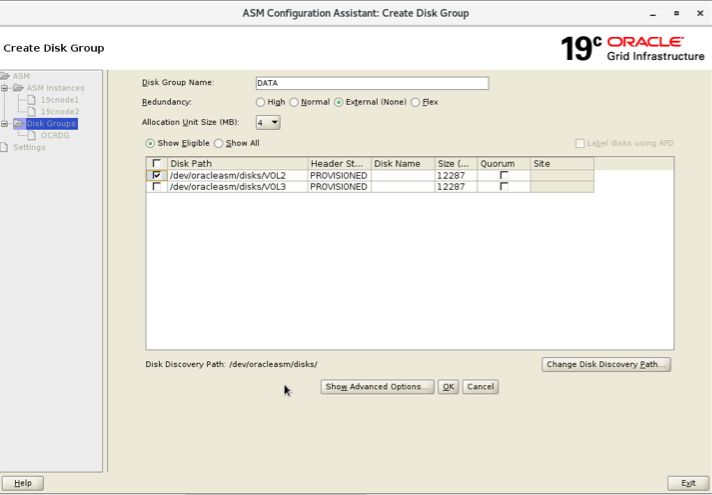
创建fra磁盘组:
创建之后:
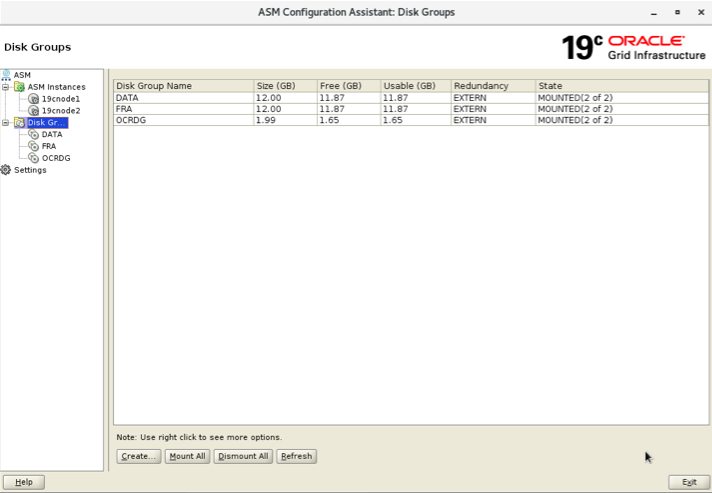
完成data和fra磁盘组的创建。
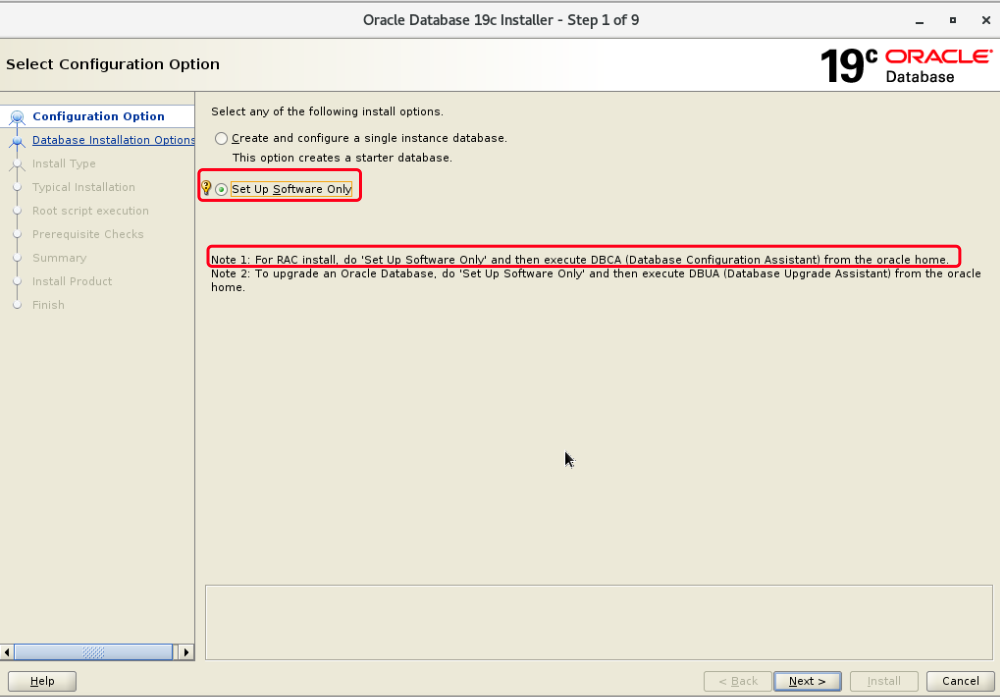
11 安装Oracle软件
具体详细步骤可以参考:一步一步安装配置双节点Oracle 21C RAC数据库
上传Oracle数据库软件到节点1:
[root@centos-master OEL]# pwd
/root/OEL
[root@centos-master OEL]# ll
总用量 31711916
-rw-r--r-- 1 root root       3112 9月   2 13:55 12.wget.sh
-rw-r--r-- 1 root root       3116 9月   2 13:50 18.wget.sh
-rw-r--r-- 1 root root          0 9月   2 13:50 cliauth
-rw-r--r-- 1 root root          0 9月   2 14:10 cliauth.1
-rw-r--r-- 1 root root 3453696911 6月  24 2020 LINUX.X64_122010_db_home.zip
-rw-r--r-- 1 root root 2994687209 6月  24 2020 LINUX.X64_122010_grid_home.zip
-rw-r--r-- 1 root root 5382265496 7月  19 2018 LINUX.X64_180000_db_home.zip
-rw-r--r-- 1 root root 4564649047 7月  19 2018 LINUX.X64_180000_grid_home.zip
-rw-r--r-- 1 root root 3059705302 4月  24 2019 LINUX.X64_193000_db_home.zip
-rw-r--r-- 1 root root 2889184573 4月  24 2019 LINUX.X64_193000_grid_home.zip
-rw-r--r-- 1 root root 3109225519 8月  10 2021 LINUX.X64_213000_db_home.zip
-rw-r--r-- 1 root root 2422217613 8月  10 2021 LINUX.X64_213000_grid_home.zip
-rw-r--r-- 1 root root 4571791360 8月  26 08:41 V980739-01.iso
-rw-r--r-- 1 root root   15496464 9月   2 14:24 wgetlog-09-02-22-13:50.log
-rw-r--r-- 1 root root   10016155 9月   2 14:34 wgetlog-09-02-22-14:10.log
[root@centos-master OEL]# scp LINUX.X64_193000_db_home.zip oracle@172.16.11.230:/home/oracle/
oracle@172.16.11.230's password:
LINUX.X64_193000_db_home.zip                                                                                                       100% 2918MB  24.3MB/s   02:00
[root@centos-master OEL]#
执行ouiInstall进入图形界面开始安装:
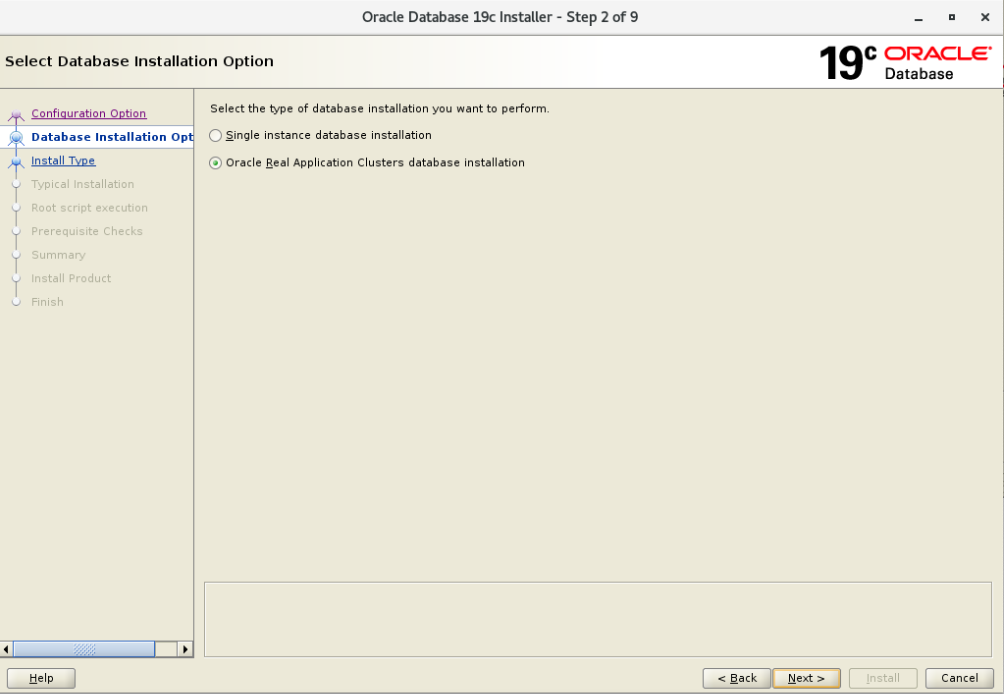
选择RAC选项:
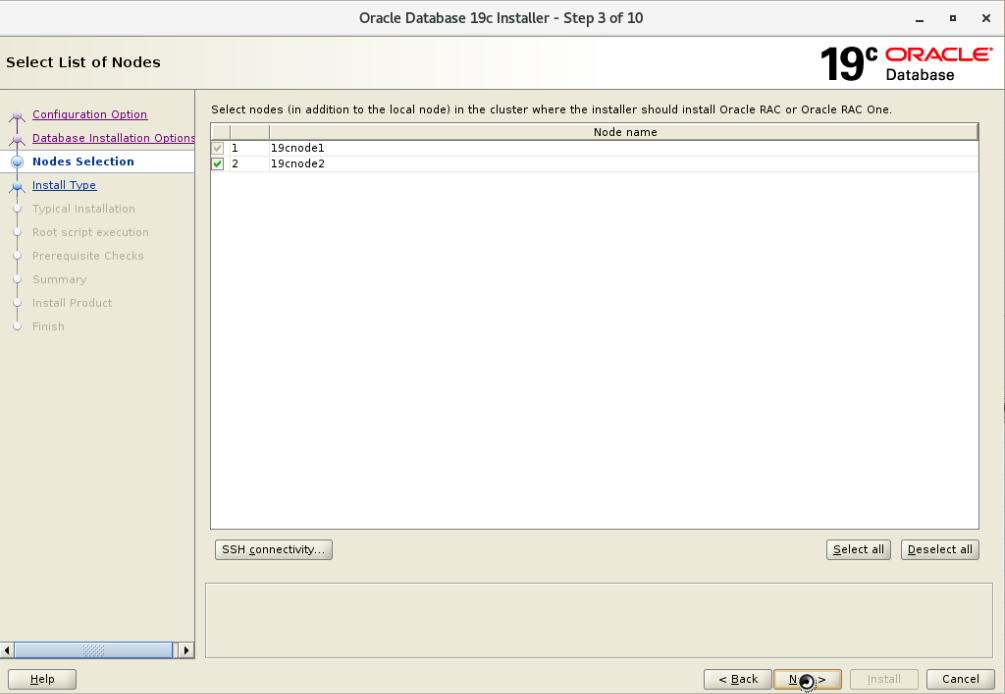
选择双节点:

设置SSH对等性:
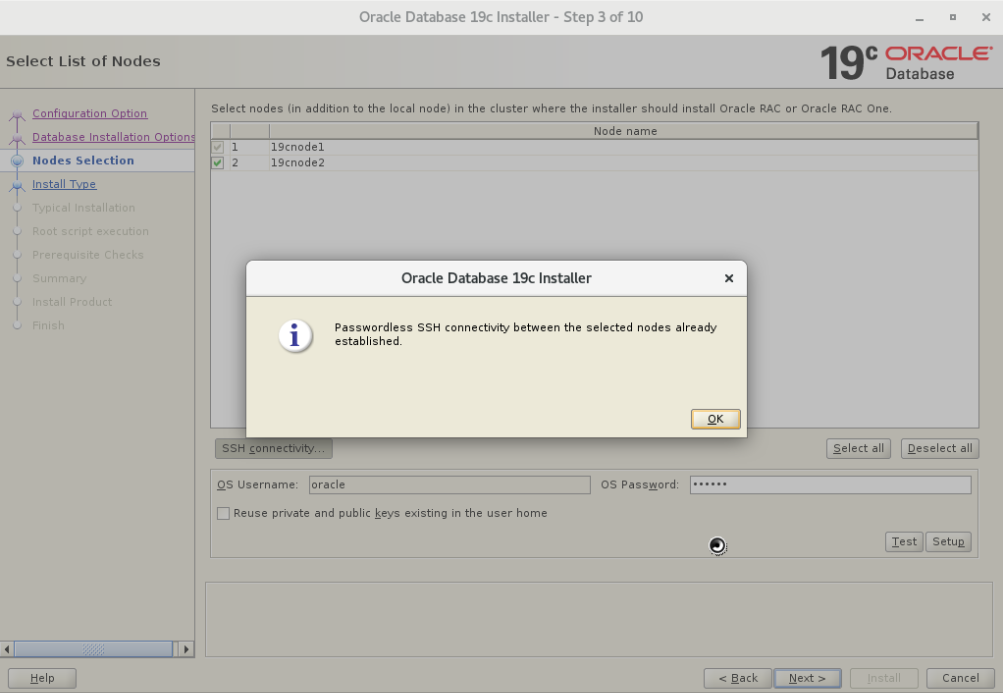
选择next:
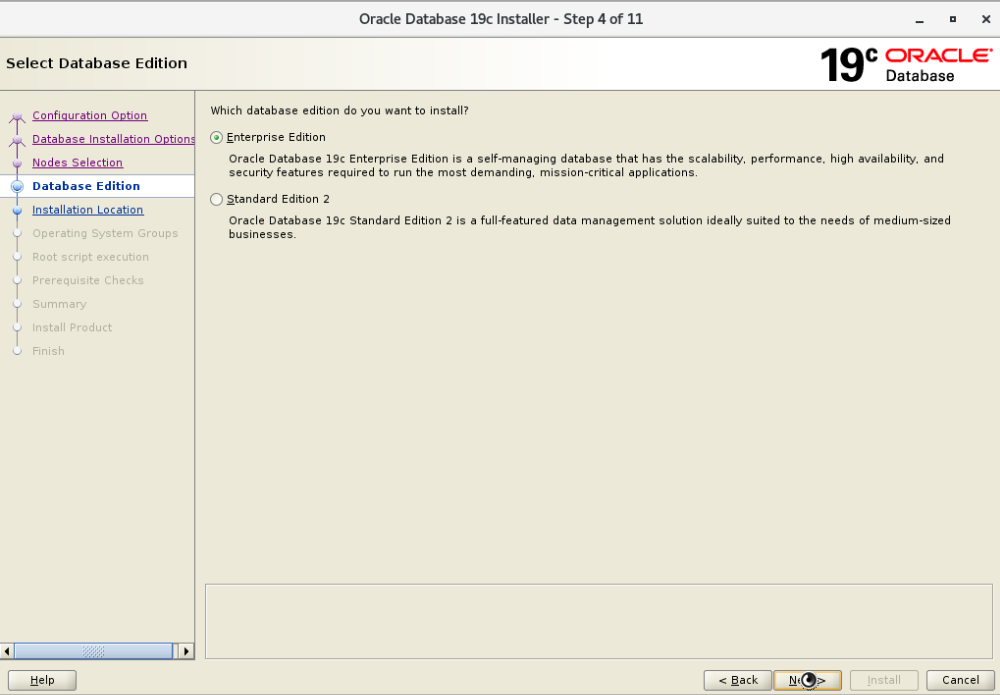
选择企业版:
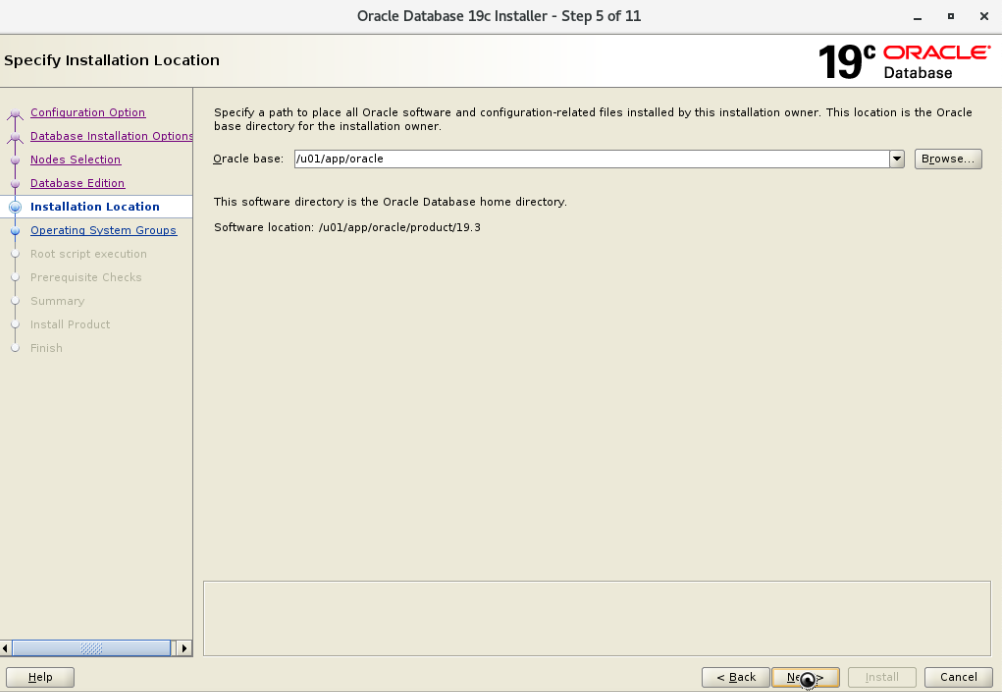
指定Oracle base:
确认用户组信息:
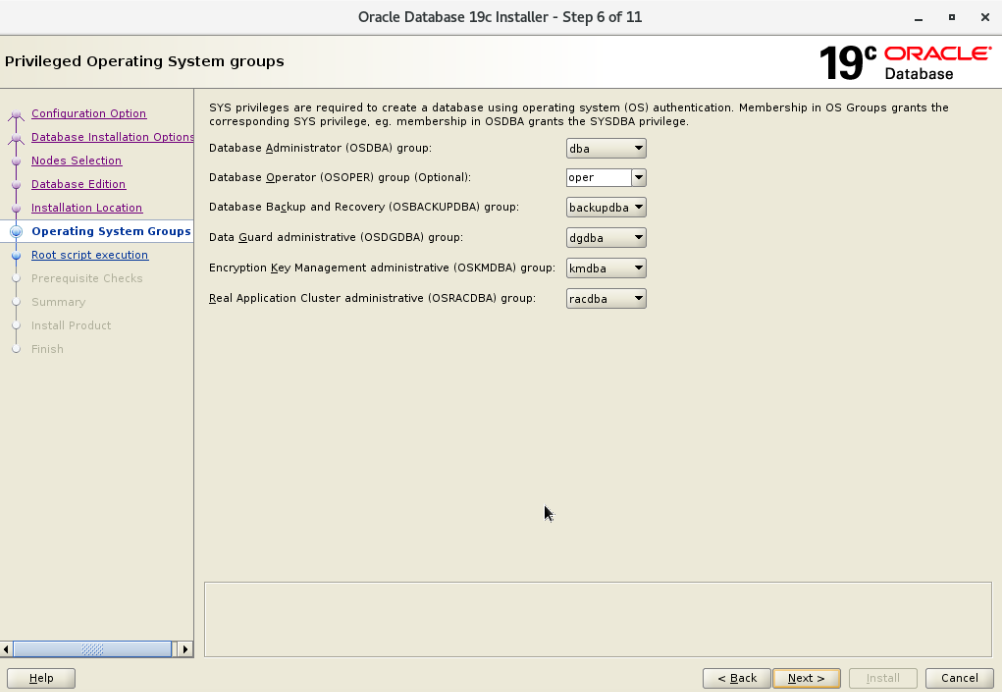
选择next:
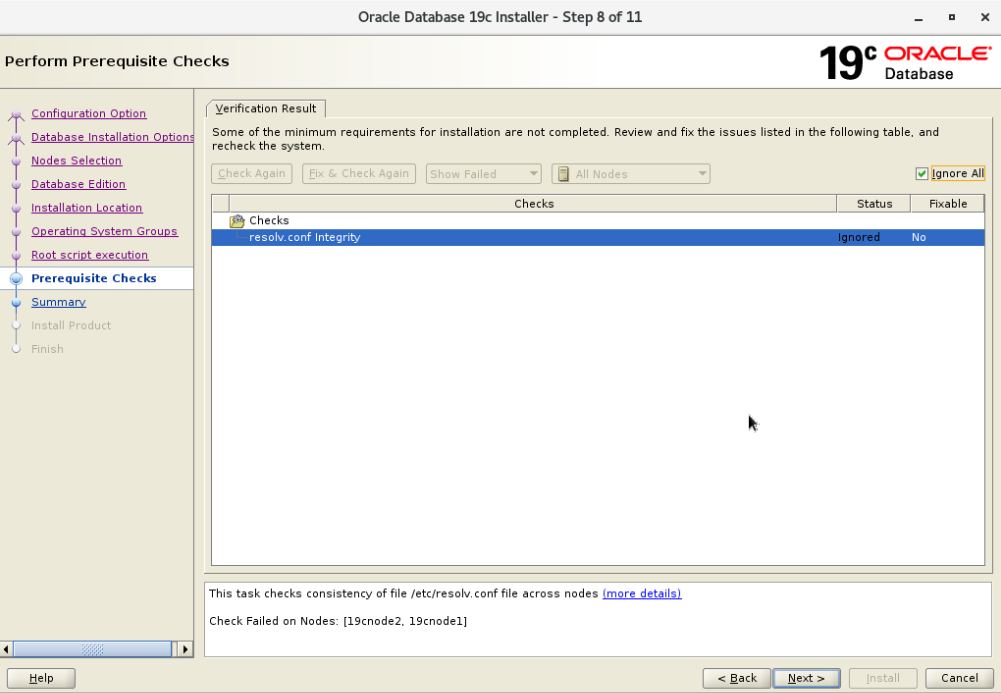
忽略resolve.conf警告:
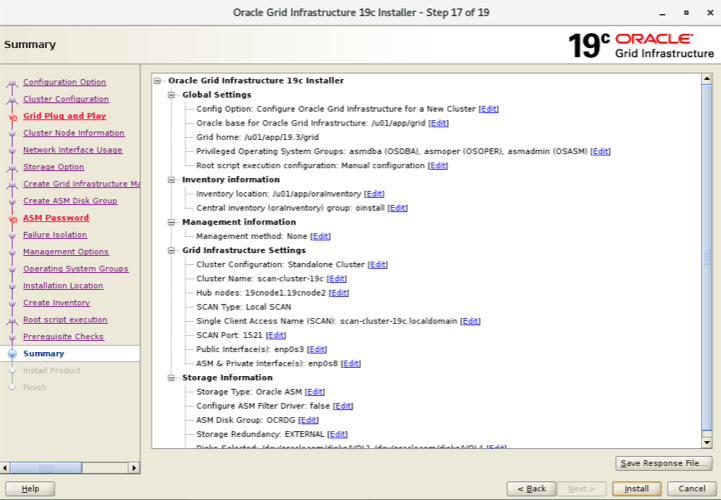
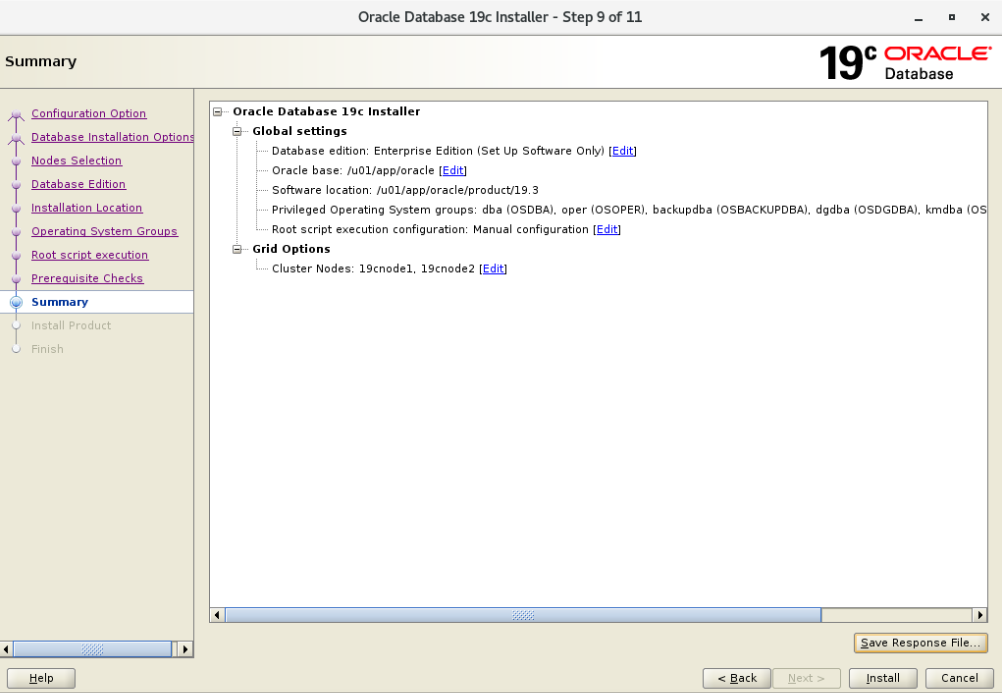
确认配置选项:
执行安装:
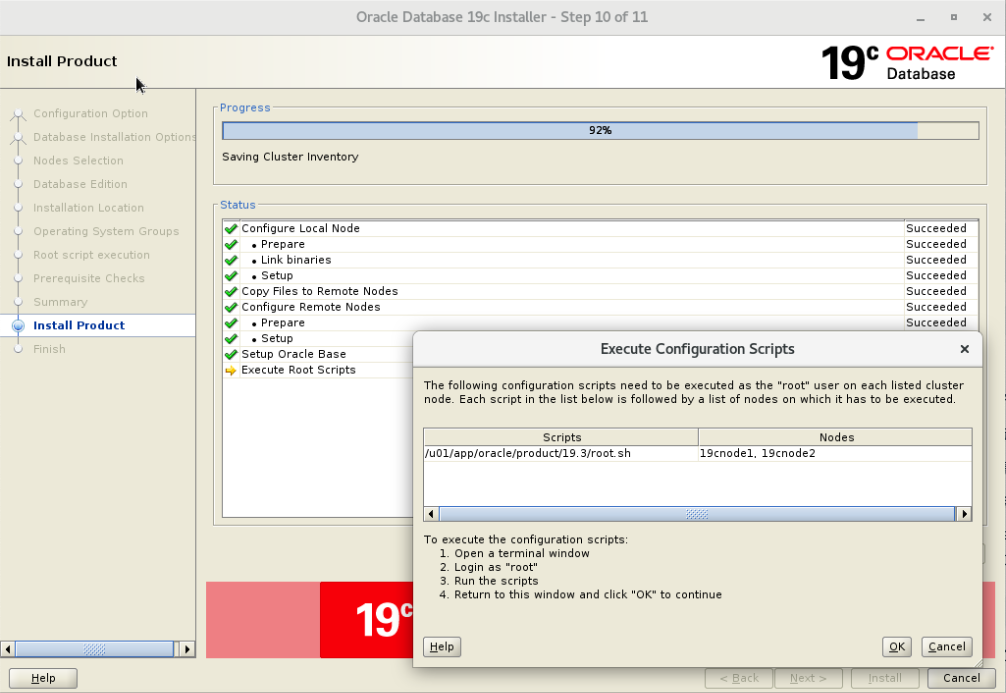
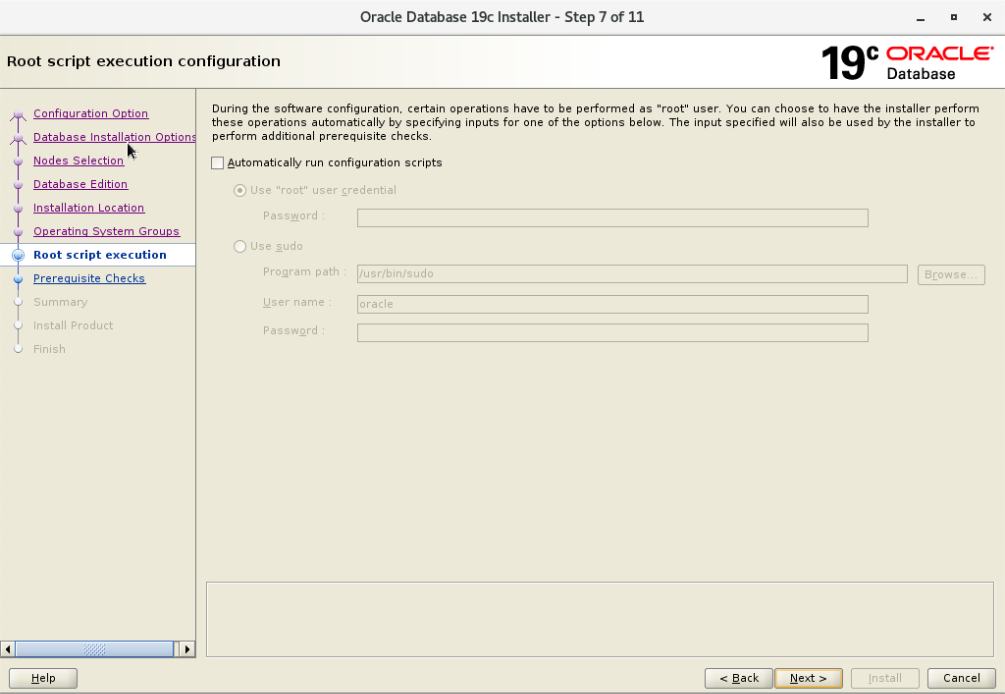
根据提示执行脚本:
[root@19cnode1 ~]# /u01/app/oracle/product/19.3/root.sh
Performing root user operation.
The following environment variables are set as:
ORACLE_OWNER= oracle
ORACLE_HOME= /u01/app/oracle/product/19.3
Enter the full pathname of the local bin directory: [/usr/local/bin]:
The contents of "dbhome" have not changed. No need to overwrite.
The contents of "oraenv" have not changed. No need to overwrite.
The contents of "coraenv" have not changed. No need to overwrite.
Entries will be added to the /etc/oratab file as needed by
Database Configuration Assistant when a database is created
Finished running generic part of root script.
Now product-specific root actions will be performed.
[root@19cnode1 ~]#
[root@19cnode2 ~]# /u01/app/oracle/product/19.3/root.sh
Performing root user operation.
The following environment variables are set as:
ORACLE_OWNER= oracle
ORACLE_HOME= /u01/app/oracle/product/19.3
Enter the full pathname of the local bin directory: [/usr/local/bin]:
The contents of "dbhome" have not changed. No need to overwrite.
The contents of "oraenv" have not changed. No need to overwrite.
The contents of "coraenv" have not changed. No need to overwrite.
Entries will be added to the /etc/oratab file as needed by
Database Configuration Assistant when a database is created
Finished running generic part of root script.
Now product-specific root actions will be performed.
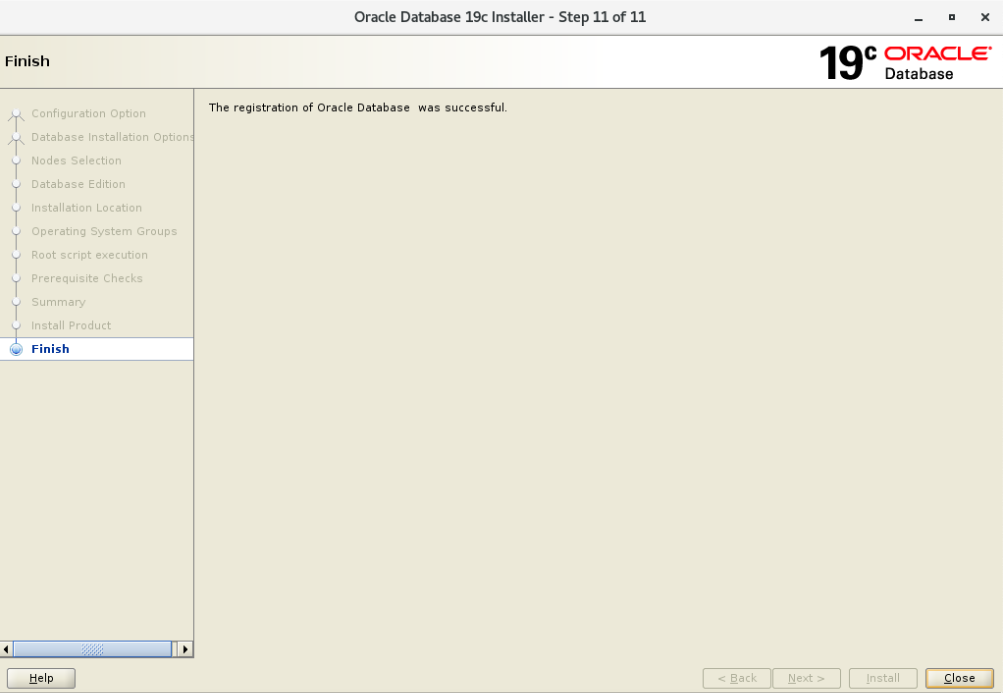
[root@19cnode2 ~]# 完成RAC数据库软件的安装:
12 DBCA建库
具体详细步骤可以参考:一步一步安装配置双节点Oracle 21C RAC数据库
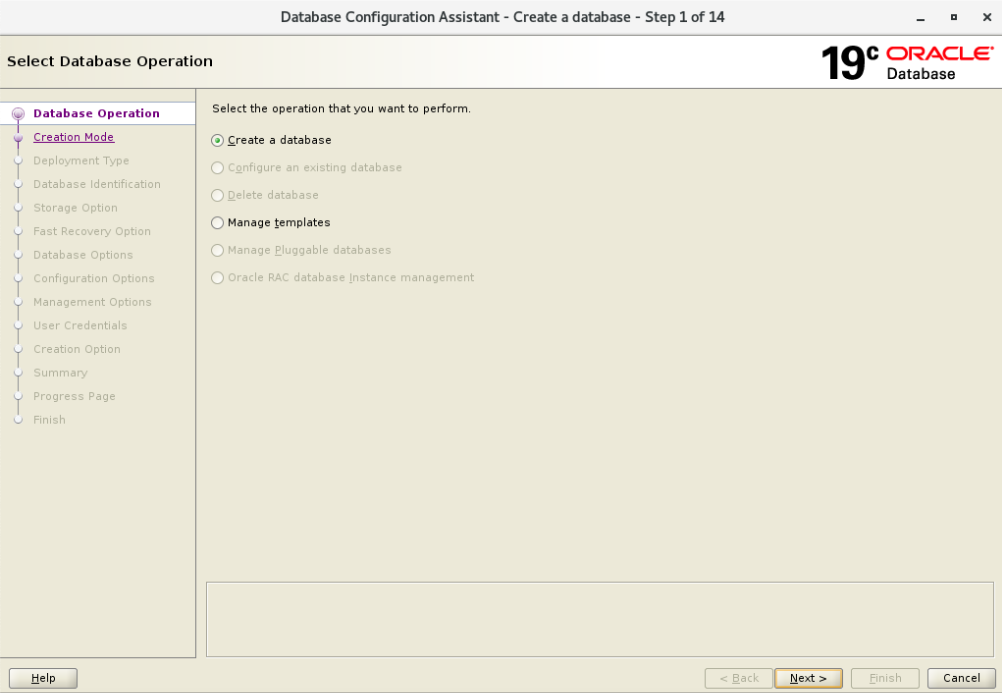
命令行执行dbca调出OUI图形界面进行数据库的创建:
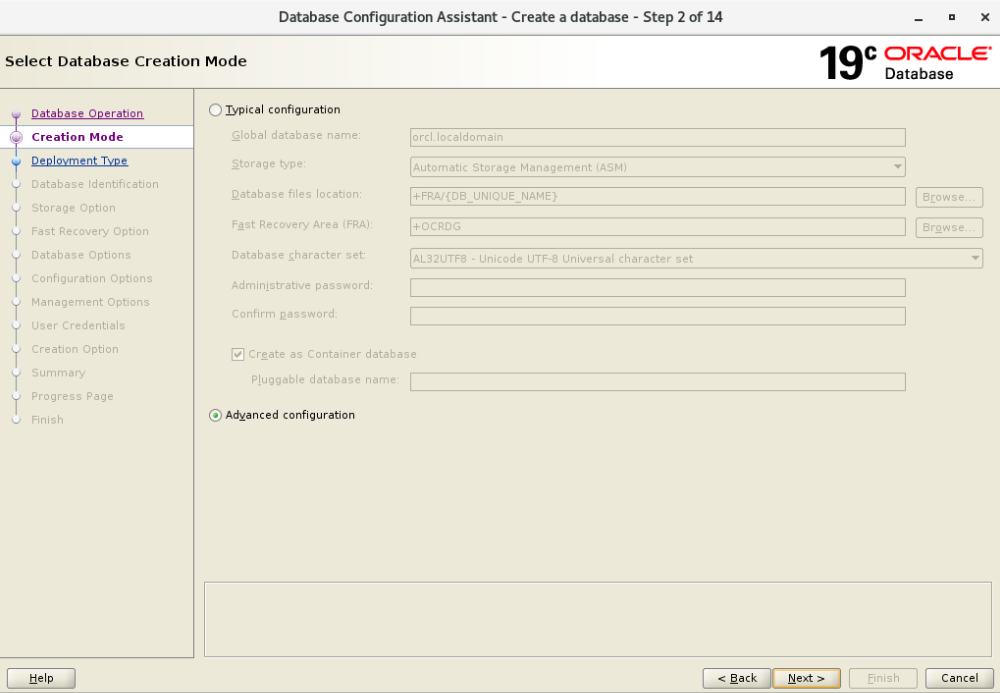
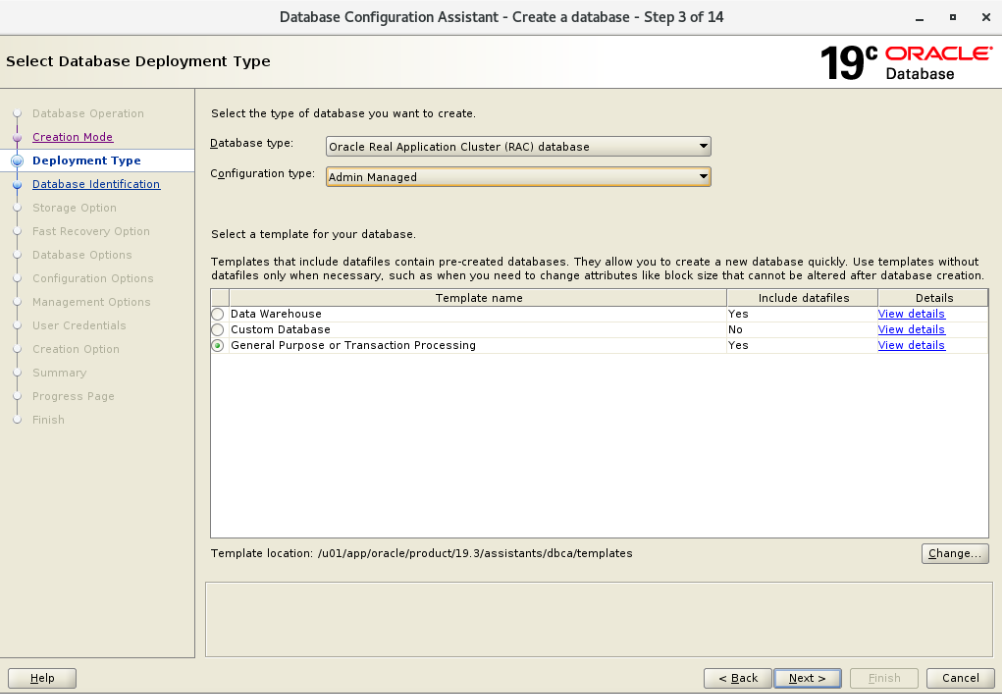
选择高级选项:
指定数据库类型:
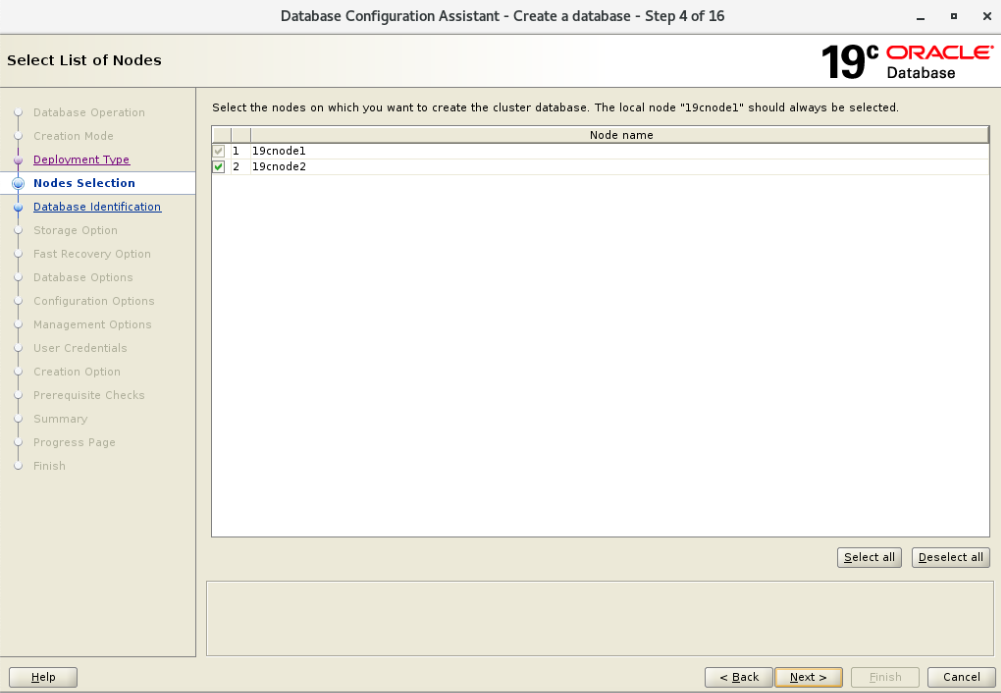
选择双节点:
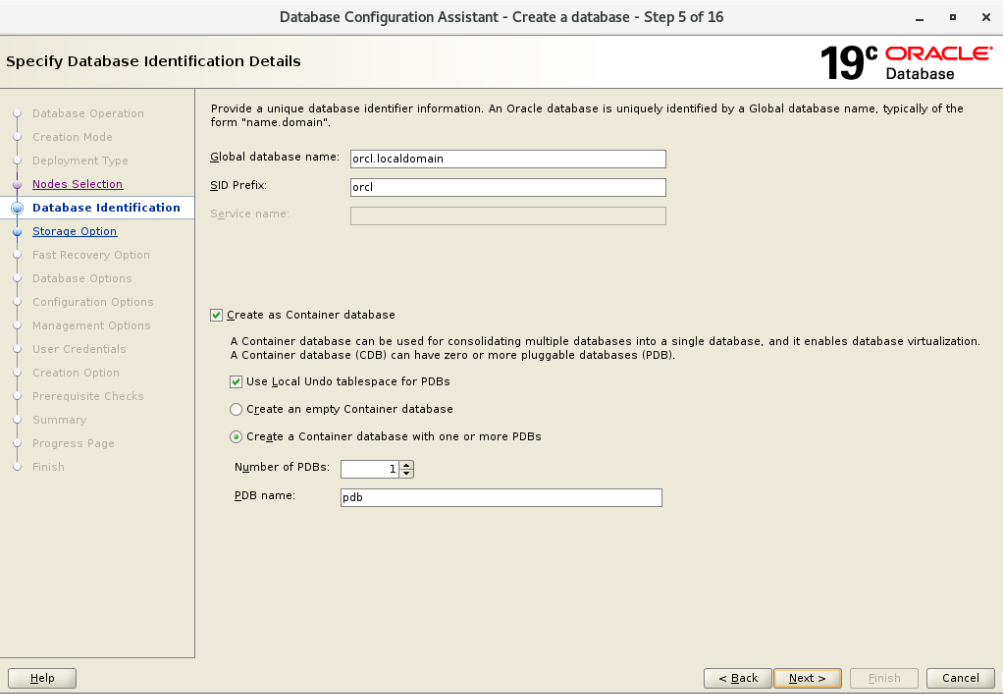
指定数据库名:orcl.localdomain
指定数据库存储类型:

选择FRA磁盘组:
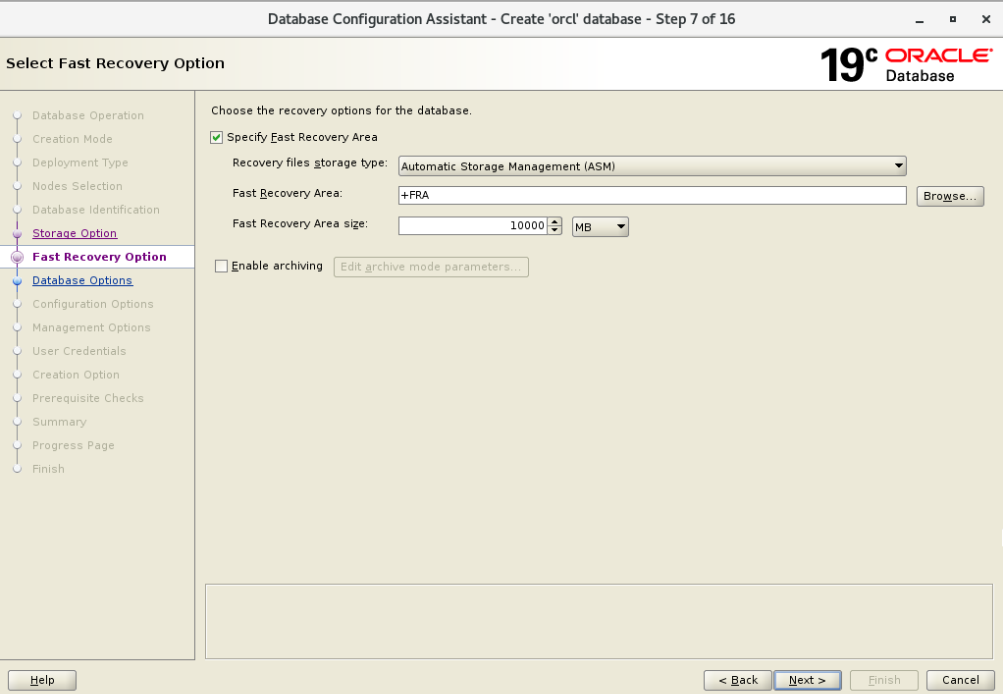
默认FRA要求13332MB,我这里的FRA磁盘组只有12GB。所以,我指定10GB。
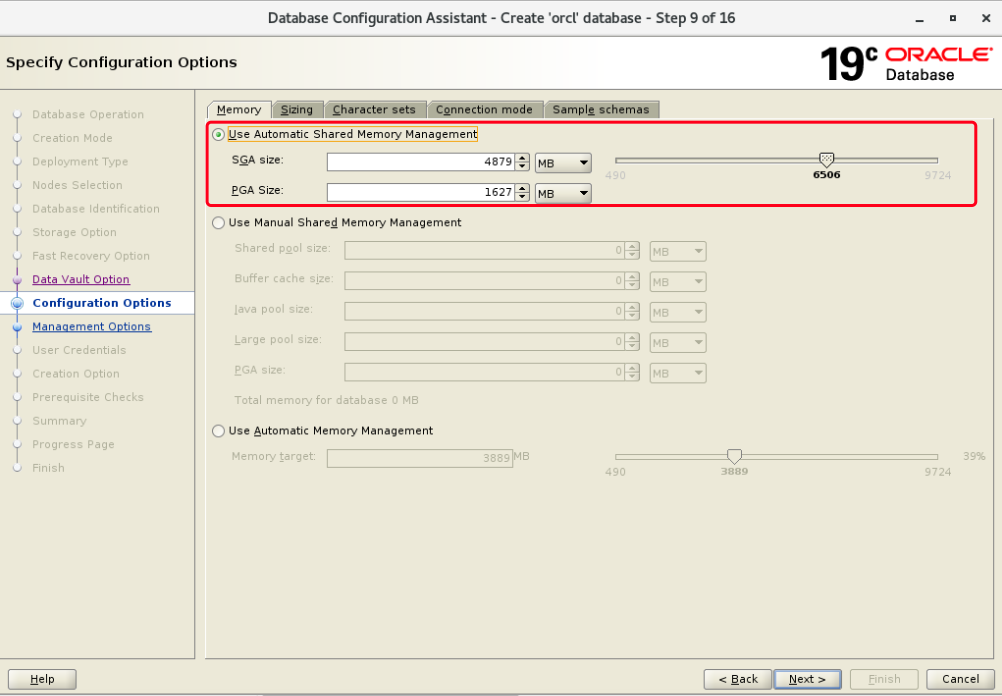
设置内存选项:
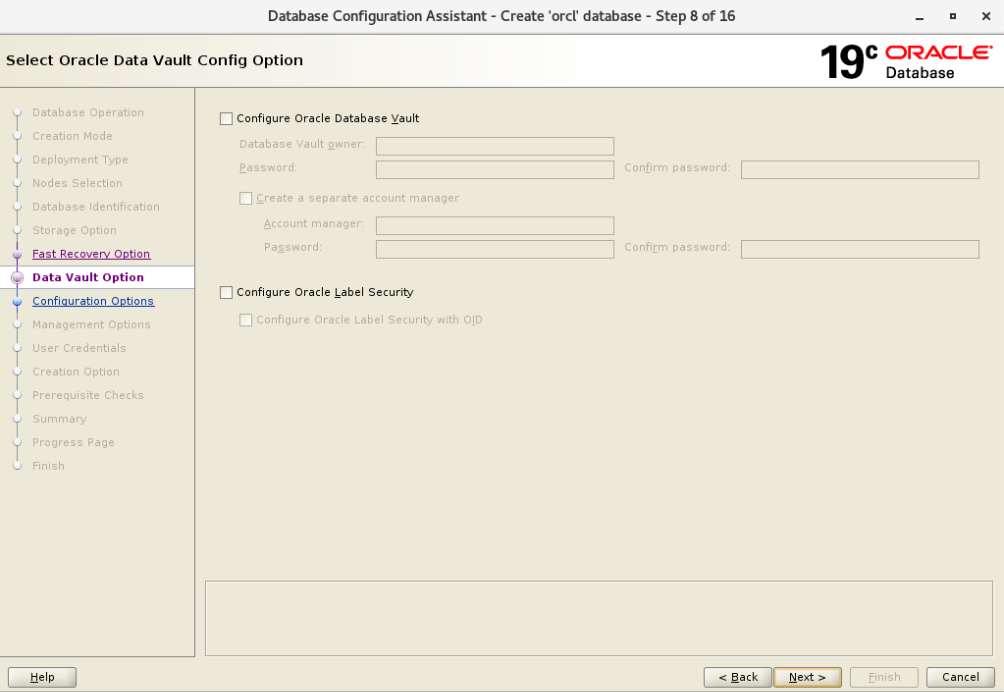
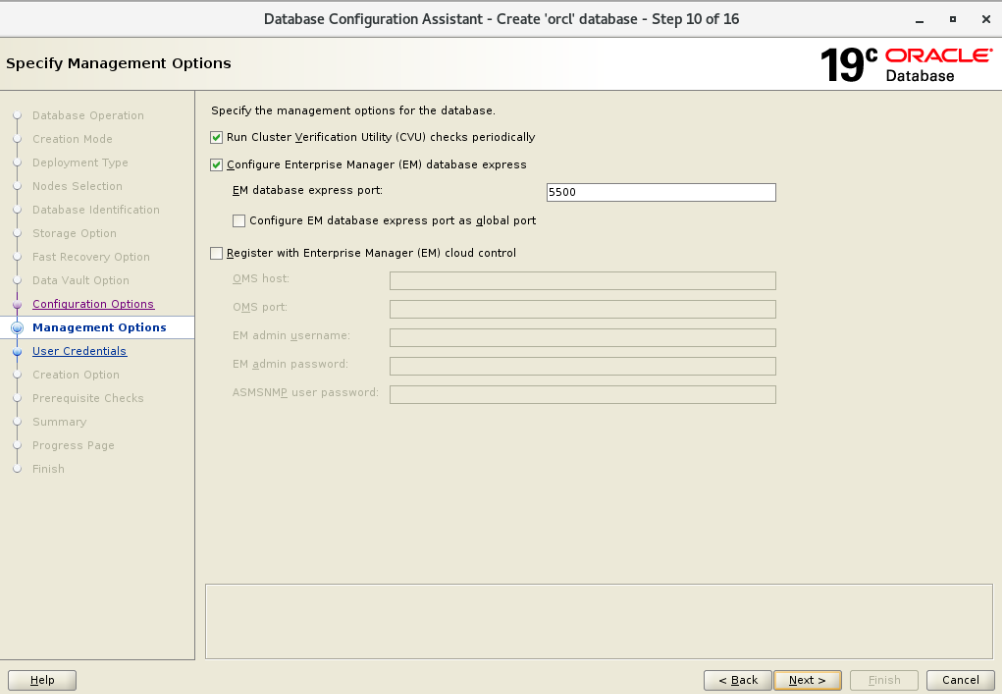
数据库管理选项:
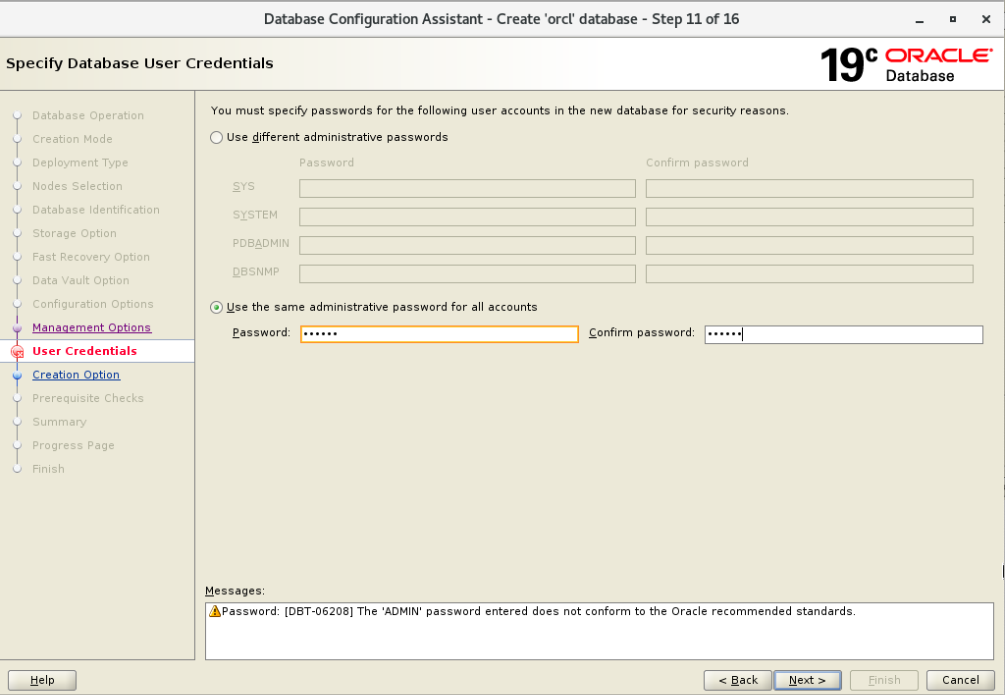
设置数据库统一密码:
选定创建数据库:
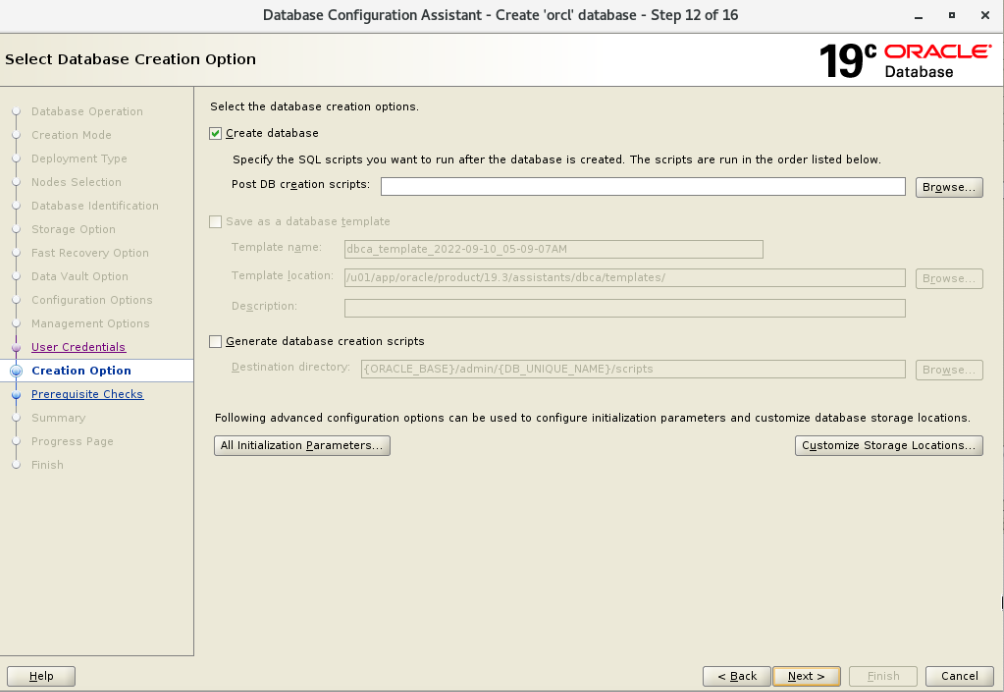
执行检查项:

确认页:
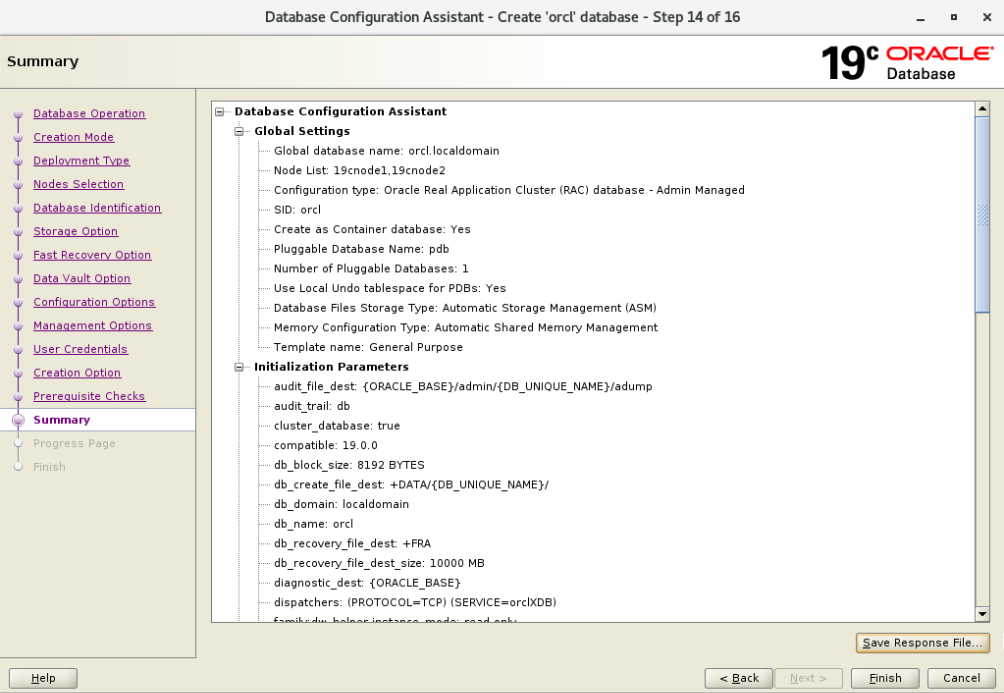
完成数据库的安装:
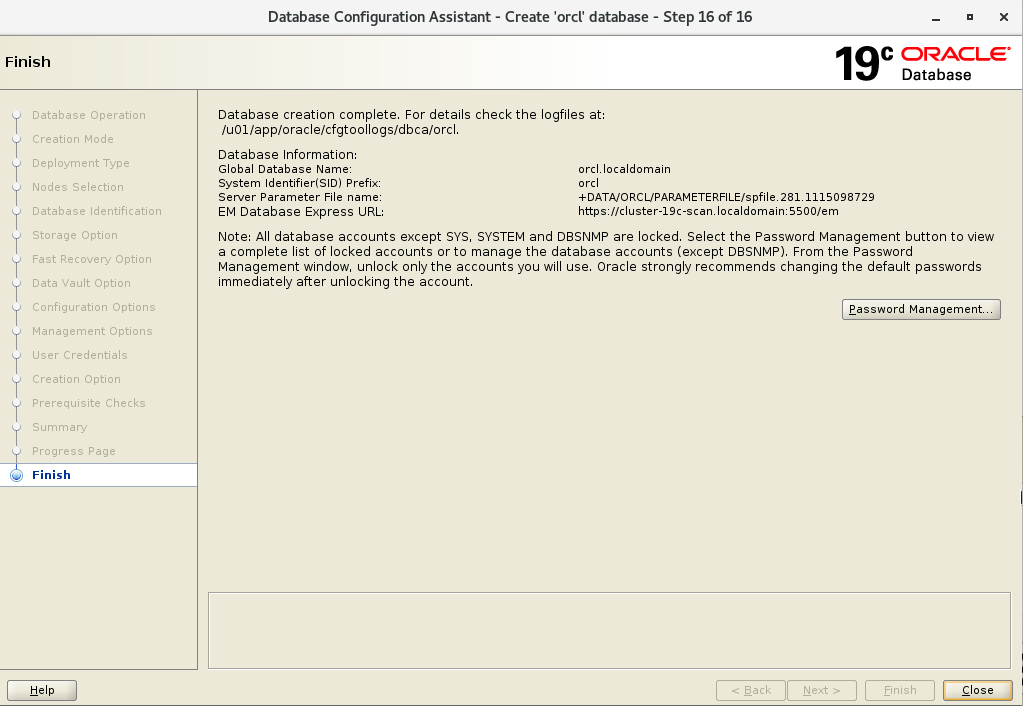
至此,完成了Oracle RAC数据库的创建。
13 测试访问19c RAC 数据库
具体操作步骤略,详细步骤可以参考:一步一步安装配置双节点Oracle 21C RAC数据库对应测试数据库步骤。
五 参考链接
参考:
https://dbakerber.wordpress.com/2019/07/31/oracle-software-installation-bugs/
卸载: