CentOS7上安装MongoDB步骤及注意事项
1 下载软件
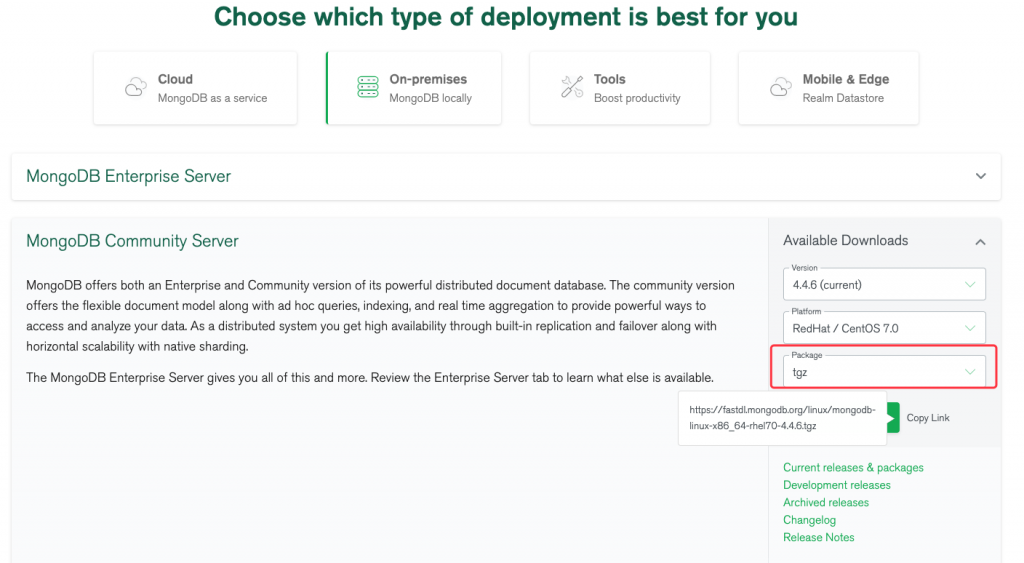
官网,选择社区版即可。
https://www.mongodb.com/try/download/community
注意:选择安装包的时候,不要选择源码,选择对应的版本,平台,package选择tgz格式的。
2 安装步骤
a 创建用户和用户组mongod
建议,创建独立的用户和组,专门用于配置和启动MongoDB数据库。
b 解压软件
tar -zxvf mongodb-linux-x86_64-rhel70-4.4.6.tgz
c cp可执行文件或创建软连接
将解压出来的安装包中的bin路径下的可执行文件cp到/usr/local/bin路径下。
cp /home/mongod/mongodb-linux-x86_64-rhel70-4.4.6/bin/* /usr/local/bin
[mongod@znpj05 bin]$ pwd
/home/mongod/mongodb-linux-x86_64-rhel70-4.4.6/bin
[mongod@znpj05 bin]$ ll
total 197092
-rwxr-xr-x 1 mongod mongod    15145 May  8 00:02 install_compass
-rwxr-xr-x 1 mongod mongod 53793528 May  8 00:32 mongo
-rwxr-xr-x 1 mongod mongod 83061736 May  8 00:32 mongod
-rwxr-xr-x 1 mongod mongod 64942968 May  8 00:32 mongos
[mongod@znpj05 bin]$ cp /home/mongod/mongodb-linux-x86_64-rhel70-4.4.6/bin/* /usr/local/bin
或者创建软连接文件。
sudo ln -s /path/to/the/mongodb-directory/bin/* /usr/local/bin/
d 参考文档
https://docs.mongodb.com/manual/tutorial/install-mongodb-on-red-hat-tarball/
3 启动配置MongoDB
a 创建数据存储位置和日志存放位置
mkdir -p /data/mongodb/data
mkdir -p /data/mongodb/log
chown -R mongod:mongod /data/mongodb
b 创建配置文件
[mongod@znpj05 bin]$ cat /etc/mongod.conf
dbpath=/data/mongodb/data
logpath=/data/mongodb/log/mongodb.log
logappend=true
port=27017
fork=true
#replSet=rs0
bind_ip_all=true
auth=true
[mongod@znpj05 bin]$
注意:初始化时,可以先不配置auth=true,等后面数据库层面配置完成后,再在配置文件里加上该选项。
bind_ip_all=true,表示,MongoDB服务启动在服务器所有网口上,默认是启动在localhost环路地址127.0.0.1上,不加上该选项的话,则可能会只能在服务器本机访问MongoDB服务,无法通过网络访问。
c 以mongod用户启动MongoDB服务
mongod -f /etc/mongod.conf
4 安装善后配置工作
a ulimit配置
查看:ulimt -a
[mongod@znpj05 bin]$ ulimit -a
core file size          (blocks, -c) 0
data seg size           (kbytes, -d) unlimited
scheduling priority             (-e) 0
file size               (blocks, -f) unlimited
pending signals                 (-i) 127881
max locked memory       (kbytes, -l) 64
max memory size         (kbytes, -m) unlimited
open files                      (-n) 64000
pipe size            (512 bytes, -p) 8
POSIX message queues     (bytes, -q) 819200
real-time priority              (-r) 0
stack size              (kbytes, -s) 8192
cpu time               (seconds, -t) unlimited
max user processes              (-u) 127881
virtual memory          (kbytes, -v) unlimited
file locks                      (-x) unlimited
[mongod@znpj05 bin]$
修改:ulimit -n 64000
ulimit -u 127881
注意:在
RHEL/CentOS 6上修改/etc/security/limits.d/90-nproc.conf,
RHEL/CentOS 7版本上,还需要修改/etc/security/limits.d/20-nproc.conf配置文件。
因为该文件上的配置信息会覆盖override上述的ulimit -u的配置。
但是,在RHEL/CentOS 8上就不再需要更改该/etc/securitiy下的配置文件了。直接使用ulimit -u配置即可。
这也解释了,为什么在CentOS 6、CentOS 7上,有时候明明修改了ulimit -u的值之后。在当前会话里通过ulimit -a可以看到修改后的效果,退出重新登录之后,却发现之前的配置失效了。
官方文档参考配置:
https://docs.mongodb.com/manual/reference/ulimit/
b 修改Transparent huge pages
新建配置文件:
vi /etc/systemd/system/disable-transparent-huge-pages.service [Unit] Description=Disable Transparent Huge Pages (THP) DefaultDependencies=no After=sysinit.target local-fs.target Before=mongod.service [Service] Type=oneshot ExecStart=/bin/sh -c 'echo never | tee /sys/kernel/mm/transparent_hugepage/enabled > /dev/null' [Install] WantedBy=basic.target
启动服务:
systemctl daemon-reload
以及配置开机启动:
systemctl start disable-transparent-huge-pages
官方文档参考:
https://docs.mongodb.com/manual/tutorial/transparent-huge-pages/index.html
c 配置认证授权
mongo超级用户先连接到admin这个数据库上,再创建管理账户:
use admin
 > db.createUser(
...    {
...      user: "admin",
...      pwd:"admin",
...      roles:[{role: "userAdminAnyDatabase", db: "admin" } ]
...    }
... )
Successfully added user: {
        "user" : "admin",
        "roles" : [
                {
                        "role" : "userAdminAnyDatabase",
                        "db" : "admin"
                }
        ]
}
> db
admin
>
再创建1个业务用户的认证授权。
连接到业务数据库上,该库不需要事先存在:
use bpc_test
创建读写用户:
 > use fdp_bill;
switched to db fdp_bill
> show users;
> db.createUser(
...       {
...       user: "fdp_bill",
...       pwd:"fdp_bill",
...       roles:[{role:"readWrite",db:"fdp_bill"}]
...       }
...   )
Successfully added user: {
        "user" : "fdp_bill",
        "roles" : [
                {
                        "role" : "readWrite",
                        "db" : "fdp_bill"
                }
        ]
}
>
最后,再关闭MongoDB数据库,在配置文件里,添加auth=true,选项,并重启数据库。
连接测试:
[mongod@znpj05 ~]$ mongo --host 172.30.220.88 --port 27017 -u "fdp_bill" -p "fdp_bill" --authenticationDatabase "fdp_bill"
+++++++++++++++++++++++++++++++++注意上面的连接选项,指定认证数据库++++++++++++++++++++
MongoDB shell version v4.4.6
connecting to: mongodb://172.30.220.88:27017/?authSource=fdp_bill&compressors=disabled&gssapiServiceName=mongodb
Implicit session: session { "id" : UUID("dc3271df-84a5-4973-b0a3-9e2fb0cd225b") }
MongoDB server version: 4.4.6
> show tables;
Warning: unable to run listCollections, attempting to approximate collection names by parsing connectionStatus
> use fdp_bill;
switched to db fdp_bill
> show tables;
t_fdp_bill_audit_result
t_fdp_bill_biz_notify
t_fdp_bill_reality_bill
t_fdp_bill_reality_biz_rel
> 注意:如果,不配置为auth=true模式的话,在MongoDB shell里,可能会看到类似下述警告。
[mongod@znpj05 ~]$ mongo
MongoDB shell version v4.4.6
connecting to: mongodb://127.0.0.1:27017/?compressors=disabled&gssapiServiceName=mongodb
Implicit session: session { "id" : UUID("bc6a3e65-cb89-42bd-a796-e4652c6c69df") }
MongoDB server version: 4.4.6
---
The server generated these startup warnings when booting:
2021-05-31T14:26:49.915+08:00: Access control is not enabled for the database. Read and write access to data and configuration is unrestricted
---
---
Enable MongoDB's free cloud-based monitoring service, which will then receive and display
metrics about your deployment (disk utilization, CPU, operation statistics, etc).
The monitoring data will be available on a MongoDB website with a unique URL accessible to you
and anyone you share the URL with. MongoDB may use this information to make product
improvements and to suggest MongoDB products and deployment options to you.
To enable free monitoring, run the following command: db.enableFreeMonitoring()
To permanently disable this reminder, run the following command: db.disableFreeMonitoring()
---
> 配置auth=true之后,一切安静了:
[mongod@znpj05 ~]$ mongo
MongoDB shell version v4.4.6
connecting to: mongodb://127.0.0.1:27017/?compressors=disabled&gssapiServiceName=mongodb
Implicit session: session { "id" : UUID("31645876-a9f1-4e92-817f-01a8edcaf4cf") }
MongoDB server version: 4.4.6
>
5 小结
解决了,我在CentOS 6、CentOS 7操作系统上,使用ulimit -u配置用户启动进程数的困惑。原来单独配置了ulimit -u之后,还得注意/etc/security/limits.d/20-nproc.conf配置文件。
做一个简单小结。
6 补充配置MongoDB自动启动
由于CentOS 7 操作系统已经是通过systemd来管理服务了,我们可以通过添加/etc/systemd/system/mongodb.service文件,来通过systemd来管理MongoDB服务。配置文件内容如下:
[root@localhost ~]# cat /etc/systemd/system/mongodb.service
[Unit]

Description=mongodb
After=network.target remote-fs.target nss-lookup.target

[Service]
Type=forking
ExecStart=/usr/local/bin/mongod --config /etc/mongod.conf
ExecReload=/bin/kill -s HUP $MAINPID
ExecStop=/usr/local/bin/mongod  --shutdown --config /etc/mongod.conf
PrivateTmp=true

[Install]
WantedBy=multi-user.target
[root@localhost ~]# systemctl daemon-reload
[root@localhost ~]# systemctl start mongodb
[root@localhost ~]# systemctl enable mongodb
[root@localhost ~]# systemctl status mongodb
● mongodb.service - mongodb
   Loaded: loaded (/etc/systemd/system/mongodb.service; enabled; vendor preset: disabled)
   Active: active (running) since 五 2022-10-28 14:21:09 CST; 4s ago
  Process: 2731 ExecStop=/usr/local/bin/mongod --shutdown --config /etc/mongod.conf (code=exited, status=0/SUCCESS)
  Process: 2742 ExecStart=/usr/local/bin/mongod --config /etc/mongod.conf (code=exited, status=0/SUCCESS)
 Main PID: 2744 (mongod)
    Tasks: 20
   CGroup: /system.slice/mongodb.service
           └─2744 /usr/local/bin/mongod --config /etc/mongod.conf

10月 28 14:21:08 localhost.localdomain systemd[1]: Starting mongodb...
10月 28 14:21:08 localhost.localdomain mongod[2742]: about to fork child process, waiting until server is ready for connections.
10月 28 14:21:08 localhost.localdomain mongod[2742]: forked process: 2744
10月 28 14:21:09 localhost.localdomain mongod[2742]: child process started successfully, parent exiting
10月 28 14:21:09 localhost.localdomain systemd[1]: Started mongodb.
[root@localhost ~]#
这样,即使将来操作系统被重启了,MongoDB会随着机器的重启而重启并对外提供服务。