Kubernetes in Action读书笔记第一章:Kubernetes概要介绍
本章主要包含4个部分的内容:
- 我们为什么需要一个像Kubernetes一样的系统
- 简单介绍容器技术
- Docker容器平台介绍
- 了解Kubernetes
1 我们为什么需要一个像Kubernetes一样的系统
1.1了解应用系统开发的演变
有过编程经验的朋友应该深有体会,从前,我们的应用系统开发通常都是一个巨大的单体应用,然后把它部署在一个硬件资源超强的服务器上。这样的应用开发模式的优势,便是部署显得很单一,只需要部署这一个大的单体应用程序即可。但是,诟病重重:
- 笨重;
- 应用组件之间耦合性强,改动部分功能的话,就需要重新打包整个应用并重新发布,牵一发动全身;
- 不易扩展,垂直扩展容易,往上堆CPU、内存,但是毕竟有上限;水平扩展几乎不可能,需要改动业务代码和应用程序;
如下是单体应用和微服务化应用的对比图。
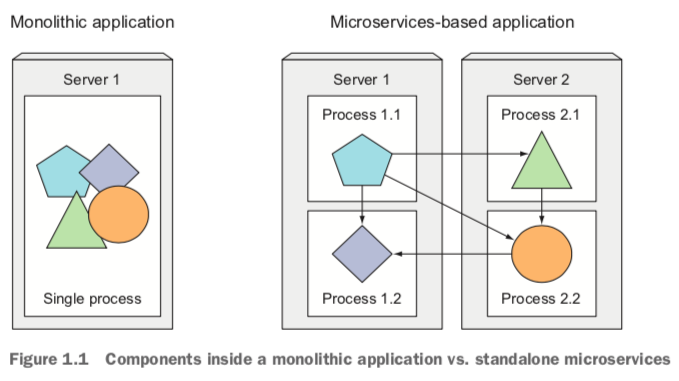
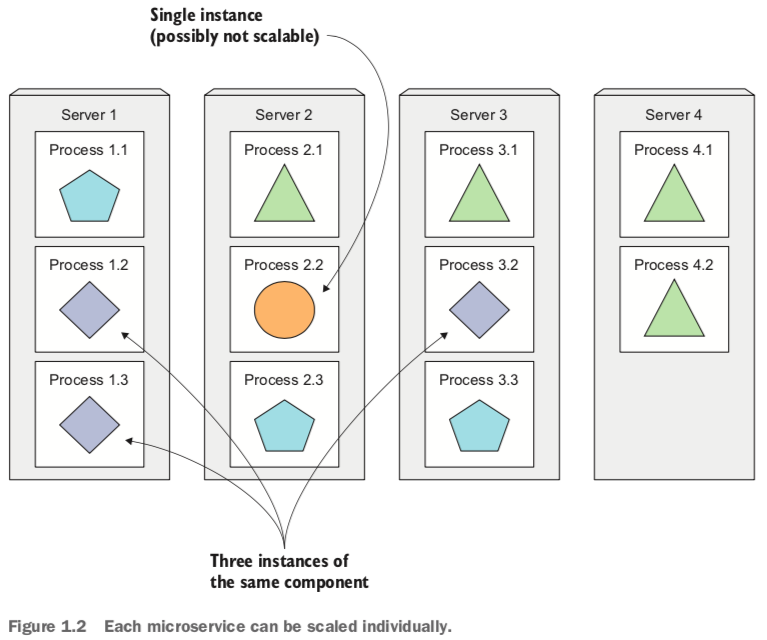
1.2微服务架构的扩展性优势
在扩展性方面,微服务化的应用比单体应用具有非常大的优势,我们可以把那些需要扩展的微服务进行水平扩展,部署在多台机器上。不易扩展的微服务可以通过垂直扩展来实现。而单体应用在水平扩展方面就非常困难。
1.3微服务架构部署管理的复杂性
尽管微服务化的架构更能应对业务端的需求和变化,那么,是不是有了微服务架构的系统就高枕无忧了呢?事实上也并非如此,因为如果微服务的个数比较少的话,部署和维护起来倒是比较轻松且得心应手。但是,随着业务的复杂度变大,拆分的微服务个数也将越来越多,同时,需要的机器也多了,且,有些微服务之间还有先后的依赖关系。这样,我们去管理和维护这些微服务架构的应用系统就变得不是那么容易的事儿了。
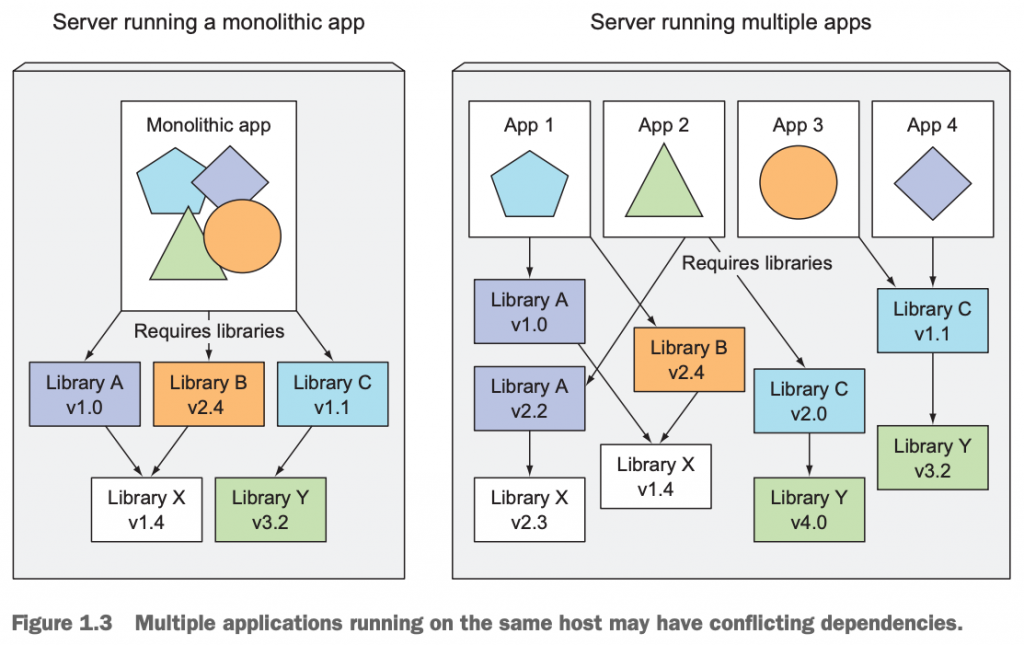
此外,正如微服务架构的各组件是独立部署的一样,它们也很有可能是由不同的开发团队开发出来的。这样,我们就不可避免的导致不同的微服务引用了版本冲突或者不兼容的依赖库和软件包,或者是依赖的软件包的版本变得越来越复杂。于是,当运维团队的人员拿到这些需要部署的微服务的程序包时,他们就得想尽办法去解决这些可能有版本冲突的软件包。想想吧,这对他们来说,绝非易事。作者在原书(P38,pdf中是第38页,纸质书上则是对应的第6页)中这样描述:
Deploying dynamically linked applications that require different versions of shared libraries, and/or require other environment specifics, can quickly become a nightmare for the ops team who deploys and manages them on production servers. The bigger the number of components you need to deploy on the same host, the harder it will be to manage all their dependencies to satisfy all their requirements.
1.4运行环境保持一致性的重要性
还有一个需要解决的问题:开发环境和生产环境的差异性问题。我们或多或少都有过这种经验,开发同事确信他的代码在他的机器上跑的完全正常没有问题,可是代码一部署到生产环境,程序就异常报错了。因此,我们希望我们要求应用程序在开发环境和生产环境所依赖的库/软件包等保持一致。当然,这个问题可以通过容器化技术来解决。
1.5开发模式转向DevOps和NoOps
之前,开发团队负责开发系统和完成功能,运维团队负责发布维护系统。渐渐地,我们越来越意识到,开发团队介入管理和维护、发布他们开发的系统变得越来越重要了,这样他们就可以第一时间体会到用户在使用系统过程中所遇到的问题,也能理解运维团队在管理过程中遭遇到的各种问题了。同时,他们可以快速更新和发布他们的程序,遇到bug,第一时间解决,并快速发布到生产系统,而不再需要等待运维团队的协助了。
可是,这就要求开发人员对底层的服务器架构、硬件资源、网络配置等基础设施比较了解。显然,这对他们来说是一个障碍。
反之,对于运维团队来说,他们希望他们管理的服务器资源也好、数据中心也罢,系统可以确保安全的前提下可以最大限度的提供服务,而不想关心运行在这些机器上面的应用程序之间是如何调度和依赖的,甚至他们希望变更底层的硬件架构和操作系统层面的变更时,而不会影响到上层的应用。明显,这对他们来说也是一个挑战。
As you’ll see, Kubernetes enables us to achieve all of this. By abstracting away the actual hardware and exposing it as a single platform for deploying and running apps, it allows developers to configure and deploy their applications without any help from the sysadmins and allows the sysadmins to focus on keeping the underlying infrastructure up and running, while not having to know anything about the actual applications running on top of it.
小结:随着应用系统的开发模式从单体应用到微服务化架构,再到迫切需要轻松管理维护和部署微服务工程,以及需要开发环境和生产环境的一致性。于是,容器化技术应运而生,解决了环境一致性的问题。应用容器化,但是也有它自己的弊端,比如服务治理,服务自愈,应用的自动扩缩容,应用开发人员只需要关注他们自己的应用程序,而无需关注他们的应用最终部署在什么类型的底层架构上。而这,最终Kubernetes诞生了,解决了上面提到的这些问题。
2 简单介绍容器技术
Kubernetes利用Linux的容器技术实现了应用层面的隔离,但是在我们一头扎入Kubernetes的世界之前,让我们先初探一下容器技术的面目吧。
2.1理解什么是容器技术
正如我们在前面提到的,多个微服务可能需要独立的环境或者是不同的依赖和软件包,那么我们不是可以通过给每个微服务配置一个虚拟机来解决问题吗?可但是,微服务工程多了怎么办?有那么多虚拟机可以提供吗?显然这是不现实的。怎么办?
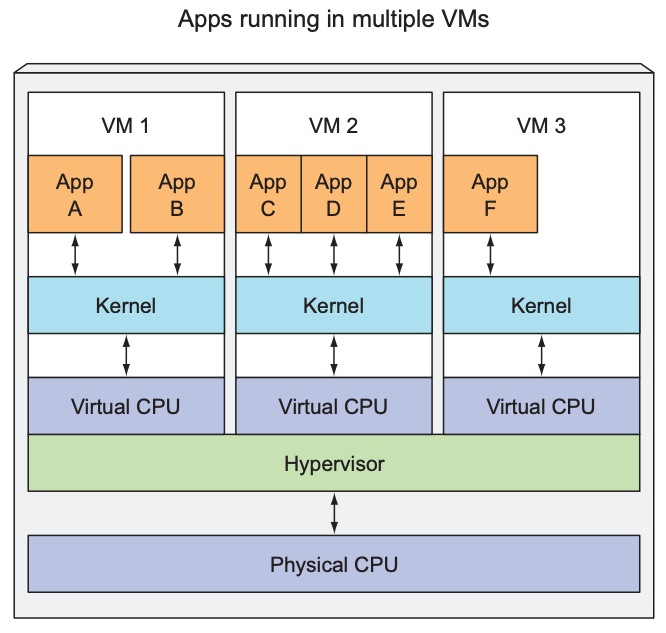
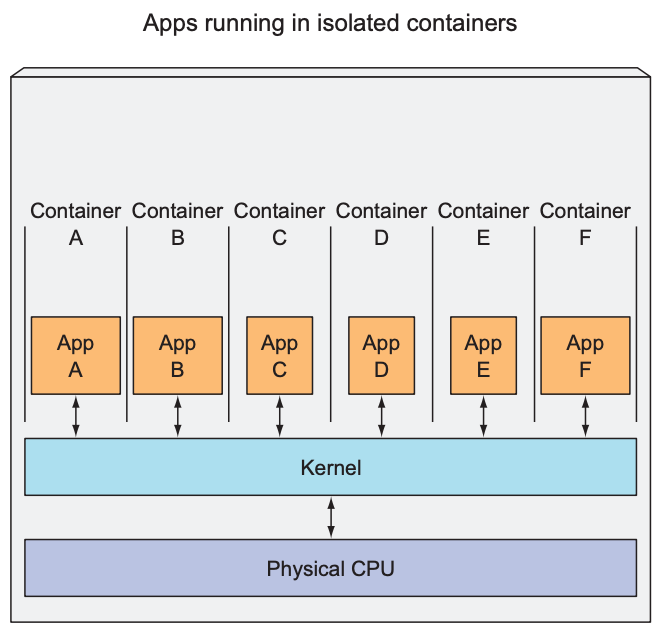
于是,人们转向利用Linux的容器化技术,把不同的微服务隔离出来。在同一台机器上同时运行多个容器,每个容器里的进程是隔离的,容器A里的进程看不到容器B里的进程,同时每个容器里的进程都运行在一个独立的环境,它们分别认为这个独立的环境(称之为操作系统吧)被它自己所独占,因为它们是被隔离的,它们看不到其它进程。虽然可以从主机层面看到运行在每个容器里的进程,但是这些进程也是和主机上的进程是隔离的。而且相较于虚拟机技术,容器化技术在资源消耗上要更小一些,因为虚拟机需要在主机上运行一个虚拟的操作系统,以及hypervisor,这些都需要开销。下图是虚拟机技术和容器化技术运行程序的对比:

左侧运行在同一个虚拟机中的App A和App B可以互相看到对方,但是右边的运行在不同容器里的App A和App B是互相看不到的。
另外,相同的硬件资源前提下,和虚拟化技术相比,通过容器技术可以运行更多的应用程序。
VM和container对比:
| items | Virtual Machine | Container |
|---|---|---|
| 应用隔离范围 | 不同虚拟机中的应用 | 不同container |
| CPU使用方式 | 通过hypervisor | syscall |
| 启动速度 | 慢 | 快 |
| 资源消耗 | 高 | 低 |
| 隔离安全性 | 高 | 低 |
2.2容器技术的底层依赖
容器技术的本质是依赖于Linux内核提供linux namespace和linux control group。
- namespace:实现隔离技术,使得每个进程只能看到自己的文件、存储、网络接口、主机名等信息;
- cgroup:提供资源限制,限制每个进程对主机资源(CPU/内存/网络带宽)的使用
cgroup可以理解为1个子系统目录(/sys/fs/cgroup)加上1组资源限制文件的组合。
2.3容器技术的本质
从本质上来讲,容器其实是一种特殊的进程而已。只是这些进程在启动的时候,容器给它们加上了不同的namespace参数,使之各自隔离。这些进程就会觉得自己是各自 PID Namespace 里的第 1 号进程,只能看到各自Mount Namespace 里挂载的目录和文件,只能访问到各自 Network Namespace 里的网络设备,就仿佛运行在一个个“容器”里面,与世隔绝。
2.4如何查看Linux支持的namespace和cgroup
当前Linux内核实现了7种不同的namespace,由于Cgroup namespace在4.6的内核才实现,所以当前可以看到6种。
当前Linux内核实现了7种不同的namespace,由于Cgroup namespace在4.6的内核才实现,所以当前可以看到6种。
名称        宏定义             隔离内容
Cgroup      CLONE_NEWCGROUP   Cgroup root directory (since Linux 4.6)
IPC         CLONE_NEWIPC      System V IPC, POSIX message queues (since Linux 2.6.19)
Network     CLONE_NEWNET      Network devices, stacks, ports, etc. (since Linux 2.6.24)
Mount       CLONE_NEWNS       Mount points (since Linux 2.4.19)
PID         CLONE_NEWPID      Process IDs (since Linux 2.6.24)
User        CLONE_NEWUSER     User and group IDs(started in Linux 2.6.23 and completed in Linux 3.8)
UTS         CLONE_NEWUTS      Hostname and NIS domain name (since Linux 2.6.19)
如查看pid为16873进程的pid namespace:
[root@master-node ~]# ps -ef|grep ora_pmon
oracle   16873     1  0  2020 ?        03:18:28 ora_pmon_devdb
root     20252 21256  0 10:41 pts/0    00:00:00 grep --color=auto ora_pmon
[root@master-node ~]# ls -l /proc/16873/ns/
总用量 0
lrwxrwxrwx 1 oracle oinstall 0 2月  17 10:41 ipc -> ipc:[4026531839]
lrwxrwxrwx 1 oracle oinstall 0 2月  17 10:41 mnt -> mnt:[4026531840]
lrwxrwxrwx 1 oracle oinstall 0 2月  17 10:41 net -> net:[4026531956]
lrwxrwxrwx 1 oracle oinstall 0 2月  17 10:41 pid -> pid:[4026531836]
lrwxrwxrwx 1 oracle oinstall 0 2月  17 10:41 user -> user:[4026531837]
lrwxrwxrwx 1 oracle oinstall 0 2月  17 10:41 uts -> uts:[4026531838]
[root@master-node ~]# uname -rm
3.10.0-693.el7.x86_64 x86_64
[root@master-node ~]#
查看cgroup:
#可以通过这2个命令分别查看 mount -t cgroup ll /sys/fs/cgroup lscgroup [root@master-node ~]# ll /sys/fs/cgroup 总用量 0 drwxr-xr-x 5 root root 0 8月 21 2020 blkio lrwxrwxrwx 1 root root 11 8月 21 2020 cpu -> cpu,cpuacct lrwxrwxrwx 1 root root 11 8月 21 2020 cpuacct -> cpu,cpuacct drwxr-xr-x 5 root root 0 8月 21 2020 cpu,cpuacct drwxr-xr-x 4 root root 0 8月 21 2020 cpuset drwxr-xr-x 5 root root 0 1月 7 17:11 devices drwxr-xr-x 4 root root 0 8月 21 2020 freezer drwxr-xr-x 4 root root 0 8月 21 2020 hugetlb drwxr-xr-x 5 root root 0 8月 21 2020 memory lrwxrwxrwx 1 root root 16 8月 21 2020 net_cls -> net_cls,net_prio drwxr-xr-x 4 root root 0 8月 21 2020 net_cls,net_prio lrwxrwxrwx 1 root root 16 8月 21 2020 net_prio -> net_cls,net_prio drwxr-xr-x 4 root root 0 8月 21 2020 perf_event drwxr-xr-x 5 root root 0 8月 21 2020 pids drwxr-xr-x 5 root root 0 8月 21 2020 systemd [root@master-node ~]# mount -t cgroup cgroup on /sys/fs/cgroup/systemd type cgroup (rw,nosuid,nodev,noexec,relatime,xattr,release_agent=/usr/lib/systemd/systemd-cgroups-agent,name=systemd) cgroup on /sys/fs/cgroup/cpuset type cgroup (rw,nosuid,nodev,noexec,relatime,cpuset) cgroup on /sys/fs/cgroup/blkio type cgroup (rw,nosuid,nodev,noexec,relatime,blkio) cgroup on /sys/fs/cgroup/net_cls,net_prio type cgroup (rw,nosuid,nodev,noexec,relatime,net_prio,net_cls) cgroup on /sys/fs/cgroup/perf_event type cgroup (rw,nosuid,nodev,noexec,relatime,perf_event) cgroup on /sys/fs/cgroup/memory type cgroup (rw,nosuid,nodev,noexec,relatime,memory) cgroup on /sys/fs/cgroup/pids type cgroup (rw,nosuid,nodev,noexec,relatime,pids) cgroup on /sys/fs/cgroup/freezer type cgroup (rw,nosuid,nodev,noexec,relatime,freezer) cgroup on /sys/fs/cgroup/cpu,cpuacct type cgroup (rw,nosuid,nodev,noexec,relatime,cpuacct,cpu) cgroup on /sys/fs/cgroup/hugetlb type cgroup (rw,nosuid,nodev,noexec,relatime,hugetlb) cgroup on /sys/fs/cgroup/devices type cgroup (rw,nosuid,nodev,noexec,relatime,devices) [root@master-node ~]#
2.5 namespace验证
#获取当前shell进程pid echo $$ #获取父进程$PPID #查看当前进程号、父进程号、祖父进程号,,,根进程号 pstree -sg pid #获取不同pid/uts namespace unshare --fork --pid --mount-proc -u bash
2.6 cgroup验证
#创建属于root用户的限制内存的cgroup: memory:oomtest
[root@master-node ~]# pwd
/root
[root@master-node ~]# cgcreate -a root -g memory:oomtest
[root@master-node ~]#
#查看
ll /sys/fs/cgroup/memory/oomtest/
#设定memory
cd /sys/fs/cgroup/memory/oomtest
echo 10000000 > /sys/fs/cgroup/memory/oomtest/memory.limit_in_bytes
[root@master-node oomtest]# echo 10000000 > /sys/fs/cgroup/memory/oomtest/memory.limit_in_bytes
[root@master-node oomtest]# cat memory.limit_in_bytes
9998336
[root@master-node oomtest]#
#验证cgroup: memory:oomtest
cgexec -g memory:oomtest mongod -f /etc/mongodb.conf
[root@master-node oomtest]# cgexec -g memory:oomtest mongod -f /etc/mongodb.conf
about to fork child process, waiting until server is ready for connections.
forked process: 438
[root@master-node oomtest]# ps -ef|grep mongo
root 440 1 0 22:42 pts/1 00:00:00 grep --color=auto mongo
[root@master-node oomtest]#
#查看 OOM
[root@master-node ~]# dmesg -T|grep oom
[一 8月 1 22:40:57 2022] mongod invoked oom-killer: gfp_mask=0xd0, order=0, oom_score_adj=0
[一 8月 1 22:40:57 2022] [<ffffffff81186394>] oom_kill_process+0x254/0x3d0
[一 8月 1 22:40:57 2022] [<ffffffff811f5296>] mem_cgroup_oom_synchronize+0x546/0x570
[一 8月 1 22:40:57 2022] Task in /oomtest killed as a result of limit of /oomtest
[一 8月 1 22:40:57 2022] Memory cgroup stats for /oomtest: cache:4KB rss:9760KB rss_huge:0KB mapped_file:0KB swap:0KB inactive_anon:0KB active_anon:9692KB inactive_file:0KB active_file:0KB unevictable:0KB
[一 8月 1 22:40:57 2022] [ pid ] uid tgid total_vm rss nr_ptes swapents oom_score_adj name
[一 8月 1 22:40:57 2022] mongod invoked oom-killer: gfp_mask=0xd0, order=0, oom_score_adj=0
[一 8月 1 22:40:57 2022] [<ffffffff81186394>] oom_kill_process+0x254/0x3d0
[一 8月 1 22:40:57 2022] [<ffffffff811f5296>] mem_cgroup_oom_synchronize+0x546/0x570
[一 8月 1 22:40:57 2022] Task in /oomtest killed as a result of limit of /oomtest
[一 8月 1 22:40:57 2022] Memory cgroup stats for /oomtest: cache:4KB rss:9760KB rss_huge:0KB mapped_file:0KB swap:0KB inactive_anon:0KB active_anon:9760KB inactive_file:4KB active_file:0KB unevictable:0KB
[一 8月 1 22:40:57 2022] [ pid ] uid tgid total_vm rss nr_ptes swapents oom_score_adj name
[root@master-node ~]#
#删除cgroup: memory:oomtest
[root@master-node ~]# cgdelete memory:oomtest
[root@master-node ~]#
# deadloop.c--> gcc compile
[root@master-node ~]# cat deadloop.c
int main(void){
int i = 0;
for(;;)
i++;
return 0;
}
[root@master-node ~]# gcc -odeadloop deadloop.c
[root@master-node ~]#
# 运行deadloop ,吃满CPU
[root@master-node ~]# top
top - 22:56:23 up 2 days, 12:36, 3 users, load average: 1.29, 0.80, 0.50
Tasks: 197 total, 2 running, 195 sleeping, 0 stopped, 0 zombie
%Cpu(s): 27.9 us, 1.0 sy, 0.0 ni, 71.0 id, 0.0 wa, 0.0 hi, 0.1 si, 0.0 st
KiB Mem : 8175440 total, 4444276 free, 1154076 used, 2577088 buff/cache
KiB Swap: 0 total, 0 free, 0 used. 6274404 avail Mem
PID USER PR NI VIRT RES SHR S %CPU %MEM TIME+ COMMAND
17221 root 20 0 4208 352 276 R 100.0 0.0 0:10.28 deadloop
3220 root 20 0 1113212 324356 46336 S 7.0 4.0 485:00.28 kube-apiserver
....
#
cgcreate -a root -g cpu:50cpu
ls -l /sys/fs/cgroup/cpu/50cpu/
[root@master-node 50cpu]# echo 50000 > /sys/fs/cgroup/cpu/50cpu/cpu.cfs_quota_us
#deadloop pid echo > /sys/fs/cgroup/cpu/50cpu/tasks
echo
#再次查看top
#删除 cpu:50cpu
[root@master-node ~]# lscgroup |grep 50cpu
cpu,cpuacct:/50cpu
[root@master-node ~]#
[root@master-node 50cpu]# cgdelete cpu:50cpu
删除之后,原来的进程回到系统的CGroup,又占满了CPU。
[root@master-node ~]# top
top - 23:00:11 up 2 days, 12:39, 3 users, load average: 0.86, 0.85, 0.59
Tasks: 198 total, 2 running, 196 sleeping, 0 stopped, 0 zombie
%Cpu(s): 28.3 us, 0.8 sy, 0.0 ni, 70.8 id, 0.0 wa, 0.0 hi, 0.1 si, 0.0 st
KiB Mem : 8175440 total, 4443908 free, 1153836 used, 2577696 buff/cache
KiB Swap: 0 total, 0 free, 0 used. 6274552 avail Mem
PID USER PR NI VIRT RES SHR S %CPU %MEM TIME+ COMMAND
17221 root 20 0 4208 352 276 R 100.0 0.0 3:34.20 deadloop
3220 root 20 0 1113212 324356 46336 S 10.3 4.0 485:19.08 kube-apiserver
2.7 参考链接
DOCKER基础技术:LINUX CGROUP :https://coolshell.cn/articles/17049.html/comment-page-1
What are Kubernetes Pods Anyway? https://www.ianlewis.org/en/what-are-kubernetes-pods-anyway
3Docker容器平台概要介绍
While container technologies have been around for a long time, they’ve become more widely known with the rise of the Docker container platform.
注意,Docker的容器化技术并不是Docker自创的,它也是利用Linux操作系统内核提供的容器化技术,只不过是Docker把Linux内核提供的容器化技术实现的更简单易用而已。Docker容器化系统是第一个实现了容器可以在不同的机器上移植的系统,同时它也简化了应用系统打成docker镜像包的过程和复杂性,顺带一并优雅的解决了如果你的应用程序需要依赖其它程序包和库文件系统时所遇到的问题的容器化平台。
补充:容器化技术不是Docker一家的,它是Linux系统内核自带的;Kubernetes并不是单单可以支持Docker的容器化技术,它还支持其它不同的容器化平台,比如rkt (pronounced “rock-it”).
A big difference between Docker-based container images and VM images is that container images are composed of layers, which can be shared and reused across multiple images. This means only certain layers of an image need to be downloaded if the other layers were already downloaded previously when running a different container image that also contains the same layers.
和虚拟机的镜像文件相比,基于Docker的镜像文件,由不同的”文件层”构成,这种机制使得多个不同的Docker镜像文件共用一份“文件层”,如果需要的话。这样就意味着,在某些场景下,如果你的机器上已经有了某个基础公共的Docker镜像文件,且你需要在其它的地方使用这些文件,那么使得你可以直接复用这些文件,而不需要重新下载或pull,变得高效灵活。
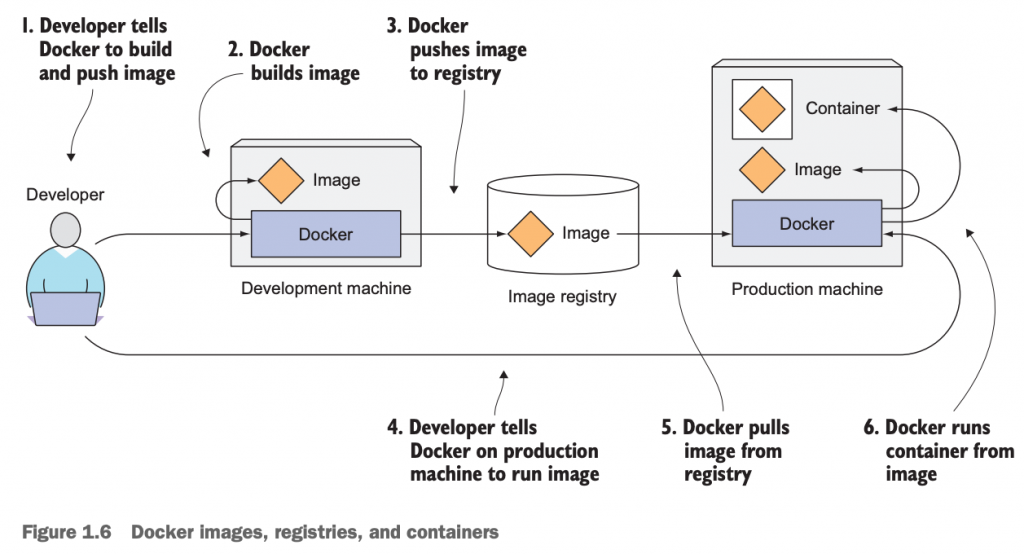
3.1 Docker的3个核心概念
- Image-—A Docker-based container image is something you package your application and its environment into. It contains the filesystem that will be available to the application and other metadata, such as the path to the executable that should be executed when the image is run.
- Registry—A Docker Registry is a repository that stores your Docker images and facilitates easy sharing of those images between different people and computers.
- Container—A Docker-based container is a regular Linux container created from a Docker-based container image.
3.2 Docker的image/registry/container流程图
如下是从开发者的角度来使用和理解image、registry、container的流程图:
3.3 Docker image layer的好处
Docker的image镜像文件分层,除了可以快速的分发镜像,镜像在pull的时候,如果本地已经存在需要用到的文件层,则可以不需要重新拉取该层文件等优势之外。其另外一个优势,镜像文件的共享,比如两个容器使用同一个image启动的话,此时每个容器看到的文件是相同的,且每个容器看到的文件都是属于它们自己的,底层的文件是只读的。如果其中一个container需要修改(写)数据的话,Docker把需要修改的文件层,CP到最上层,然后对最上层的文件进行变更,此时,另外的container是看不到这部分修改的文件的。
4 Kubernetes介绍
至此,我们已经知道了,我们需要部署管理的应用越来越多,想要管理好它们并不是一件容易的事儿。业界的Google早就面临了这个问题,他们在全球有成千上万台机器要管理,上面跑的应用程序更是多如牛毛,如果想要管理好这些程序和机器,并且要求它们可以很好的工作,不出错,更不是简单的事儿。好吧,他们走在了前列,他们憋出了大招儿,他们使出了Kubernetes。当然,这也不是一蹴而就的,他们早在内部开发了一个名叫Borg和Omega的项目,主要用于管理和维护大量应用和服务的系统。在此基础上,2014年,他们推出了Kubernetes,千呼万唤始出来。
4.1自顶而下鸟瞰Kubernetes
Kubernetes是一个软件系统,用于轻松管理和部署那些运行在这个软件系统之上的应用。
Kubernetes enables you to run your software applications on thousands of computer nodes as if all those nodes were a single, enormous computer. It abstracts away the underlying infrastructure and, by doing so, simplifies development, deployment, and management for both development and the operations teams.
Deploying applications through Kubernetes is always the same, whether your cluster contains only a couple of nodes or thousands of them. The size of the cluster makes no difference at all. Additional cluster nodes simply represent an additional amount of resources available to deployed apps.
有了Kubernetes,我们可以把数以万计的机器看做是一个独立的同一的计算资源,然后可以在该资源上轻松管理、部署应用。Kubernetes抽离了底层的硬件架构,我们根本不需要关心底层到底有多少台机器,事实上在只有少数几个节点或者成百上千个节点的Kubernetes上安装、部署、管理应用程序,并没有什么不同,我们需要执行的命令和操作流程是一样的。更多的节点个数,只是意味着我们可以在这个可供使用的资源上部署更多的应用而已,其它并不能表示什么。节点更多,可以部署的应用更多。
4.2使用Kubernetes部署应用的核心流程
如下图所示,是我们使用Kubernetes发布应用的一个通用流程。Kubernetes cluster包含1个master和若干个worker node,至于具体有几个worker,对发布应用的流程没有任何影响。
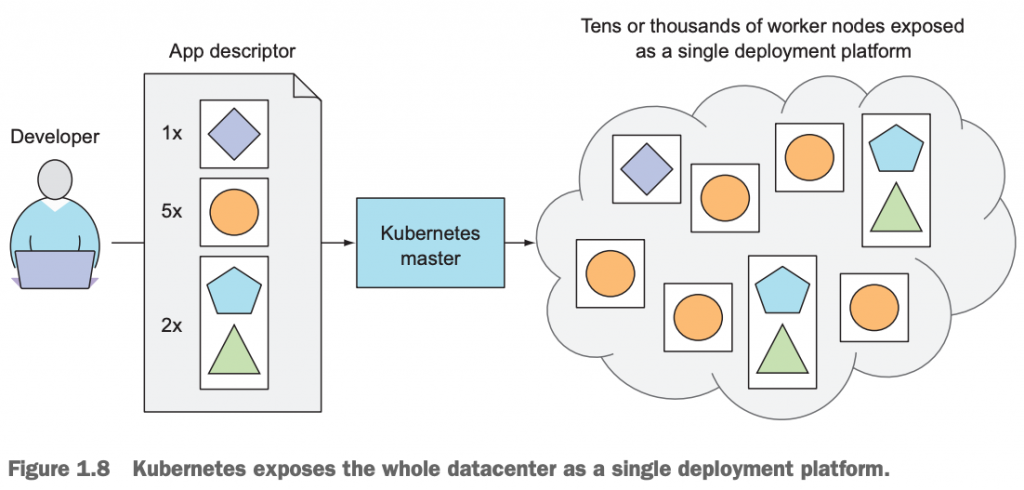
流程大概是这样的:
应用开发人员告诉Kubernetes,我要1份儿◇的应用;5份儿○的应用;2份儿☆和△的应用,并把这些需要的应用做成1个应用清单(真实场景是我们提交给Kubernetes1个manifest,其实就是1个yaml或者是json格式的文件),就是上图的App descriptor,提交给Kubernetes;然后,由Kubernetes帮助我们完成这些具体的事项就OK啦。至于说,我们的应用跑在哪个或者是哪几个node上,其实开发人员是无需也完全没有必要去关心。
看起来,这简直不能更简单轻松了。
注意:这里有2个Kubernetes的核心思想;1个是声明式API,我们告诉Kubernetes我们想要的结果是什么就结束了,至于说Kubernetes自己怎么做怎么调度,我们完全不关心,也不应该告诉它应该怎么做。另外1个是控制器模式,这里暂时没有体现出来,我们后面会讲到,先做了解。
我们如果想要掌握Kubernetes的精髓部分,就得转变思维方式,习惯这种思想。
4.2.1Kubernetes让developers专注于应用核心功能开发
Kubernetes can be thought of as an operating system for the cluster. It relieves application developers from having to implement certain infrastructure-related services into their apps; instead they rely on Kubernetes to provide these services. This includes things such as service discovery, scaling, load-balancing, self-healing, and even leader election.Application developers can therefore focus on implementing the actual features of the applications and not waste time figuring out how to integrate them with
把Kubernetes看作是一个操作系统可能比较更好一些。它把developer从要去实现特定架构相关的服务的痛苦中解救出来了,因为这些特定的服务可以由Kubernetes提供给developer。比如说:服务发现功能、扩缩容、负载均衡、服务自愈等,这些都交由Kubernetes来实现。当然,这些功能随着我们对Kubernetes的学习和使用,会慢慢体会的更加深刻。
4.2.2Kubernetes帮助ops teams实现资源高效利用
Kubernetes will run your containerized app somewhere in the cluster, provide information to its components on how to find each other, and keep all of them running. Because your application doesn’t care which node it’s running on, Kubernetes can relocate the app at any time, and by mixing and matching apps, achieve far better resource utilization than is possible with manual scheduling.
Kubernetes会帮我们照看好运行在cluster中的应用,并且使之各种组件之间协调工作,而不需要我们干预。再加上,我们根本不需要关心我们的application具体运行在哪个node上,因此,Kubernetes可以通过调度不同的组件在不同的node上运行,使之资源得以充分发挥和使用。这些也根本不需要人工干预。
4.3 Kubernetes cluster体系架构
从物理层面,Kubernetes cluster包含2种节点:
master node:which hosts the Kubernetes Control Plane that controls and manages the whole Kubernetes system
worker node:that run the actual applications you deploy
通常情况下,一个cluster有1个master node,当然如果部署高可用集群的话,也有多个master node,master node上通常是不跑应用的(也可以通过设置使之运行应用)。worker node是负责运行应用的,通常包含多个worker node。
4.3.1 Kubernetes cluster结构图
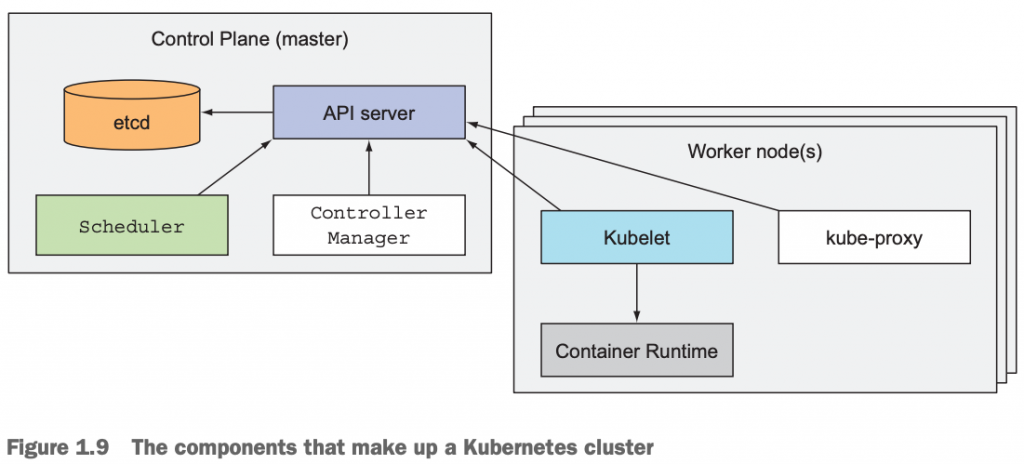
4.3.2 master node|The controle plane
master节点是负责整个cluster正常工作的,它包含的组件有:
- The Kubernetes API Server, which you and the other Control Plane components communicate with
- The Scheduler, which schedules your apps (assigns a worker node to each deployable component of your application)
- The Controller Manager, which performs cluster-level functions, such as replicating components, keeping track of worker nodes, handling node failures, and so on
- etcd, a reliable distributed data store that persistently stores the cluster configuration.
The components of the Control Plane hold and control the state of the cluster, but they don’t run your applications. This is done by the (worker) nodes.
4.3.3 worker node
worker node是真正的负责运行我们的容器化应用的机器。跑在worker节点上的应用的运行、监控、服务提供是通过下面的组件来实现的:
- Docker, rkt, or another container runtime, which runs your containers
- The Kubelet, which talks to the API server and manages containers on its node
- The Kubernetes Service Proxy (kube-proxy), which load-balances network traffic between application components
We’ll explain all these components in detail in chapter 11. I’m not a fan of explaining how things work before first explaining what something does and teaching people to use it. It’s like learning to drive a car. You don’t want to know what’s under the hood. You first want to learn how to drive it from point A to point B. Only after you learn how to do that do you become interested in how a car makes that possible. After all, knowing what’s under the hood may someday help you get the car moving again after it breaks down and leaves you stranded at the side of the road.
不同节点上的不同类型的组件之间如何协调工作以及它们的工作流程,我们会在第11章详细介绍。在还没有跟人解释清楚Kubernetes能干嘛以及没有教会人们如何使用Kubernetes之前,一上来就跑去跟人们讲Kubernetes的本质以及它底层是如何工作的,我可不是那样的人。这就如同开车一样,你当然不会一开始就一头扎进引擎盖儿下面去一探究竟,而是想着如何把车从地下车库开到海边沙滩或者某个地方去溜一圈儿。当然,在你熟练的掌握了驾驶技能之后,再去了解汽车引擎以及各部件相关的工作原理和如何工作的,对于将来肯定有益,比如某天你的汽车抛锚在马路边而不得动弹的时候。
4.4Kubernetes部署应用架构图
前面,我们提到在Kubernetes上部署应用的流程非常简单,只需要告诉Kubernetes我们需要什么(其实就是给Kubernetes master的API server提交一份程序清单manifest)就结束了。接下来,我们结合Kubernetes的架构图来描述一下应用部署流程。
- 应用开发|部署人员把应用程序打成镜像包(image),并提交到容器仓库(registry);
- 应用开发|部署人员把需要的程序列成1个程序清单manifest,其实就是准备1个yaml|json格式的配置文件,并把这份文件提交给Kubernetes master node的API Server;
- API server收到请求后,转交给master node的Scheduler;
- Scheduler收到部署请求后,分析应用程序的资源请求(需要多少CPU、内存等),结合当前Kubernetes cluster中各个worker node上的资源使用情况来调度,把程序请求转到满足条件的对应worker node上;
- worker node上的kubelet收到master节点下发的指令,来启动容器运行环境,并从容器镜像仓库上pull对应的image,然后启动运行容器。这时的容器其实是运行在pod中,Kubernetes不像Docker那样把container当作基本的调度和管理单位,pod才是。pod的详细内容,在第3章学习。
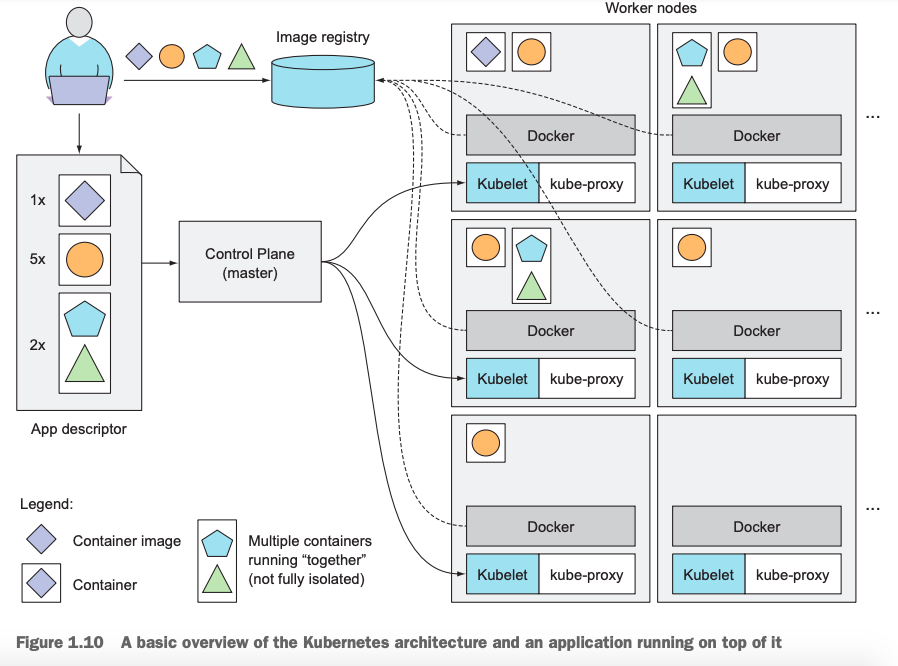
当我们的某个应用出现问题,比如我们需要5份儿(replicaset)的○其中1个实例出现问题,Kubernetes会自动帮我们重新启动1个实例,使得可以满足我们需要的5份儿该应用。或者我们需要的唯一一份的◇应用所在的worker node整个节点出现故障,这时我们也无需担心,Kubernetes会自动监控探测到该故障,并由master node上的Scheduler重新把我们的应用调度到其它正常运行的worker node上运行。
动态扩缩容我们的应用,如果随着业务需求我们之前需要的1个副本集的◇应用不够,需要扩容,我们只需要告诉Kubernetes我们现在需要3个副本集的该应用即可,剩下的任务就交给Kubernetes帮我们完成。反之,如果5份儿副本集的○应用太多了,需要缩容到2个副本集,同样的思路,我们告诉Kubernetes即可,它会帮我们完成。
把多个pod封装成service,上例中我们需要的5个副本集的○应用应该怎么去访问它们呢?通过每个pod的IP地址吗?如果是的话,存在pod出现意外被Kubernetes重新启动,进而IP发生改变。通过worker node的IP吗?更不是,pod还有可能被调度到其它node上。怎么办?Kubernetes在pod的基础上封装了一层称之为service的对象,它本质是一个静态IP地址,把满足某个条件的多个应用封装在一起,进而对外提供服务。这样,不管底层的pod是不是被重启被调度到其它worker node上,我service始终暴露给外部的是同一个IP地址,这样对于应用来说就方便多了。
4.5Kubernetes部署应用的优势
简化应用部署:Kubernetes是基于容器化的运行平台,可以快速部署发布应用,只需要应用打成对应的image即可;再也不像传统的运维团队和系统管理员去准备物理机、虚拟机,安装操作系统补丁,应用依赖的程序库和第3个库文件等,这些环境依赖的程序已经被放到image里了,只需要在Kubernetes里启动容器即可;
最大化利用资源:Kubernetes可以基于应用系统对资源的使用率进行监控,合理调度和分配资源,进而使得整个Kubernetes cluster中的计算资源得以充分使用和发挥;如果这些工作由人工来完成的话,一旦机器和应用程序个数变得多了起来,恐怕并不是一件容易的事儿;
健康检查和服务自愈:Kubernetes会帮我们监控应用的监控状态,一旦某个pod出现故障,它会帮我们重新启动或者重新调度,而不需要人工干预;
自动扩|缩容:应用系统的扩容缩容,交给Kubernetes来完成变得非常简单,只需要一个简单的命令提交给Kubernetes即可,传统环境下扩缩容显得非常笨拙;
更多关于Kubernetes的优势,我们可以从Kubernetes官网查看:https://kubernetes.io/docs/concepts/overview/what-is-kubernetes/
5小结
在第一章中,我们学习了:
- 应用系统开发和管理从传统的单体应用到虚拟机环境,再到容器化平台,最终到统一编排平台Kubernetes的演进;
- 快速了解和知道了容器技术及其底层依赖的本质;
- Docker容器平台的核心概念和image layer分层的优势和好处;
- Kubernetes的核心架构;
- Kubernetes部署应用的流程;