Kubernetes in Action读书笔记第三章:Kubernetes中的核心对象-pod
本章主要内容:
如何创建、运行、停止pods;
通过label来组织管理pod和其它对象;
通过label selector来调度和维护pod;
了解pod的annotation;
了解和使用namespace;
Contents
1 如何创建、运行、pods
1.1我们为什么需要pod?
But why do we even need pods? Why can’t we use containers directly? Why would we even need to run multiple containers together? Can’t we put all our processes into a single container? We’ll answer those questions now.
P88
由于Docker的设计初衷就是单进程隔离的,即1个容器里只跑1个进程,如果我们想要在单个容器里运行多个进程的话,那么我们就需要自己去管理和维护这多个进程,显然这不是一个简单的事情。
但是,有些时候我们需要多个进程协同工作,或者它们之间会互相访问,怎么办呢?又不太方便把它们放到同1个container里。那么就需要一种机制,把这些需要协同工作互相访问的多个container给封装在一起。显然,我们需要在container之上再抽象1个对象出来,于是有了pod。
我们把多个需要协同工作的container运行在1个pod里,这个pod里的多个container就
Kubernetes cluster中的pod拓扑图
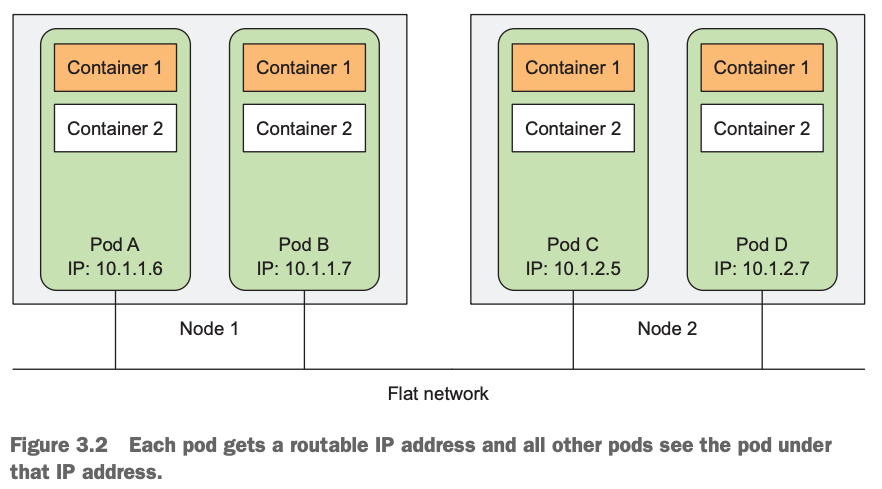
pods are logical hosts and behave much like physical hosts or VMs in the non-container world. Processes running in the same pod are like processes running on the same physical or virtual machine, except that each process is encapsulated in a container.
p90
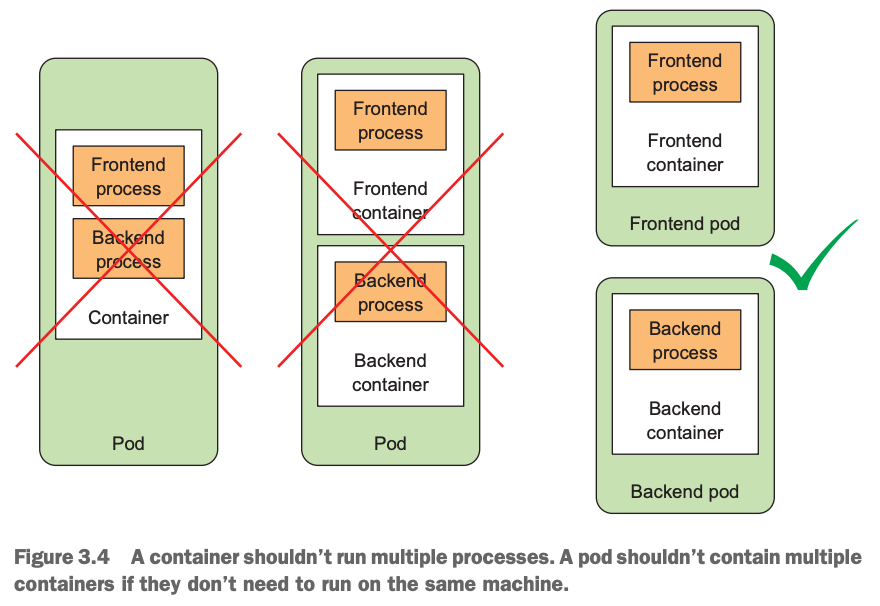
我们应该把一个多层架构的应用拆分到多个pod中去,而不是把它们放到一个pod里。比如:front-end的web应用和一个backend 的database应用,如果我们把它放到1个pod里,则该pod里就有2个container,假设此时我们的cluster是2个node,那么由于pod不能跨node,因而2个container一定只运行在1个node上,结果就是有1个node工作,另外闲置了,造成资源浪费。
另外:如果把它们放到1个pod里,如果我们的前端应用需要扩容,那么此时我们一旦scale out front-end应用的话,同一个pod中的database也被扩容了,这是我们想要的吗?即:此种情况下,不便于应用的扩缩容。因为,Kubernetes执行扩缩容的基本单位是pod,而不是container。
通常情况下,我们会在单个pod中运行单个container,除非特殊情况。那么,究竟怎么判断单个pod是不是应该运行多个container呢,我们可以这样判断:
Do they need to be run together or can they run on different hosts?
Do they represent a single whole or are they independent components?
Must they be scaled together or individually?
p92
1.2如何查看已有pod的yaml
前面第二章中我们学习了通过kubectl run命令的方式来创建Kubernetes资源对象,由于命令行上可以使用的命令选项有限,并且不容易被重用。我们开始了解和学习如何通过yaml|json格式的manifest文件来创建Kubernetes资源对象。
首先,我们查看一下前面创建的pod的yaml文件内容:
[root@master-node ~]# kubectl get pods kubia-lzmxz -oyaml
apiVersion: v1
kind: Pod
metadata:
  creationTimestamp: "2022-02-23T03:20:40Z"
  generateName: kubia-
  labels:
    app: kubia
  name: kubia-lzmxz
  namespace: default
  ownerReferences:
  - apiVersion: v1
    blockOwnerDeletion: true
    controller: true
    kind: ReplicationController
    name: kubia
    uid: ff174326-b73d-4e27-80ad-276bfc68852d
  resourceVersion: "5422217"
  uid: 74d86042-d3a5-49af-aedf-a84ee14fed4d
spec:
  containers:
  - image: luksa/kubia
    imagePullPolicy: Always
    name: kubia
    ports:
    - containerPort: 8080
      protocol: TCP
    resources: {}
    terminationMessagePath: /dev/termination-log
    terminationMessagePolicy: File
    volumeMounts:
    - mountPath: /var/run/secrets/kubernetes.io/serviceaccount
      name: kube-api-access-n4sm8
      readOnly: true
  dnsPolicy: ClusterFirst
  enableServiceLinks: true
  nodeName: node-2
  preemptionPolicy: PreemptLowerPriority
  priority: 0
  restartPolicy: Always
  schedulerName: default-scheduler
  securityContext: {}
  serviceAccount: default
  serviceAccountName: default
  terminationGracePeriodSeconds: 30
  tolerations:
  - effect: NoExecute
    key: node.kubernetes.io/not-ready
    operator: Exists
    tolerationSeconds: 300
  - effect: NoExecute
    key: node.kubernetes.io/unreachable
    operator: Exists
    tolerationSeconds: 300
  volumes:
  - name: kube-api-access-n4sm8
    projected:
      defaultMode: 420
      sources:
      - serviceAccountToken:
          expirationSeconds: 3607
          path: token
      - configMap:
          items:
          - key: ca.crt
            path: ca.crt
          name: kube-root-ca.crt
      - downwardAPI:
          items:
          - fieldRef:
              apiVersion: v1
              fieldPath: metadata.namespace
            path: namespace
status:
  conditions:
  - lastProbeTime: null
    lastTransitionTime: "2022-02-23T03:20:40Z"
    status: "True"
    type: Initialized
  - lastProbeTime: null
    lastTransitionTime: "2022-02-23T03:20:45Z"
    status: "True"
    type: Ready
  - lastProbeTime: null
    lastTransitionTime: "2022-02-23T03:20:45Z"
    status: "True"
    type: ContainersReady
  - lastProbeTime: null
    lastTransitionTime: "2022-02-23T03:20:40Z"
    status: "True"
    type: PodScheduled
  containerStatuses:
  - containerID: docker://58ef90f9f8a67b1cd633a4ee7e11513c7d0e685c215b4e022bceca280ebfad26
    image: docker.io/luksa/kubia:latest
    imageID: docker-pullable://docker.io/luksa/kubia@sha256:3f28e304dc0f63dc30f273a4202096f0fa0d08510bd2ee7e1032ce600616de24
    lastState: {}
    name: kubia
    ready: true
    restartCount: 0
    started: true
    state:
      running:
        startedAt: "2022-02-23T03:20:45Z"
  hostIP: 172.16.11.161
  phase: Running
  podIP: 10.244.2.25
  podIPs:
  - ip: 10.244.2.25
  qosClass: BestEffort
  startTime: "2022-02-23T03:20:40Z"
[root@master-node ~]#
刚一开始看这个yaml文件非常费劲,比较懵。但是,除了开头两行的pod所属的版本和类型之外。接下来就是3部分重要的内容了:
Metadata includes the name, namespace, labels, and other information about the pod.
Spec contains the actual description of the pod’s contents, such as the pod’s containers, volumes, and other data.
Status contains the current information about the running pod, such as what condition the pod is in, the description and status of each container, and the pod’s internal IP and other basic info.
而且,我们通过yaml manifest创建Kubernetes对象时,没必要写的这么全乎,只需要把核心的内容提交给Kubernetes API server即可。比如,当我们创建pod时,yaml文件里根本就没必要填写status部分的信息给Kubernetes。
1.3怎么通过yaml来创建pod
查看作者提供的yaml文件:
[root@master-node Chapter03]# pwd
/root/kubernetes-in-action/Chapter03
[root@master-node Chapter03]# ll
总用量 20
-rw-r--r-- 1 root root  66 1月  21 17:34 custom-namespace.yaml
-rw-r--r-- 1 root root 144 1月  21 17:34 kubia-gpu.yaml
-rw-r--r-- 1 root root 202 1月  21 17:34 kubia-manual-custom-namespace.yaml
-rw-r--r-- 1 root root 227 1月  21 17:34 kubia-manual-with-labels.yaml
-rw-r--r-- 1 root root 172 1月  21 17:34 kubia-manual.yaml
[root@master-node Chapter03]# cat kubia-manual.yaml
apiVersion: v1
kind: Pod
metadata:
  name: kubia-manual
spec:
  containers:
  - image: luksa/kubia
    name: kubia
    ports:
    - containerPort: 8080
      protocol: TCP
[root@master-node Chapter03]#
kubia-manual.yaml显得简洁清爽,除了开头2行的版本和类型之外。就只有metadata部分的name: kubia-manual表示当前的pod名字;spec字段用于描述该pod的container信息,容器镜像选择之前我们创建并推送到Docker hub上的image:luksa/kubia。指定container的端口在8080,当然这个并非是必需的,我们也可以在这个yaml文件里完全不指定container的端口信息。不过,这里我们已经知道运行在container中的我们的app.js确定监听在8080端口,这里我们也一并写到pod的yaml文件里,看起来更清楚明了。
我们通过一条简单的命令来创建该pod:
[root@master-node Chapter03]# kubectl create -f kubia-manual.yaml
pod/kubia-manual created
[root@master-node Chapter03]# kubectl get pods
NAME           READY   STATUS              RESTARTS        AGE
kubia-lzmxz    1/1     Running             1 (4h14m ago)   28h
kubia-manual   0/1     ContainerCreating   0               4s
[root@master-node Chapter03]#
...
###过一会儿之后,再执行kubectl get pods
[root@master-node Chapter03]# kubectl get pods
NAME           READY   STATUS    RESTARTS        AGE
kubia-lzmxz    1/1     Running   1 (4h15m ago)   28h
kubia-manual   1/1     Running   0               37s
[root@master-node Chapter03]#
接下来,我们可以反过来通过kubectl get pods pod_name -oyaml命令,输出完整的yaml的manifest,通过它的输出和我们提供的kubia-manual.yaml做对比,这样我们可以深入了解编写yaml所需要的不同字段值。
[root@master-node Chapter03]# kubectl get pod kubia-manual -oyaml
apiVersion: v1
kind: Pod
metadata:
  creationTimestamp: "2022-02-24T07:44:51Z"
....
###命令输出结果太长,这里省略。
同时,Kubernetes还帮我们提供了一个命令:kubectl explain pods 来查看关于pod这种Kubernetes对象的yaml属性值可以有哪些?
[root@master-node Chapter03]# kubectl explain pods
KIND: Pod
VERSION: v1
DESCRIPTION:
Pod is a collection of containers that can run on a host. This resource is
created by clients and scheduled onto hosts.
FIELDS:
apiVersion <string>
APIVersion defines the versioned schema of this representation of an
object. Servers should convert recognized schemas to the latest internal
value, and may reject unrecognized values. More info:
https://git.k8s.io/community/contributors/devel/sig-architecture/api-conventions.md#resources
kind <string>
Kind is a string value representing the REST resource this object
represents. Servers may infer this from the endpoint the client submits
requests to. Cannot be updated. In CamelCase. More info:
https://git.k8s.io/community/contributors/devel/sig-architecture/api-conventions.md#types-kinds
metadata <Object>
Standard object's metadata. More info:
https://git.k8s.io/community/contributors/devel/sig-architecture/api-conventions.md#metadata
spec <Object>
Specification of the desired behavior of the pod. More info:
https://git.k8s.io/community/contributors/devel/sig-architecture/api-conventions.md#spec-and-status
status <Object>
Most recently observed status of the pod. This data may not be up to date.
Populated by the system. Read-only. More info:
https://git.k8s.io/community/contributors/devel/sig-architecture/api-conventions.md#spec-and-status
[root@master-node Chapter03]# 从上述的输出,我们知道pod的yaml文件中需要的核心字段包括:apiVersion,kind,metadata,spec,status等字段。当然,如果我们想深入看关于status字段的信息,我们可以执行,kubectl explain pod.status:
[root@master-node Chapter03]# kubectl explain pod.status
KIND: Pod
VERSION: v1
RESOURCE: status <Object>
DESCRIPTION:
Most recently observed status of the pod. This data may not be up to date.
Populated by the system. Read-only. More info:
https://git.k8s.io/community/contributors/devel/sig-architecture/api-conventions.md#spec-and-status
PodStatus represents information about the status of a pod. Status may
trail the actual state of a system, especially if the node that hosts the
pod cannot contact the control plane.
FIELDS:
conditions <[]Object>
Current service state of pod. More info:关于Kubernetes更多对象的API接口文档,可以查看官方文档:https://kubernetes.io/docs/reference/
1.4如何查看pod和pod中的container的log
Docker的世界里,我们通过docker logs container_id|container_name来获取container的日志,类似的Kubernetes里,我们通过kubectl logs pod_name来获取pod的日志,如果1个pod里运行了多个container的话,我们则需要通过kubectl logs pod_name -c container_name来查看每个不同的container的日志。
[root@master-node Chapter03]# kubectl get pods
NAME           READY   STATUS    RESTARTS        AGE
kubia-lzmxz    1/1     Running   1 (4h32m ago)   28h
kubia-manual   1/1     Running   0               17m
[root@master-node Chapter03]# kubectl logs kubia-manual
Kubia server starting...
[root@master-node Chapter03]#
启动1个pod,其中运行2个container,然后查看不同container的日志:
[root@master-node Chapter03]# cat kubia-two-containers.yaml
apiVersion: v1
kind: Pod
metadata:
  name: kubia-two-containers
spec:
  containers:
  - image: renguzi/kubia8081
    name: kubia1
    ports:
    - containerPort: 8081
      protocol: TCP
  - image: renguzi/kubia8082
    name: kubia2
    ports:
    - containerPort: 8082
      protocol: TCP
[root@master-node Chapter03]# kubectl create -f kubia-two-containers.yaml
pod/kubia-two-containers created
[root@master-node Chapter03]# kubectl get pods
NAME                   READY   STATUS    RESTARTS        AGE
kubia-lzmxz            1/1     Running   1 (4h34m ago)   28h
kubia-manual           1/1     Running   0               19m
kubia-two-containers   2/2     Running   0               10s
[root@master-node Chapter03]# kubectl logs kubia-two-containers
error: a container name must be specified for pod kubia-two-containers, choose one of: [kubia1 kubia2]
[root@master-node Chapter03]# kubectl logs kubia-two-containers  -c kubia1
Kubia server starting...
[root@master-node Chapter03]# kubectl logs kubia-two-containers  -c kubia2
Kubia server starting...
[root@master-node Chapter03]#
1.5 如何进入1个pod中不同container执行命令
通过kubectl exec pod_name -c container_name -it — /bin/bash格式的命令,
exec 后面跟pod名;
-c 表示pod中指定的container名;
-it交互式的方式执行命令;
— 后面表示要执行的命令,这里是执行一个bash shell;注意–和命令之间要留空格。
进入第1个container kubia1:
[root@master-node Chapter03]# kubectl exec kubia-two-containers -it -c kubia1 -- /bin/bash
root@kubia-two-containers:/# hostname
kubia-two-containers
root@kubia-two-containers:/# ifconfig
bash: ifconfig: command not found
root@kubia-two-containers:/# ip a
1: lo: <LOOPBACK,UP,LOWER_UP> mtu 65536 qdisc noqueue state UNKNOWN group default qlen 1000
    link/loopback 00:00:00:00:00:00 brd 00:00:00:00:00:00
    inet 127.0.0.1/8 scope host lo
       valid_lft forever preferred_lft forever
    inet6 ::1/128 scope host
       valid_lft forever preferred_lft forever
3: eth0@if438: <BROADCAST,MULTICAST,UP,LOWER_UP> mtu 1450 qdisc noqueue state UP group default
    link/ether da:d3:18:b4:16:19 brd ff:ff:ff:ff:ff:ff
    inet 10.244.2.203/24 brd 10.244.2.255 scope global eth0
       valid_lft forever preferred_lft forever
    inet6 fe80::d8d3:18ff:feb4:1619/64 scope link tentative dadfailed
       valid_lft forever preferred_lft forever
root@kubia-two-containers:/#
进入第2个container kubia2:
[root@master-node Chapter03]# kubectl exec kubia-two-containers -c kubia2 -it -- /bin/sh
# hostname
kubia-two-containers
# ip a
1: lo: <LOOPBACK,UP,LOWER_UP> mtu 65536 qdisc noqueue state UNKNOWN group default qlen 1000
    link/loopback 00:00:00:00:00:00 brd 00:00:00:00:00:00
    inet 127.0.0.1/8 scope host lo
       valid_lft forever preferred_lft forever
    inet6 ::1/128 scope host
       valid_lft forever preferred_lft forever
3: eth0@if438: <BROADCAST,MULTICAST,UP,LOWER_UP> mtu 1450 qdisc noqueue state UP group default
    link/ether da:d3:18:b4:16:19 brd ff:ff:ff:ff:ff:ff
    inet 10.244.2.203/24 brd 10.244.2.255 scope global eth0
       valid_lft forever preferred_lft forever
    inet6 fe80::d8d3:18ff:feb4:1619/64 scope link tentative dadfailed
       valid_lft forever preferred_lft forever
#
1.6如何通过端口转发来访问pod提供的服务
在前面第二章,我们通过创建1个service对象,来把通过ReplicationController创建的pod提供的服务暴露出去,这里我们先不用service对象来暴露服务,后面我们再来讨论service。我们通过端口转发的方式来实现:
先看,通过pod ip+端口(运行在pod中的container服务所在的端口)的方式来访问服务,当然,这种方式作为了解即可,我们不建议也不应该通过这种方式来访问服务。
[root@master-node Chapter03]# kubectl get pods -owide
NAME                   READY   STATUS    RESTARTS        AGE   IP            NODE     NOMINATED NODE   READINESS GATES
kubia-lzmxz            1/1     Running   1 (4h44m ago)   28h   10.244.2.27   node-2   <none>           <none>
kubia-manual           1/1     Running   0               30m   10.244.2.33   node-2   <none>           <none>
kubia-two-containers   2/2     Running   0               10m   10.244.2.34   node-2   <none>           <none>
[root@master-node Chapter03]# curl 10.244.2.33:8080
You've hit kubia-manual
[root@master-node Chapter03]#
设置端口转发:
[root@master-node Chapter03]# kubectl port-forward --address 0.0.0.0 kubia-manual 8888:8080
Forwarding from 0.0.0.0:8888 -> 8080
...
然后,新开1个terminal,执行:
[root@master-node Chapter03]# curl localhost:8888
You've hit kubia-manual
[root@master-node Chapter03]# curl 172.16.11.168:8888
You've hit kubia-manual
[root@master-node Chapter03]#
或者在其它机器上,可以通过设置端口转发的主机的IP+8888来访问服务,比如在我的Mac上,访问:
$ curl 172.16.11.168:8888 You've hit kubia-manual asher at MacBook-Air-3 in ~ $
kubectl port-forward –address 0.0.0.0 kubia-manual 8888:8080命令解释:表示要在0.0.0.0的地址,即当前机器上的所有网络接口上都可以接受网络请求,而不仅仅是localhost,然后接收来自8888端口的请求,转发给名为kubia-manual的pod上的8080去。有点儿邪乎,172.16.11.168机器的8888端口对外提供服务,把请求转发到运行在Kubernetes中的kubia-manual的pod的8080端口上,而不需关心底层的pod到底运行在哪个node上。
关于端口转发设置的命令,可以查看帮助:
[root@master-node Chapter03]# kubectl port-forward --help Forward one or more local ports to a pod. Use resource type/name such as deployment/mydeployment to select a pod. Resource type defaults to 'pod' if omitted. If there are multiple pods matching the criteria, a pod will be selected automatically. The forwarding session ends when the selected pod terminates, and a rerun of the command is needed to resume forwarding. Examples: # Listen on ports 5000 and 6000 locally, forwarding data to/from ports 5000 and 6000 in the pod kubectl port-forward pod/mypod 5000 6000 ....
1.7如何删除pod
[root@master-node Chapter03]# kubectl get pods
NAME                   READY   STATUS    RESTARTS        AGE
kubia-lzmxz            1/1     Running   1 (4h56m ago)   29h
kubia-manual           1/1     Running   0               41m
kubia-two-containers   2/2     Running   0               22m
[root@master-node Chapter03]# kubectl delete pod kubia-two-containers
pod "kubia-two-containers" deleted
[root@master-node Chapter03]# kubectl get pods
NAME           READY   STATUS    RESTARTS       AGE
kubia-lzmxz    1/1     Running   1 (5h4m ago)   29h
kubia-manual   1/1     Running   0              49m
[root@master-node Chapter03]#
2通过label来组织管理pod和其它对象
2.1为什么我们需要label
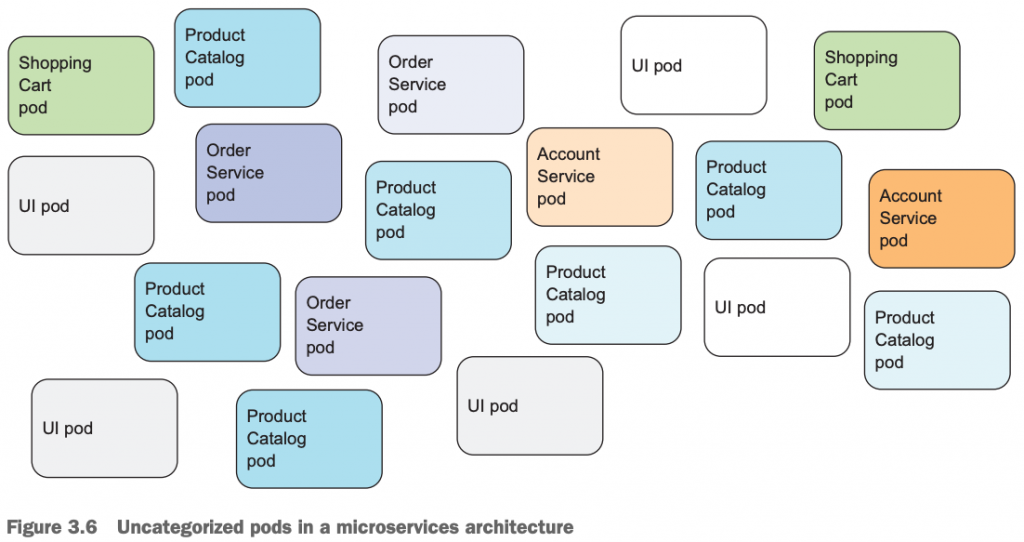
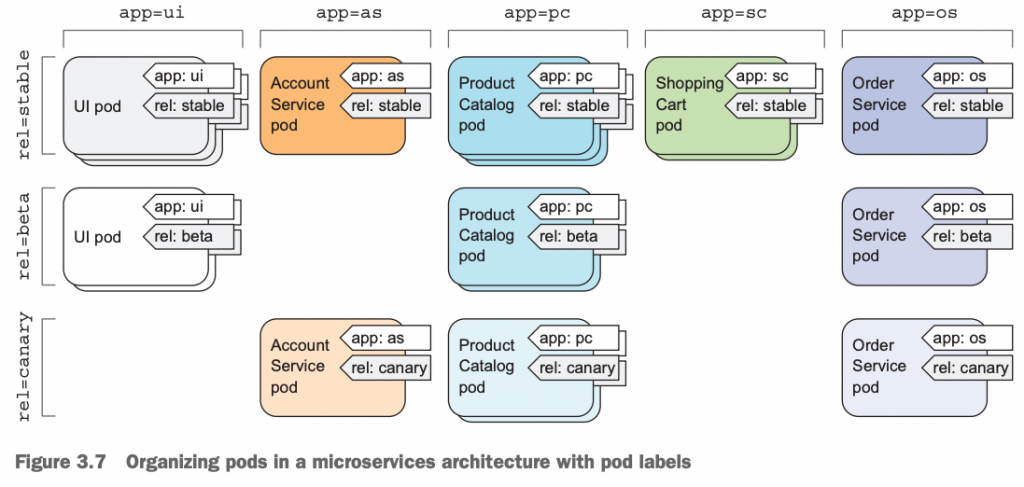
试想,在一个Kubernetes cluster中,我们可能部署了非常多的pod,运行这不同环境的应用,这样的话,pod以及其它类型的Kubernetes对象,如果想要通过它们的名字来管理它们的话,可能就不太容易。于是,Kubernetes引入了一个概念,label,通过给不同的Kubernetes对象打上不同的标签label,当然不同的对象可以拥有相同的label,比如同是属于生产环境的应用,就可以贴上相同的标签:environment=production等。同一个对象也可以拥有多个不同的label。如下,一个基于微服务架构环境下的应用,没有贴上对于的label的话,就显得凌乱:
2.2 label的解释和作用
label是一个逻辑上的概念,它是由一个键值对,key=value组成的。在Kubernetes的世界里,除了pod之外,service、ReplicationController,ReplicaSet、Deployment、甚至node都可以贴上label。它的作用主要是用于统一规划和管理维护不同的对象,也可以通过它来调度资源。
canary: \ kə-ˈner-ē \
如下,当我们给资源贴上基于应用类型的label,app=xx;以及处于不同版本的维度的label:rel=yy;之后,我们的应用就变得清晰了:
2.3如何给新pod贴上新label
我们可以在创建pod的过程中给pod贴上label,也可以在pod创建完之后,修改pod的label。
[root@master-node Chapter03]# pwd
/root/kubernetes-in-action/Chapter03
[root@master-node Chapter03]# ll
总用量 28
-rw-r--r-- 1 root root 168 2月  24 15:29 c
-rw-r--r-- 1 root root  66 1月  21 17:34 custom-namespace.yaml
-rw-r--r-- 1 root root 144 1月  21 17:34 kubia-gpu.yaml
-rw-r--r-- 1 root root 202 1月  21 17:34 kubia-manual-custom-namespace.yaml
-rw-r--r-- 1 root root 227 1月  21 17:34 kubia-manual-with-labels.yaml
-rw-r--r-- 1 root root 172 1月  21 17:34 kubia-manual.yaml
-rw-r--r-- 1 root root 290 2月  24 16:04 kubia-two-containers.yaml
[root@master-node Chapter03]# cat kubia-manual-with-labels.yaml
apiVersion: v1
kind: Pod
metadata:
  name: kubia-manual-v2
  labels:
    creation_method: manual
    env: prod
spec:
  containers:
  - image: luksa/kubia
    name: kubia
    ports:
    - containerPort: 8080
      protocol: TCP
[root@master-node Chapter03]# kubectl create -f kubia-manual-with-labels.yaml
pod/kubia-manual-v2 created
[root@master-node Chapter03]#
查看pod时,连带label一起显示,kubectl get pods –show-labels :
[root@master-node Chapter03]# kubectl get pods --show-labels
NAME              READY   STATUS    RESTARTS       AGE    LABELS
kubia-lzmxz       1/1     Running   1 (6h4m ago)   30h    app=kubia
kubia-manual      1/1     Running   0              109m   <none>
kubia-manual-v2   1/1     Running   0              43s    creation_method=manual,env=prod
[root@master-node Chapter03]#
上述,我们在kubia-manual-with-labels.yaml中,给pod贴上了2个label,在metadata字段上,分别为:creation_method=manual,env=prod。然后,我们创建了该pod,并通过kubectl get pods –show-labels 显示了pod信息的同时,连label也打印输出。
如何查看包含指定label的pod:
[root@master-node Chapter03]# kubectl get pods -L creation_method,env
NAME              READY   STATUS    RESTARTS       AGE     CREATION_METHOD   ENV
kubia-lzmxz       1/1     Running   1 (6h8m ago)   30h
kubia-manual      1/1     Running   0              113m
kubia-manual-v2   1/1     Running   0              4m31s   manual            prod
[root@master-node Chapter03]#
如上,只有包含指定标签的pod在该列位置处显示对于的信息,否则显示为空。
2.4如何给已有pod贴上|修改label
我们可以通过kubectl label pod pd_name key=value的命令给pod贴上新的标签。如果需要修改已有标签的值,可以加上–overwirte参数选项。具体如下:
[root@master-node Chapter03]# kubectl get pods --show-labels
NAME              READY   STATUS    RESTARTS      AGE   LABELS
kubia-lzmxz       1/1     Running   1 (21h ago)   45h   app=kubia
kubia-manual      1/1     Running   0             17h   <none>
kubia-manual-v2   1/1     Running   0             15h   creation_method=manual,env=prod
[root@master-node Chapter03]# kubectl label pod kubia-manual creation_method=manual
pod/kubia-manual labeled
[root@master-node Chapter03]# kubectl label pod kubia-manual-v2 env=debug --overwrite
pod/kubia-manual-v2 labeled
[root@master-node Chapter03]# kubectl get pods --show-labels
NAME              READY   STATUS    RESTARTS      AGE   LABELS
kubia-lzmxz       1/1     Running   1 (21h ago)   45h   app=kubia
kubia-manual      1/1     Running   0             17h   creation_method=manual
kubia-manual-v2   1/1     Running   0             15h   creation_method=manual,env=debug
[root@master-node Chapter03]#
我们给名为kubia-manual的pod贴上了新的标签:creation_method=manual;然后,给名为kubia-manual-v2的pod的旧标签env=prod改为了env=debug,通过在命令行上加上–overwrite选项即可。
2.5通过label selector过滤pod
我们给pod贴上了不同的label,反过来我们可以通过label selector来选择过滤我们想要的pod,即满足我们的过滤条件的pod。示例如下:
[root@master-node Chapter03]# kubectl get pods --show-labels
NAME              READY   STATUS    RESTARTS      AGE   LABELS
kubia-lzmxz       1/1     Running   1 (21h ago)   45h   app=kubia
kubia-manual      1/1     Running   0             17h   creation_method=manual
kubia-manual-v2   1/1     Running   0             15h   creation_method=manual,env=debug
[root@master-node Chapter03]# kubectl get  pods -l creation_method=manual
NAME              READY   STATUS    RESTARTS   AGE
kubia-manual      1/1     Running   0          17h
kubia-manual-v2   1/1     Running   0          15h
[root@master-node Chapter03]# kubectl get  pods -l env
NAME              READY   STATUS    RESTARTS   AGE
kubia-manual-v2   1/1     Running   0          15h
[root@master-node Chapter03]#
kubectl get pods -l key=value;表示只显示包含key=value label的pod;
kubectl get pods -l key;表示只显示包含key的pod,不关心value具体的值;
我们也可以使用类似kubectl get pods -l ‘!env’;label中不包含env的label;
[root@master-node Chapter03]# kubectl get pods -l '!env'
NAME           READY   STATUS    RESTARTS      AGE
kubia-lzmxz    1/1     Running   1 (21h ago)   45h
kubia-manual   1/1     Running   0             17h
[root@master-node Chapter03]#
不等于:creation_method!=manual
[root@master-node Chapter03]# kubectl get pods -l creation_method!=manual
NAME          READY   STATUS    RESTARTS      AGE
kubia-lzmxz   1/1     Running   1 (21h ago)   45h
[root@master-node Chapter03]#
回到2.1小节,如果我们想要通过label来查看包含app=pc这个label的pod,则下列灰色的pod全部被过滤出来:
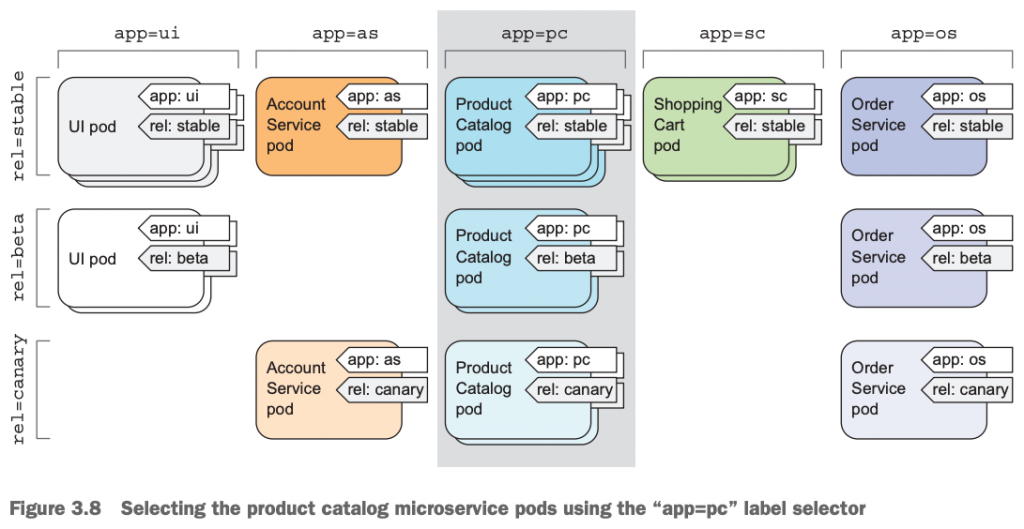
我们也可以使用多个label selector来过滤pod,比如:kubectl get pods -l app=pc,rel=beta;多个label中间用逗号分隔;

2.6kubectl label命令使用帮助
我们除了可以使用kubectl label 给pod贴上标签之外,我们还可以通过该命令给Kubernetes的其它资源贴上label。
具体的使用,我们可以通过kubectl pod –help来查看:
[root@master-node Chapter03]# kubectl label --help Update the labels on a resource. * A label key and value must begin with a letter or number, and may contain letters, numbers, hyphens, dots, and underscores, up to 63 characters each. * Optionally, the key can begin with a DNS subdomain prefix and a single '/', like example.com/my-app. * If --overwrite is true, then existing labels can be overwritten, otherwise attempting to overwrite a label will result in an error. * If --resource-version is specified, then updates will use this resource version, otherwise the existing resource-version will be used. Examples: # Update pod 'foo' with the label 'unhealthy' and the value 'true' kubectl label pods foo unhealthy=true ... Usage: kubectl label [--overwrite] (-f FILENAME | TYPE NAME) KEY_1=VAL_1 ... KEY_N=VAL_N [--resource-version=version] [options] Use "kubectl options" for a list of global command-line options (applies to all commands). [root@master-node Chapter03]#
3通过label selector来调度和维护pod
前面,我们了解到在Kubernetes系统里,我们除了可以给pod贴上label之外,也可以给node贴上label。然后,我们就可以在pod上通过label selector来把它调度到具有指定label的node上。这在实际生产环境下非常好用,比如说同一个Kubernetes cluster里可能有些node配置有SSD、其它机器配有GPU,这样我们可以通过给这些具有不同配置的node贴上不同label,然后把需要使用SSD的应用调度到对应的具有SSD的node上,需要GPU计算资源的应用调度到GPU的node上。
3.1如何查看node的label
通过命令:kubectl get nodes –show-labels
[root@master-node Chapter03]# kubectl get nodes --show-labels
NAME          STATUS   ROLES                  AGE   VERSION   LABELS
master-node   Ready    control-plane,master   48d   v1.23.1   beta.kubernetes.io/arch=amd64,beta.kubernetes.io/os=linux,kubernetes.io/arch=amd64,kubernetes.io/hostname=master-node,kubernetes.io/os=linux,node-role.kubernetes.io/control-plane=,node-role.kubernetes.io/master=,node.kubernetes.io/exclude-from-external-load-balancers=
node-1        Ready    <none>                 48d   v1.22.3   beta.kubernetes.io/arch=amd64,beta.kubernetes.io/os=linux,kubernetes.io/arch=amd64,kubernetes.io/hostname=node-1,kubernetes.io/os=linux
node-2        Ready    <none>                 48d   v1.22.3   beta.kubernetes.io/arch=amd64,beta.kubernetes.io/os=linux,kubernetes.io/arch=amd64,kubernetes.io/hostname=node-2,kubernetes.io/os=linux
[root@master-node Chapter03]#
3.2如何给node贴上label
这里假定节点1所在的机器配置了GPU,然后我们给该节点贴上gpu=true的label,将来我们可以在要部署的pod资源的yaml文件里指定nodeSelector,将其指向该节点,那么这个要部署的pod就会被调度到node1节点上了。
[root@master-node Chapter03]# kubectl label nodes node-1 gpu=true
node/node-1 labeled
[root@master-node Chapter03]# kubectl get nodes --show-labels
NAME          STATUS   ROLES                  AGE   VERSION   LABELS
master-node   Ready    control-plane,master   48d   v1.23.1   beta.kubernetes.io/arch=amd64,beta.kubernetes.io/os=linux,kubernetes.io/arch=amd64,kubernetes.io/hostname=master-node,kubernetes.io/os=linux,node-role.kubernetes.io/control-plane=,node-role.kubernetes.io/master=,node.kubernetes.io/exclude-from-external-load-balancers=
node-1        Ready    <none>                 48d   v1.22.3   beta.kubernetes.io/arch=amd64,beta.kubernetes.io/os=linux,gpu=true,kubernetes.io/arch=amd64,kubernetes.io/hostname=node-1,kubernetes.io/os=linux
node-2        Ready    <none>                 48d   v1.22.3   beta.kubernetes.io/arch=amd64,beta.kubernetes.io/os=linux,kubernetes.io/arch=amd64,kubernetes.io/hostname=node-2,kubernetes.io/os=linux
[root@master-node Chapter03]#
通过kubectl get nodes -l gpu;查看只包含key=gpu的node;
[root@master-node Chapter03]# kubectl get nodes -l gpu=true
NAME     STATUS   ROLES    AGE   VERSION
node-1   Ready    <none>   48d   v1.22.3
[root@master-node Chapter03]#
通过kubectl get nodes -L gpu;显示列上包含gpu,如果有该label的node则显示其value,没有则显示为空:
[root@master-node Chapter03]# kubectl get nodes -L gpu
NAME          STATUS   ROLES                  AGE   VERSION   GPU
master-node   Ready    control-plane,master   48d   v1.23.1
node-1        Ready    <none>                 48d   v1.22.3   true
node-2        Ready    <none>                 48d   v1.22.3
[root@master-node Chapter03]#
3.3通过nodeSelector调度pod到指定node上
这里的kbuia-gpu.yaml文件内容如下:
[root@master-node Chapter03]# pwd
/root/kubernetes-in-action/Chapter03
[root@master-node Chapter03]# ll
总用量 28
-rw-r--r-- 1 root root 168 2月  24 15:29 c
-rw-r--r-- 1 root root  66 1月  21 17:34 custom-namespace.yaml
-rw-r--r-- 1 root root 144 1月  21 17:34 kubia-gpu.yaml
-rw-r--r-- 1 root root 202 1月  21 17:34 kubia-manual-custom-namespace.yaml
-rw-r--r-- 1 root root 227 1月  21 17:34 kubia-manual-with-labels.yaml
-rw-r--r-- 1 root root 172 1月  21 17:34 kubia-manual.yaml
-rw-r--r-- 1 root root 290 2月  24 16:04 kubia-two-containers.yaml
[root@master-node Chapter03]# cat kubia-gpu.yaml
apiVersion: v1
kind: Pod
metadata:
  name: kubia-gpu
spec:
  nodeSelector:
    gpu: "true"
  containers:
  - image: luksa/kubia
    name: kubia
[root@master-node Chapter03]#
创建kubia-gpu这个pod:
[root@master-node Chapter03]# kubectl apply -f kubia-gpu.yaml
pod/kubia-gpu created
[root@master-node Chapter03]#
查看kubia-gpu这个pod所在node信息,是不是调度到具有gpu=true这个label的node1上?
[root@master-node Chapter03]# kubectl get pods
NAME              READY   STATUS    RESTARTS      AGE
kubia-gpu         1/1     Running   0             7s
kubia-lzmxz       1/1     Running   1 (29h ago)   2d5h
kubia-manual      1/1     Running   0             25h
kubia-manual-v2   1/1     Running   0             23h
[root@master-node Chapter03]# kubectl get pods -owide
NAME              READY   STATUS    RESTARTS      AGE    IP            NODE     NOMINATED NODE   READINESS GATES
kubia-gpu         1/1     Running   0             13s    10.244.1.7    node-1   <none>           <none>
kubia-lzmxz       1/1     Running   1 (29h ago)   2d5h   10.244.2.27   node-2   <none>           <none>
kubia-manual      1/1     Running   0             25h    10.244.2.33   node-2   <none>           <none>
kubia-manual-v2   1/1     Running   0             23h    10.244.2.35   node-2   <none>           <none>
[root@master-node Chapter03]# kubectl describe pod kubia-gpu
Name:         kubia-gpu
Namespace:    default
Priority:     0
Node:         node-1/172.16.11.148
Start Time:   Fri, 25 Feb 2022 17:17:05 +0800
Labels:       <none>
Annotations:  <none>
Status:       Running
IP:           10.244.1.7
IPs:
  IP:  10.244.1.7
.....
通过kubectl describe pod kubia-gpu看到该pod的IP为10.244.1.7,它被调度到node-1上,而该node具有gpu=true的标签。
注意:我们在前面通过kubectl get nodes –show-labels查看node的label时,可能看到有类似的label:kubernetes.io/hostname=node-2,但是我们不应该在pod的nodeSelector字段上显示的指定类似于这种唯一命名的标签。因为这将使得pod被固定在这个唯一的node上,将来,一旦该node出现故障下线之后,原来通过nodeSelectotr指向该node的所有pod都将不可能被Kubernetes重新调度和管理了。
这里,我们通过pod和node快速的使用和了解了label和label selector,其实,这只是小菜一碟儿,在后面我们接触和使用到ReplicationController以及Service时,label的作用将被真正发挥和使用到。
4了解pod的annotation
4.1什么是pod的annotation
所谓pod的annotation,顾名思义,就是用来给pod做注解用的,毕竟简单的几个label可以快速用来调度,管理和维护pod。但是可能不太容易见名知意的知道某个pod具体是干嘛用的,如果想要实现这个目的,人们给pod引入了annotation。
4.2如何查看pod的annotation
可以通过kubectl describe pods kubia-gpu 或者kubectl get pods kubia-gpu -oyaml的方式查看:
[root@master-node Chapter03]# kubectl describe pods kubia-gpu Name: kubia-gpu Namespace: default Priority: 0 Node: node-1/172.16.11.148 Start Time: Fri, 25 Feb 2022 17:17:05 +0800 Labels: <none> Annotations: <none> Status: Running IP: 10.244.1.7 ....
只不过当前pod的annotation字段为空,所以,看不到具体的annotation信息。
4.3如何给pod做annotation
我们可以通过kubectl annotate pod pod_name annotate_key=”annotation info”;来给pod贴上annotation。
[root@master-node Chapter03]# kubectl annotate pod kubia-gpu description="This is a gpu computed resource."
pod/kubia-gpu annotated
[root@master-node Chapter03]# kubectl describe pods kubia-gpu
Name:         kubia-gpu
Namespace:    default
Priority:     0
Node:         node-1/172.16.11.148
Start Time:   Fri, 25 Feb 2022 17:17:05 +0800
Labels:       <none>
Annotations:  description: This is a gpu computed resource.
Status:       Running
然后,我们可以查看到前面贴上的annotation。
4.4annotation和label的对比
作用:label用于调度/选择、过滤管理维护pod;annotation用于描述对象自身的信息,如作者、版本号等,不能用于选择过滤对象;
范围:都可以用于pod也可以用于其它对象;比如可以给node分别贴label和annotation;
形式:都是key=value的形式;
查看:kubect get pods –show-labels ; kubectl get pods -oyaml;
长度:label存放内容比较短;annotation可以用于存储更长更多信息;
5了解和使用namespace
5.1什么是namespace
顾名思义,命名空间。主要用于解决资源隔离和资源重名问题。解决资源重名问题上,有点儿类似于Oracle数据库和PostgreSQL数据库中的schema。namespace是1个逻辑上的概念。也可以把它看作是操作系统上的directory,一个directory下不可以有重名文件|子目录,一个namespace下不可以同同名资源对象。
5.2namespace解决了什么问题
如果我们在同一个Kubernetes上运行着不同环境的应用,比如开发、测试、UAT等环境,我们可以通过使用namespace来把不同环境下的应用完全隔离出来。也可以通过namespace来实现resources quota限制。
5.3如何查看namespace
kubectl get namespace或者使用简写的命令kubectl get ns;Kubernetes里有很多简写,比如service简写为svc;deployment写为deploy;
[root@master-node Chapter03]# kubectl get namespace
NAME              STATUS   AGE
default           Active   51d
kube-node-lease   Active   51d
kube-public       Active   51d
kube-system       Active   51d
[root@master-node Chapter03]#
默认情况下,我们创建的资源都在default这个namespace下。其它的几个如kube-system,kube-public,kube-node-lease都是系统自带的命名空间。
5.4怎么创建namespace
[root@master-node Chapter03]# kubectl create namespace custom-namespace
namespace/custom-namespace created
[root@master-node Chapter03]#
通过kubectl create namespace –help获取帮助信息。
5.5如何使用namespace
创建namespace不是目的,用起来才有意义。
[root@master-node Chapter03]# pwd
/root/kubernetes-in-action/Chapter03
[root@master-node Chapter03]# cat kubia-manual.yaml
apiVersion: v1
kind: Pod
metadata:
  name: kubia-manual
spec:
  containers:
  - image: luksa/kubia
    name: kubia
    ports:
    - containerPort: 8080
      protocol: TCP
[root@master-node Chapter03]# kubectl apply -f kubia-manual.yaml -n custom-namespace
pod/kubia-manual created
[root@master-node Chapter03]#
如上,我们名为kubia-manual的pod在custom-namespace中也创建了一份。
[root@master-node Chapter03]# kubectl get pods
NAME              READY   STATUS    RESTARTS        AGE
kubia-gpu         1/1     Running   0               2d5h
kubia-lzmxz       1/1     Running   1 (3d10h ago)   4d11h
kubia-manual      1/1     Running   0               3d6h
kubia-manual-v2   1/1     Running   0               3d4h
[root@master-node Chapter03]# kubectl get pods -n custom-namespace
NAME           READY   STATUS    RESTARTS   AGE
kubia-manual   1/1     Running   0          77s
[root@master-node Chapter03]#
6通过label和namespace来删除pod
6.1通过pod name删除pod
[root@master-node Chapter03]# kubectl get pods
NAME              READY   STATUS    RESTARTS        AGE
kubia-gpu         1/1     Running   0               2d5h
kubia-lzmxz       1/1     Running   1 (3d10h ago)   4d11h
kubia-manual      1/1     Running   0               3d6h
kubia-manual-v2   1/1     Running   0               3d4h
[root@master-node Chapter03]# kubectl delete pod kubia-gpu
pod "kubia-gpu" deleted
[root@master-node Chapter03]# kubectl get pods
NAME              READY   STATUS    RESTARTS        AGE
kubia-lzmxz       1/1     Running   1 (3d11h ago)   4d11h
kubia-manual      1/1     Running   0               3d6h
kubia-manual-v2   1/1     Running   0               3d4h
[root@master-node Chapter03]#
6.2 通过label selector删除pod
kubectl delete pod -l creation_method=manual;
[root@master-node Chapter03]# kubectl get pods --show-labels
NAME              READY   STATUS    RESTARTS        AGE     LABELS
kubia-lzmxz       1/1     Running   1 (3d11h ago)   4d11h   app=kubia
kubia-manual      1/1     Running   0               3d6h    creation_method=manual
kubia-manual-v2   1/1     Running   0               3d4h    creation_method=manual,env=debug
[root@master-node Chapter03]# kubectl delete pod -l creation_method=manual
pod "kubia-manual" deleted
pod "kubia-manual-v2" deleted
[root@master-node Chapter03]# kubectl get pods --show-labels
NAME          READY   STATUS    RESTARTS        AGE     LABELS
kubia-lzmxz   1/1     Running   1 (3d11h ago)   4d11h   app=kubia
[root@master-node Chapter03]#
6.3通过删除namespace来删除pod
[root@master-node Chapter03]# kubectl get ns
NAME               STATUS   AGE
custom-namespace   Active   15m
default            Active   51d
kube-node-lease    Active   51d
kube-public        Active   51d
kube-system        Active   51d
[root@master-node Chapter03]# kubectl get pods -n custom-namespace
NAME           READY   STATUS    RESTARTS   AGE
kubia-manual   1/1     Running   0          12m
[root@master-node Chapter03]# kubectl delete namespaces custom-namespace
namespace "custom-namespace" deleted
[root@master-node Chapter03]# kubectl get ns
NAME              STATUS   AGE
default           Active   51d
kube-node-lease   Active   51d
kube-public       Active   51d
kube-system       Active   51d
[root@master-node Chapter03]#
通过删除namespace的方法来删除pod,需要注意,该方法会删除namespace下的所有资源。
6.4删除所有的pod,但是保留namespace
[root@master-node Chapter03]# kubectl get pods
NAME          READY   STATUS    RESTARTS        AGE
kubia-lzmxz   1/1     Running   1 (3d11h ago)   4d11h
[root@master-node Chapter03]# kubectl delete pods --all
pod "kubia-lzmxz" deleted
[root@master-node Chapter03]# kubectl get pods
NAME          READY   STATUS        RESTARTS        AGE
kubia-5kct2   1/1     Running       0               30s
kubia-lzmxz   1/1     Terminating   1 (3d11h ago)   4d11h
[root@master-node Chapter03]#
kubectl delete pods –all表示要删除default这个namespace下的所有pods.如果要删除其他namespace下的所有pods,则带上-n other_namespace_name即可。
注意:这个命令执行之后,我们看到kubia-lzmxz正在Terminating,而另外一个kubia-5kct2 pod却启动了。这是怎么回事儿呢?
因为,我们的这个pod是我们前面通过创建名为kubia的ReplicationController时创建出来的pod,所以,当我们手工删除了由它管理的pod时,这个ReplicationController会自动帮我们重新拉起1个pod来。这也就是我们为啥不应该直接去创建pod的原因之一。如果是我们手工创建的pod,一旦执行delete操作之后,Kubernetes不会帮我们重新拉起一个pod来。
6.5删除namespace下的所有资源
[root@master-node Chapter03]# kubectl delete all --all
pod "kubia-5kct2" deleted
replicationcontroller "kubia" deleted
service "kubernetes" deleted
service "kubia-http" deleted
[root@master-node Chapter03]# kubectl get  pods
No resources found in default namespace.
[root@master-node Chapter03]#
kubectl delete all –all;会把当前默认namespace下的所有类型(第1个all的含义)的资源都删掉,–all表示把所有资源删除,不管叫什么名字。
当我们把kubia这个ReplicationController删掉之后,那么它管理的pod也一并被删掉了,不会再自动重建了。
7小结
本章我们掌握学习了:
- 如何创建、运行、停止pods;
- 通过label来组织管理pod和其它对象;
- 通过label selector来调度和维护pod;
- 了解pod的annotation;
- 了解和使用namespace;